The Quick Editor is a feature that allows you to quickly create authority records without wading through all the fields and subfields that make up an authority record. It is a simple window in which you can enter basic information about the authority record in non-MARC format along with any See or See also reference.
If you subscribe to the Library of Congress database, you never need to create authority records; they are automatically downloaded. If you receive your authority records from a vendor, you may occasionally need to create an authority record. The Quick Editor would be helpful in this case and any time you need to create many new authority records.
The Quick Editor is not recommended if you want to protect the integrity of your authority records. Since there are no guidelines or rules when using the Quick Editor, your authority records will be basic records subject to the skills and judg- ment of the person creating the record. For this reason, there is a permissions option in Group Editor for this feature so it can be disabled for a particular patron group.
To access the Quick Editor in the Cataloging module:
1. On the File menu, select New, select Authority Record, and then click the type of authority record you want to create. This displays the authority record template in MARC format.
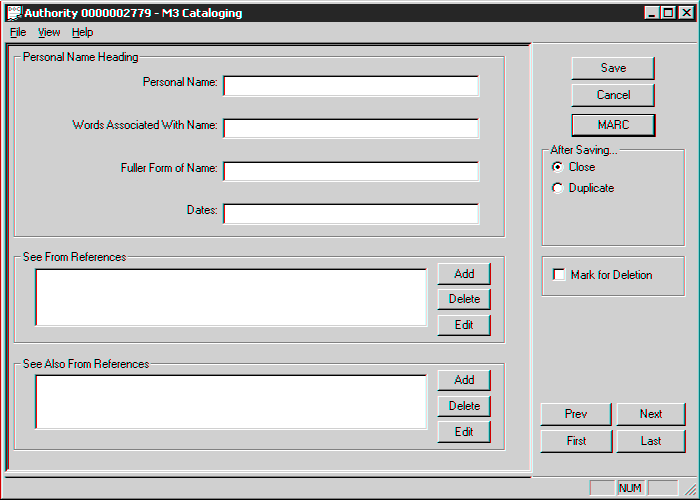
2. Click Quick. This displays the Quick Editor window (the Quick Editor window for a Personal Name heading is shown in Figure 4).
FIGURE 4
Creating a quick authority record consists of two steps.
Step 1: Set Up the Established Headings
The Quick Editor window contains the fields and subfields in non-MARC format that are essential for a basic authority record. The upper pane contains informa- tion for the established heading, while the lower pane contains information for the See From and See Also From references. If after entering the basic information you want to return to the MARC template to add additional information, click MARC.
Depending on the authority template you choose, different fields display in the Quick Editor window. Although the first field is always required, the other fields are optional. The authority templates are:
• Corporate Name – The Corporate Name and Subordinate Unit fields display (corresponding to MARC field 110#a and b of an authority record).
• Geographic Name – The Geographic Term, General Subdivision, Chronological Subdivision, and Geographic Subdivision fields display (corresponding to MARC field 151#a, x, y, and z of an authority record).
• Meeting Name – The Meeting Name, Number of Part/Section/Meeting, Date of Meeting, Location of Meeting, and Subordinate Unit fields display (cor- responding to MARC field 111#a, n, d, c, and e of an authority record).
• Personal Name – The Personal Name, Words Associated With Name, Fuller Form of Name, and Dates fields display (corresponding to MARC field 100#a, c, q, and d of an authority record).
• Uniform Title/Series – The Uniform Title, Date of Work, Number of Part/ Section, Name of Part/Section, Language of Work, Version, and Form Sub- heading fields display (corresponding to MARC field 130#a, f, n, p, l, s, and k of an authority record).
• Topical Term – The Topical Term, General Subdivision, Chronological Sub- division, and Geographic Subdivision fields display (corresponding to MARC field 150#a, x, y, and z of an authority record).
Step 2: Set Up the Cross-References
Regardless of the authority template you choose, all cross-references are set up in the same manner. The procedure is the same for See From References and See Also From References.
• To add a cross-reference, click Add next to the desired box. This displays the same fields and subfields as the established heading in non-MARC format. The first field is required but all other fields are optional. You can add as many cross-references as desired.
• To delete a cross-reference, select the desired reference, and then click Delete.
• To edit a cross-reference, select the desired reference, and then click Edit.