Circulation
OVERVIEW
With the Circulation module, you can:
• Conduct loans, returns, reserves, holds, bookings, renewals, and fine pro- cessing
• Select different interface languages
• View patron and item status
• Add, edit, and search for patron and item records
• Add book cover images and patron photos to records so they can be viewed in Circulation and OPAC
• Temporarily change the system date
• Set up one or more circulation schedules
• Add and delete patron and item messages
• Attach, edit, and detach messages to patron and item records
• Enable self checkout, self return, and quick return
• Send e-mail notifications to patrons who owe a fine or have overdue items.
• Send automatic e-mail notifications to patrons when items they reserved are available
• Track in-house usage
• Run transactions reports
• Upload transactions from portable scanners
• Print receipts
STARTING CIRCULATION
-
Open the Mandarin M3 folder on your desktop, then double-click the Cir- culation icon. This displays the Login dialog box.
-
In the Login Name box, type admin.
-
In the Password box, type boca raton, and then click OK. This displays the main Circulation window (Figure 3.1).
FIGURE 3.1
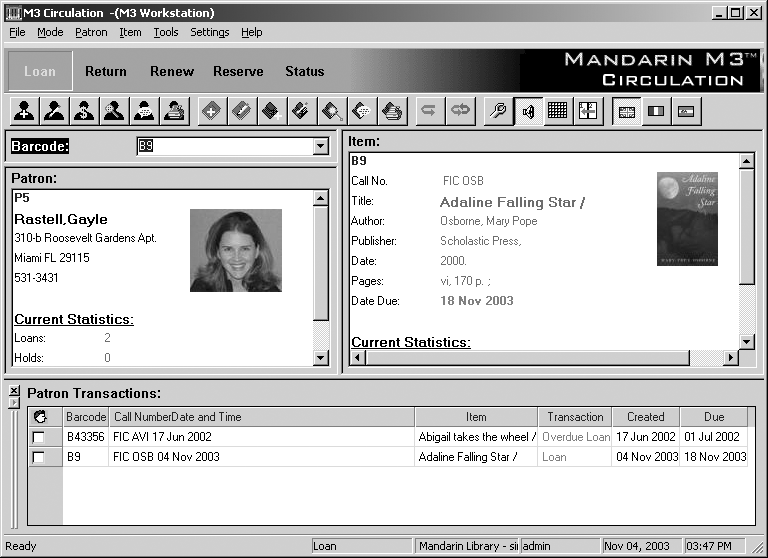
• Circulation menu bar – Contains File, Mode, Patron, Item, Tools, Settings, and Help menus.
• Circulation toolbar – Contains Loan (green), Return (red), Renew (blue), Reserve (yellow), and Status (purple) functions. Click each of these buttons to observe the color change with each function.
• Shortcut toolbar – Contains buttons for commonly-used functions, such as adding an item or patron, accessing circulation options and the schedule, and changing the interface language. Rest your mouse pointer on each toolbar button for a moment to view a tooltip that explains the function of each button. To turn the shortcut toolbar on or off for the current session, press CTRL+T.
• Barcode box – Allows you to type or scan a patron or item barcode, type a patron or author’s last name, or type an item’s title to access the matching record.
Images can be added to patron and bibliographic records. Patron and item images will display in the Circulation and OPAC modules.
CONDUCTING TRANSACTIONS
All circulation transactions are accessed from the main Circulation window. You can view patron and item status, loan items, return items, renew items, reserve and hold items, book equipment and rooms, attach patron and item messages, process fine payments, forgive fines, and record patron claims of lost, previously paid, never had, and previously returned. Many of these procedures are covered in the following sections.
Loaning Items
There are three ways to access the loan function:
• On the toolbar, click Loan.
• On the Mode menu, click Loan.
• Press F5.
Tip: If a patron has a fine, a warning appears. You can:
• Click Override to ignore the message and continue with the transaction.
• Click Payment to go to thePayment dialog box.
• Click Cancel to stop the transaction.
Tip: There are several methods for returning items:
• Single Return – Returning a single item from a patron.
• Multiple Return – Returning multiple items from one patron.
• Return All – Returning all items listed.
• Quick Return – Scanning in bookdrop returns without patrons present.
• In-House Circulation Return – Returning items left on tables and desks after in- library use.
Loan Example
-
On the toolbar, click Loan.
-
In the Barcode box, type a barcode or patron name, and then press ENTER.
-
This displays information for the patron in the Patron pane. The Patron pane can be customized to display any information that is stored in the patron record.
-
In the Barcode box, type an item barcode, and then press ENTER to check out the first item.
-
Type another barcode and press ENTER to check out a second item.
Returning Items
Returning a Single Item
-
On the toolbar, click Return.
-
In the Barcode box, type the barcode of the item being returned, and then press ENTER. This returns the item.
Returning Multiple Items for the Same Patron
-
On the toolbar, click Loan to reset the screen.
-
In the Barcode box, type the patron’s barcode, and then press ENTER.
-
In the Transactions pane, select the check boxes next to the items being returned.
-
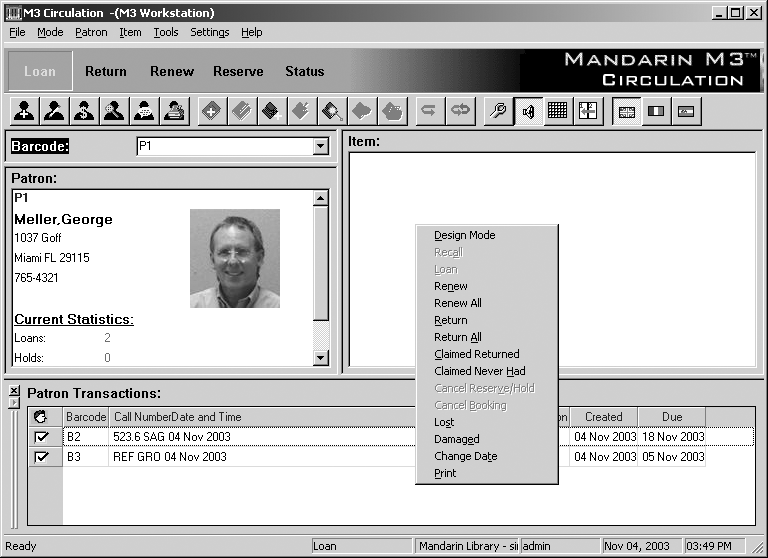
Right-click in the Transactions pane to access a transaction menu (shown in Figure 3.2).
FIGURE 3.2
-
Click Return. This batch-returns all checked items.
NOTE: You can also return all loaned items by clicking Return All on the transaction menu; you do not need to select the check boxes next to the items.
Attaching a Message to a Patron Record
-
In the Barcode box, type a patron barcode, and then press ENTER.
-
On the Patron menu, click Messages.
This displays a list of any messages in the system. You can select a message from the list or add a new message for this patron.
-
Click New. Type a message, click OK, and then click Accept.
-
In the Block Type list (click the arrow to view the list), select Information as the block type, and then click Accept.
This message will appear the next time this patron’s barcode is entered.
|
Message Block Types in M3
| |
|
Information block – You can bypass the message by clicking anywhere on the Circulation window (the least intrusive block type).
|
Nudge block – On first occurrence, you must select an option in order to proceed. Any time this message appears again, it will act as an information block.
|
|
Blocking block – You must select an option in order to proceed.
|
Privilege block – You must type a password to bypass the message (the most intrusive block type).
|
Booking an Item
Use the Booking feature to reserve an item such as a conference room, a piece of equipment, or group of videos, for a future day and/or time. You can book an item for a single day, a range of days, or for specific days.
-
On the toolbar, click Loan.
-
In the Barcode box, type a patron’s barcode, and then press ENTER.
-
On the Mode menu, click Booking.
-
In the Barcode box, type the barcode of an equipment item that exists in the system, and then press ENTER. This displays the Booking dialog box (Figure 3.3).
FIGURE 3.3
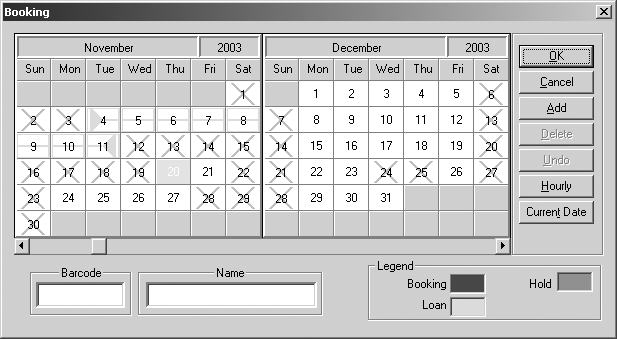
Tip: Click Hourly to display the current day’s agenda. Click Daily to return the calendar to a two-month view.
-
Click the first day you want the item and drag the mouse to the last day you want the item. Click Add, and then click OK.
OR
Click Hourly, then click the first hour you want the item and drag the mouse to the last hour you want the item. Click Add, and then click OK.
-
To exit Booking mode, click Loan on the toolbar.
Locating a Patron
-
Clear the Circulation window by pressing ESC.
-
In the Barcode box, type a patron’s last name. This displays the Select Barcode box, which lists all matches for this name.
-
Select a patron and click OK. This displays the patron information in the Patron pane of the Circulation window.
Locating and Loaning an Item
-
With a patron displayed in the Patron pane, type an item’s title in the Barcode box, and then press ENTER.
This displays the bib and holding information in the Item pane of the Circulation window and loans the item to the patron.
Setting Up the Library Calendar
-
On the Tools menu, click Schedule. This displays the Circulation Schedule dialog box.
-
Click each tab and review the contents.
• General tab – Establishes loan period rules.
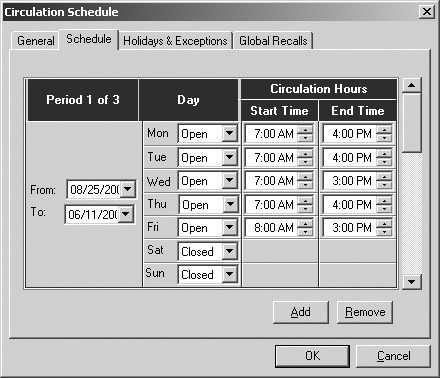
• Schedule tab – (Shown in Figure 3.4) Establishes the calendar period and the library’s opening and closing hour for each day of the week. Create multiple calendar periods to apply to different times of the year.
• Holidays & Exceptions tab – Allows you to eliminate or add irregular dates. Identify days when library is closed because of holidays, and so on.
• Global Recalls tab – Allows you to specify the date when all items have to be back in the library.
FIGURE 3.4
-
When finished, click Cancel to close this dialog box.
Transaction Report Utility
M3 provides basic transaction reports to monitor your library status and activity. On the Mode menu, click Library Transactions.
In Figure 3.5, notice the All Transactions header in the Transactions pane.
FIGURE 3.5
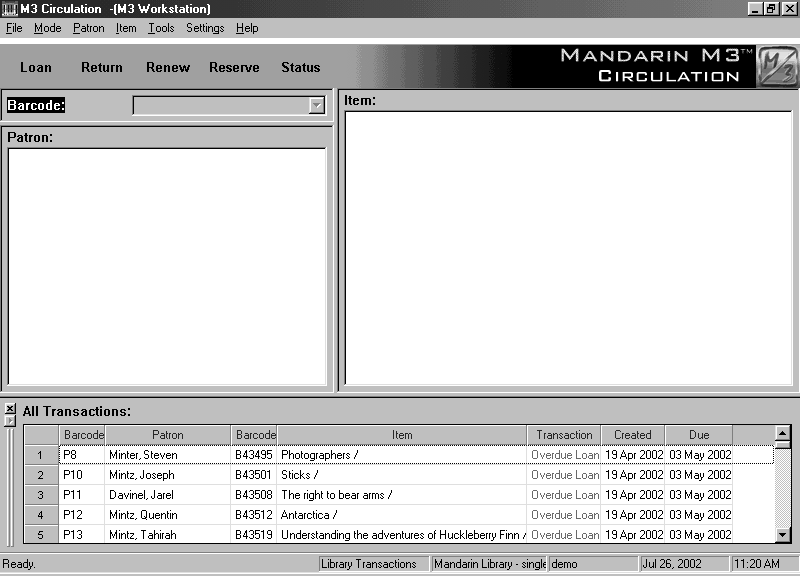
Tip: To resize the bottom pane to allow for easier viewing, drag “up” the bar at the top of the Transactions pane.
-
Right-click in the Transactions pane to open a shortcut menu with a list of report choices.
-
Click Select Transactions. This displays the Select Transactions dialog box.
-
Under Transaction Type, click Overdue Loans.
-
Under Overdue Loans, click the second option and type 30 in the days or more box.
-
Click OK.
Notice the header in the Transactions pane has changed.