OVERVIEW
Note: This demonstration guide may not explain all features available in Inventory.
With the Inventory module, you can:
• Conduct a full or partial inventory
• Enter additional barcodes after the barcode records have been uploaded
• Remove barcodes during the inventory process
• Print and save inventory results
• Export a barcode list of inventory results
Conducting an inventory with M3 requires a few basic steps:
1. Scan items to be inventoried
2. Upload the results into the Inventory module
3. Set range limits (partial inventory only)
4. Perform the “Do Inventory” procedure
STARTING INVENTORY
-
Open the Mandarin M3 folder on your desktop, then double-click the Inven- tory icon. This displays the Login dialog box.
-
In the Login Name box, type admin.
-
In the Password box, type boca raton, and then click OK. This displays the Select Inventory Session window.
CONDUCTING AN INVENTORY
This basic example assumes that you have scanned and uploaded barcodes into M3, and then saved the barcode file. For instructions, refer to the M3 Users Guide. In the Select Inventory Session window, click Create New Session. This displays the main Inventory window (Figure 6.1).
FIGURE 6.1
-
In the File menu, click Add Barcode File. Navigate to your saved barcode file and click Open.
-
In the Barcode pane, click the plus (+) sign next to the barcode file name. This displays the list of barcodes in the file.
-
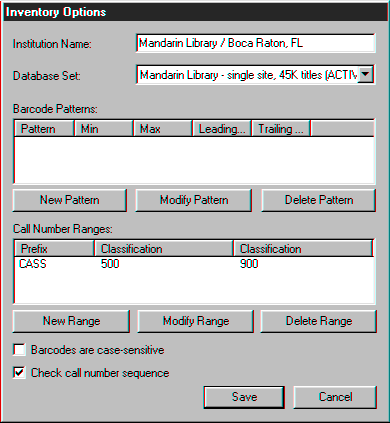
To review Inventory set-up, click Inventory Options on the Action menu. This displays the Inventory Options window (Figure 6.2).
FIGURE 6.2
In this window, you can:
• Configure the Inventory module to recognize a specific pattern of characters, a certain barcode length, or both
• Indicate a partial inventory by entering the range of call numbers (classification parts) and selecting a call number prefix
-
When finished in this window, click Save.
-
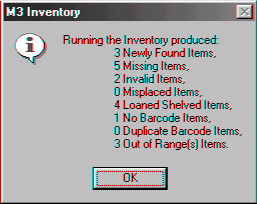
On the Action menu, click Do Inventory to run the Inventory procedure. When finished, a dialog box displays with a summary of the inventory results (Figure 6.3).
FIGURE 6.3
-
Click OK to close the dialog box and return to the main Inventory window.
M3 places the appropriate information in each of the nine tabs in the Inventory pane.
• Newly Found – Lists items present in this barcode upload, but previously flagged as missing.
• Missing – Lists all items missing from this barcode upload.
• Invalid Barcodes – Lists items that do not belong in the collection or have the wrong barcode length.
• Misplaced – Lists items that are in the wrong shelf position.
• Loaned Shelved – Lists items that have an availability status of loaned, but are actually on the shelf.
• No Barcode – Lists items that have no barcode on file in the catalog.
• Duplicate Barcode – Lists items that have duplicate barcodes.
• Out of Range(s) – Lists items that are not in the inventory call number range, but are in the barcode upload in shelflist order.
• Statistics – Displays a summary of the current inventory results, as well as statistics regarding this inventory.
Click each of the tabs in the Inventory pane to view the Inventory results. Now that all the results are compiled, the reports needed to reconcile the Inventory can be printed from within each tab by clicking Print [List Type] List on the File menu.