Conducting a Partial Inventory
To conduct a partial inventory:
1. Scan the barcode of each item on the shelves to be inventoried at this time, following shelflist order. Use a barcode scanner such as a tricoder.
2. Upload the scanned barcode records (for the shelved items) from the bar- code scanner to M3 Inventory. To do so:
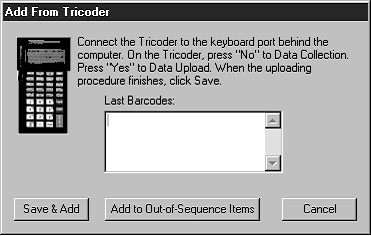
A. On the File menu, click Upload From Reader. (Or, right-click while pointing to the Barcode pane to access a shortcut menu.) This displays the Add From Tricoder window (Figure 8.9).
FIGURE 8.9
B. Follow the instructions in the window, then click Save & Add. This displays the Save As dialog box.
C. Navigate to the location where you want to store the barcode file. If you are going to upload multiple barcode files, you may want to create a new folder for the files.
D. In the File name box, type a name for the barcode file you are uploading, and then click Save. This saves the file and adds the barcodes to the current inventory. (If you need to upload multiple times, be sure to designate different names for each upload file to avoid overwriting data.)
3. Scan the barcode of each item to be inventoried that is out-of-sequence
(that is, items not on the shelves, such as items on carts).
4. Upload the scanned barcode records (for the out-of-sequence items) from the barcode scanner to M3 Inventory. To do so:
A. On the File menu, click Upload From Reader. (Or, right-click while pointing to the Barcode pane to access a shortcut menu.) This displays the Add From Tricoder window (Figure 8.3).
B. Click Add to Out-of-Sequence Items. This adds the items to the out-of- sequence list without creating a file. A misplaced item check is not performed on the out-of-sequence list.
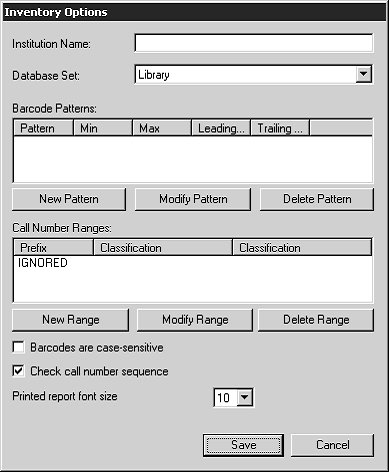
5. On the Action menu, click Inventory Options. This displays the Inventory
Options window (Figure 8.10).
FIGURE 8.10
6. In the Database Set list, select the database containing the holdings that are now being inventoried.
7. (Optional Step) You can configure the Inventory module to recognize a specific pattern of characters, a certain barcode length, or both. If any scanned barcodes deviate from this character and/or length specification, the deviant barcodes are highlighted in the barcode listing. To do so:
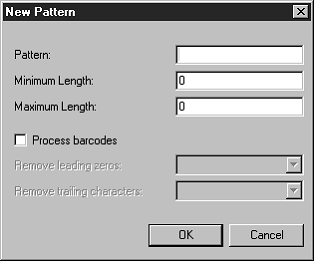
A. Click New Pattern. This displays the New Pattern dialog box (Figure 8.11).
FIGURE 8.11
B. To set up a character pattern, type the pattern in the Pattern box. For example, if all barcodes involved in this partial inventory begin with the same three characters, type those three characters here.
C. To set up a length pattern:
• In the Minimum Length box, type the minimum number of charac- ters in the barcode pattern.
• In the Maximum Length box, type the maximum number of charac- ters in the barcode pattern.
D. Click OK to return to the Inventory Options window, where your pattern entries display in the Barcode Patterns box.
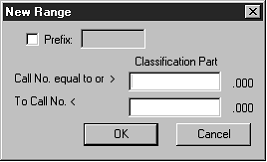
8. Click New Range. This displays the New Range dialog box (Figure 8.12), where you specify the range of call numbers involved in this partial inven- tory. The range of holdings you specify here is compared to the barcodes you uploaded from the barcode scanner. If your barcode files cover mul- tiple ranges, you can specify multiple ranges in this dialog box.
FIGURE 8.12
A. In the Call No. equal to or > box, type the beginning range. (You are only typing the classification part of the call number, as designated in MARC field 852#h.)
B. In the To Call No. < box, type the ending range. The ending range should be the first increment of one after the classification range you want to include. (You are only typing the classification part of the call number, as designated in MARC field 852#h.)
Example: You want to inventory all holdings with an 800 classification part. To do so, the correct entries are 800 in the Call No. equal to or > box and 900 in the To Call No. < box. This ensures that all 800 hold- ings up to but not including 900 are included (everything through 899.999). If you had typed 899 in the To Call No. < box, any 899.+ numbers would be unintentionally left out.
C. (Optional Step) Within the specified call number range, you can advise the Inventory module to compare barcodes to holdings that have a specific prefix or that have no prefix in MARC field 852#k.
• If you want to compare barcodes to holdings with or without a prefix, do not select the Prefix check box.
• If you want to compare barcodes to holdings that have no prefix, select the Prefix check box and do not type anything in the Prefix box.
• If you want to compare barcodes to holdings with a certain prefix, select the Prefix check box and type the desired prefix in the Prefix box.
D. Click OK to return to the Inventory Options window, where your range entries display in the Call Number Ranges box.
9. Click Save to save your entries in the Inventory Options window.
10. Create the barcode file. To do so:
A. On the File menu, click Add Barcode File. This displays the Open dialog box.
Note: If you return a missing item while an inventory is in progress, the item will not be reported as “missing.”
B. Navigate to the location where you stored the barcode records files.
Double-click the file name. (If you uploaded multiple barcode record files, double-click one of the files. Then repeat this step for each barcode record you uploaded.) This imports the data into the M3
Inventory module and creates a file in M3 Inventory. The file name appears in the Barcode pane in the main Inventory window.
C. The total number of barcodes imported is displayed to the right of the name of the newly created file. Click the plus (+) sign to expand the file and see the list of barcodes entered.
11. Run the Do Inventory procedure. To do so:
A. On the Action menu, click Do Inventory.
NOTE: If a there is a discrepancy of more than 3,000 barcode entries, a message appears asking if you want to proceed. This happens when:
• You are trying to run a partial inventory and did not set the appro- priate call number range. Make sure you have set the correct call number range in the Inventory Options window. See step 8 on page 8-11 for instructions.
• Your scanning devices may not have functioned properly or you may have missed a large number of items during the scanning process. To resolve the problem, check the barcode scanner. If it appears to be functioning properly, scan the items again.
To proceed, click Continue; otherwise, click Cancel. M3 Inventory compares the uploaded barcode data to the specified range of call numbers in the corresponding holdings data.
B. When the inventory comparison is complete, a dialog box (shown in Figure 8.7) displays with a summary of the inventory results. The results include the number of Newly Found, Missing, Invalid Barcode, Misplaced, Loaned Shelved, No Barcode, Duplicate Barcode, and Out of Range(s) Items. Details appear in the corresponding tabs in the main Inventory window. For more information on these tabs, see step
9B beginning on page 8-7.
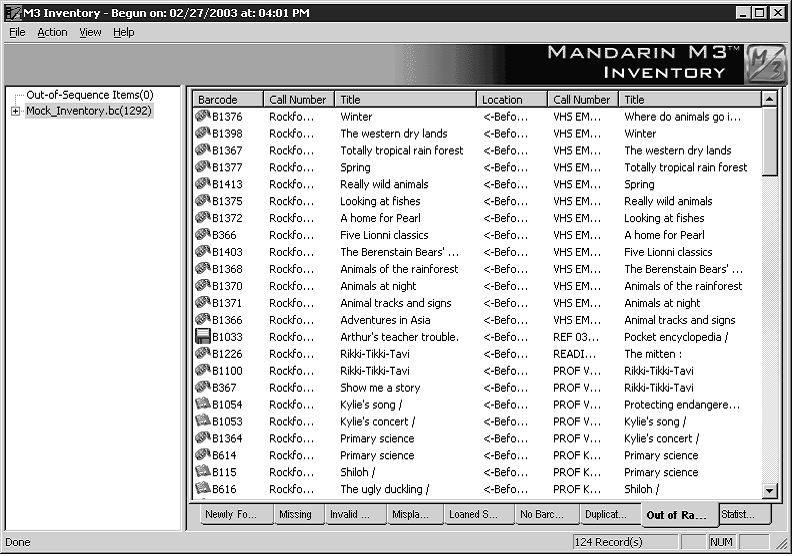
C. Click any tab to view the corresponding information. In Figure 8.13, the Out of Range(s) tab is selected. This information can be printed or saved to a file, if desired. (See “Printing and Saving Results” on
page 8-14.)
FIGURE 8.13
12. To place a “missing” status in the corresponding holding records of all items listed in the Missing tab:
A. Click the Missing tab. Some items may display in black and some in red. Black signifies the item was listed as missing in a previous inven- tory. Red signifies the item was listed as missing during this inventory.
B. On the Action menu, click Mark Missing Items. At the confirmation prompt, click OK. This turns all red items to black and places a status of “missing” in the corresponding holding records.