Importing Bibliographic, Patron and Authority Records
Importing Overview
M3 Cataloging includes a utility to import bibliographic, patron, and authority records formatted in three different data types:
• MARC – Records in MARC format.
• Delimited – Records in which each field ends with, or is “delimited” by, a particular character such as a comma or tab.
• Fixed width – Records in which each field has a designated maximum width in number of characters.
During the import procedure, despite which of the three data types applies to the records to be imported, the records are mapped into a MARC record format. This is necessary as M3 is designed exclusively to operate with MARC records to pro- vide optimum performance.
The import procedure for each data type is explained in this section. In addition, an optional high-speed import procedure is available that can be used the first time you import records into M3.
The same import procedures apply to bibliographic, patron, and authority records; the only difference occurs when you specify the type of record to import.
M3 also includes a Picture Manager utility to import pictures. To use this utility, see “Using M3 Picture Manager” beginning on page 4-49.
Optional High-Speed Import Option
For the first mass import of records into M3, you may want to use the high-speed import option. This option cannot be run while others are using any part of the M3 system.
Warning: Do not use the high-speed import option to load records into an existing catalog containing records. If your catalog contains records, use one of the three import options explained in the preceding section, “Importing Overview.”
To use the high-speed import option:
1. Press and hold CTRL, then click Import on the File menu. When an asterisk appears by the menu options on the Import submenu, release CTRL.
2. Proceed with the importing instructions in one of the following sections, depending on the type of data you are importing (MARC, delimited, or fixed width). (As the procedure progresses, a dialog box advises you that it is going to index. This is appropriate.)
Importing MARC Records
To import records that are in MARC format:
1. Verify that you are working with the correct database.
2. On the File menu, select Import, and then click the type of records you are importing. This displays the Open dialog box.
3. Navigate to the file containing the records you want to import, and then click Open.
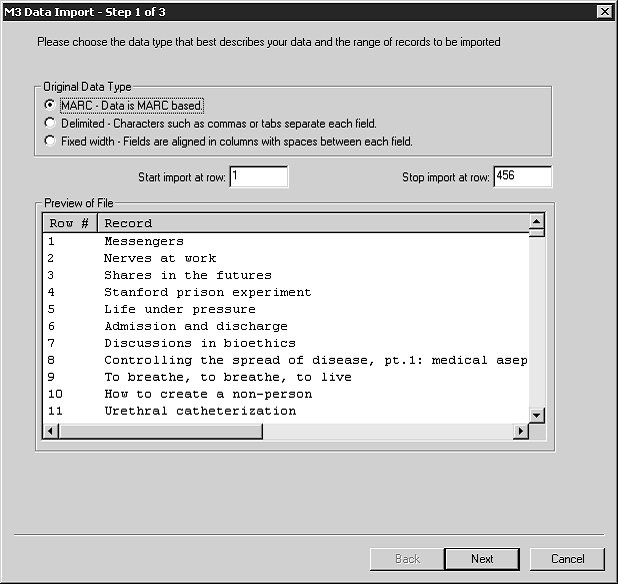
4. In the Step 1 dialog box (Figure 4.52), specify the range of records you want to import.
FIGURE 4.52
To do so:
A. Skip the Original Data Type group. The MARC option should automati- cally be selected.
B. In the Start import at row and Stop import at row boxes, select the range of records you want to import. By default, the first and last row numbers in the import file are displayed. If you only want to import a portion of the records in the file, type the row numbers corresponding to the range you want to import.
NOTE: The data in the Preview pane displays differently depending on the record type you are importing.
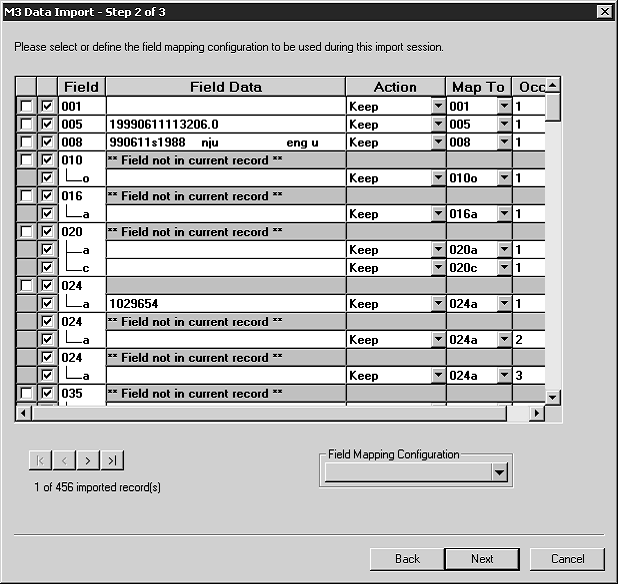
Tip: To see the field entries in other records of the import file, click the navigation buttons in the lower left of the Step 2 dialog box (see Figure 4.53). From left to right, these buttons access the first record in the import file range, the previous record, the next record, and the last record.
FIGURE 4.53
C. When finished, click Next.
5. In the Step 2 dialog box (Figure 4.53), indicate the field mapping struc- ture that you want the records to conform to once they are imported. By default, the dialog box is set to import the field mapping configuration currently used by the records to be imported.
NOTE: When the Step 2 dialog box appears, it displays the field entries for the first record in the range of records you plan to import. In addition, you see the comprehensive list of fields and subfields used by the entire range of records in your import file. Because this first record may not have entries in every field used by the range of records, you are likely to see **Field not in current record** throughout the Field Data column.
Your options in this dialog box are:
• Accept the default field mapping configuration and continue the import process. To do so, click Next, and then skip to step 7 on page 4-60.
• Accept the default field mapping configuration and save it for future importing sessions before continuing. To do so:
A. In the Field Mapping Configuration list, select Save As. This displays the Save Field Mapping As dialog box.
B. Type a descriptive name for the new configuration, then click OK. C. After the Step 2 dialog box refreshes, click Next, and then skip to
step 7 on page 4-60.
Tip: To map most but not all occurrences of a repeating field to the same destination field, you can still use the optional Unite procedure explained in step A, with one modification. After selecting the Unite check box and revising the Map To destination as explained in step F on page 4-59, clear the Unite check box. This separates the repeating field listings once again but maintains the Map To modification entered while the fields were united. You can then modify the mapping as explained in step F for those few listings that do not match the global change you entered while the fields were united.
• Use a field mapping configuration that was previously saved. To do so:
A. In the Field Mapping Configuration list, select Load. This displays the Load Field Mapping Configuration dialog box.
B. Select the desired configuration, then click OK.
C. After the Step 2 dialog box refreshes, click Next, and then skip to step 7 on page 4-60.
• Create a new field mapping configuration by modifying the default configuration. To do so, follow the modification instructions as explained in step 6.
• Create a new field mapping configuration by modifying a configura- tion that was previously saved. To do so:
A. In the Field Mapping Configuration list, select Load. This displays the Load Field Mapping Configuration dialog box.
B. Select the desired configuration, then click OK.
C. After the Step 2 dialog box refreshes, make any desired changes as explained in step 6.
6. To modify a field mapping configuration:
A. In the Step 2 dialog box, review the Field column for fields that repeat. If you plan to change the mapping of a repeating field, and if all occurrences of the repeating field are to be mapped to the same destination field, then you can save time and keystrokes by using the optional Unite check box feature. This collapses all the occurrences of the repeating field into one line, creating a single occurrence, thereby enabling you to simultaneously remap all occurrences of this field to the same field. (If the field repeats several times, this could save you considerable time. If you do not use this feature, you must revise the mapping for each occurrence individually.)
To use this time-saving option, select the Unite check box by the first occurrence of the repeating field. (This action collapses all the repeated field occurrences into a single listing.) Then continue to step B.
B. In the Include check box column, select the fields and subfields you want to import among those listed in the Field column. In the default configuration, all fields and subfields are selected based on the assumption you want to import all data contained in the records you are importing. If you do not want to import a particular field or subfield, clear the field’s Include check box.
C. In the Field column, do nothing. The Field column provides a compre- hensive list of the fields and subfields used by the records to be imported. Some records may not have entries in each field and subfield in this list.
D. The Field Data column works with the Action column. By default, the Field Data column displays the actual field and subfield data for the first record in the range you plan to import. To view the data contained in other records, click the navigation buttons in the lower left of this dialog box.
E. In the Action column, select Keep or Replace for each field and subfield you plan to import. In the default mapping configuration, Keep is selected for each field and subfield.
• Select Keep if you want the data currently stored in that field to be kept during the import procedure.
• Select Replace if you want to change the current data in a field to a constant value (such as a library name, regional code, or field label) during the import procedure. This constant value over- writes all data contained in the field prior to importing. If you select Replace, then in the Field Data column, type the information you want to appear in this field.
F. In the Map To column, select the destination MARC field or subfield for each field you plan to import. The default mapping configuration assumes you want to import to the same field locations; therefore, the Map To column displays the same field tag number and subfield code listed in the Field column.
To change the default mapping to a different destination field or subfield, click the Map To arrow and select the preferred destination field or subfield from the tree. (You can expand and collapse the field tree by clicking the field’s corresponding plus (+) and minus (–) signs.)
G. In the Occurrence Number (Occ.#) column, select the order in which you want any repeating fields to appear in the new records. (This is not applicable if the repeating field’s Unite check box is selected.) In the default mapping configuration, any repeating fields are numbered in sequential order in the Occ.# column. (To review the type of infor- mation in each occurrence of the field, look at the entries in the Field Data column.) For example, if subfield 020#a occurs twice, the first listing is assumed to be occurrence 1 and the second is occurrence 2. You can override this occurrence order by typing the preferred order numbers into this column.
If you revise the Map To column, the utility assumes that the field or subfield you are remapping becomes the first occurrence of that field in the new records. You are prompted to either accept this first occur- rence order or change to a preferred occurrence order. (If the new occurrence order leaves gaps between occurrence numbers, a GAP error message advises and allows you to revise the order.)
H. When finished:
• If you want to save the mapping configuration to use during another import session, select Save As in the Field Mapping Config- uration list. This displays the Save Field Mapping As dialog box. Type a descriptive name for the new mapping configuration, then click OK.
OR
• If you do not want to save the mapping configuration, proceed to the next step.
I. In the Step 2 dialog box (Figure 4.53), click Next.
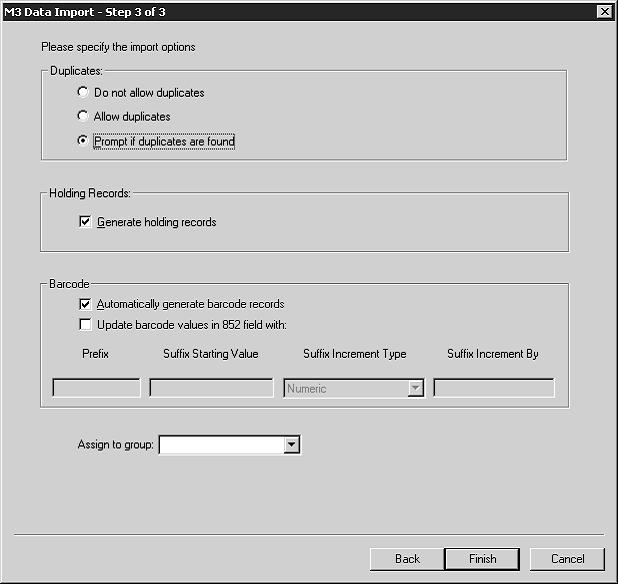
7. In the Step 3 dialog box (Figure 4.54), specify the import options.
FIGURE 4.54
To do so:
A. If you are importing bibliographic or authority records, the Duplicates group is available. Choose one of the following:
• To prevent the import of records that may duplicate existing records, click Don’t allow duplicates. (All fields in two records need not match to consider the records as duplicates; matching is based upon specific vital field criteria. For example, two biblio- graphic records may be considered duplicates if just the ISBN field matches.)
• To import records that may duplicate existing records, click Allow duplicates.
• To be prompted when duplicate records are found during the import process, accept the default Prompt if duplicates are found option. This lets you compare the record you are importing to the record already in the M3 system, and then decide whether to import the duplicate record.
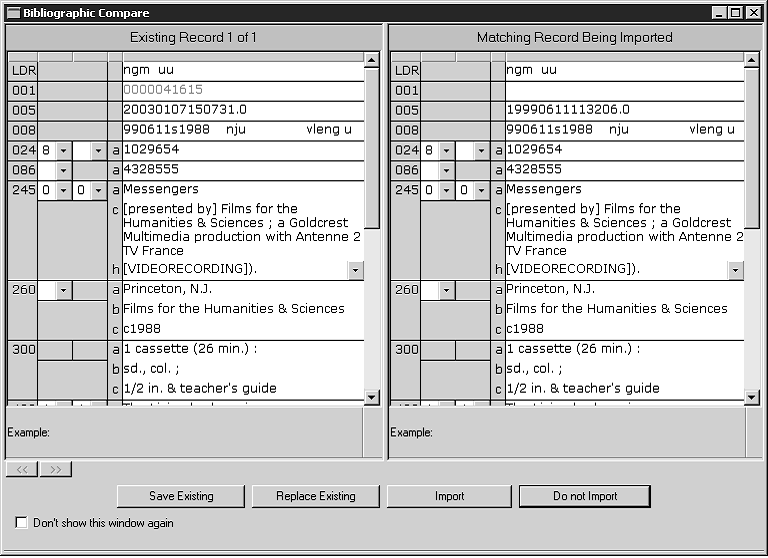
If a duplicate record is found, the Bibliographic Compare or Authority Compare dialog box displays (depending on the type of record you are importing), showing the two records side by side. Figure 4.55 shows the Bibliographic Compare dialog box.
FIGURE 4.55
Tip: Select the Don’t show this window again check box before clicking a button to apply the action to the displayed record and all records being imported in this session.
Note: If you are importing authority records, only the Duplicates group is available.
Using the option buttons, you have the following four choices:
Save Existing – Saves the existing record and does not import the duplicate record. If it is a bibliographic record, all corresponding holding records are imported. Result: One bibliographic record with all corresponding holding records.
Replace Existing – Imports the duplicate record and replaces the existing record. If it is a bibliographic record, all corresponding holding records are also imported. Result: One bibliographic record with all corresponding holding records.
Import – Imports the duplicate record and keeps the existing record. If it is a bibliographic record, all corresponding holding records are also imported and linked to the duplicate biblio- graphic record, not the existing bibliographic record. Result: Two bibliographic records and two sets of holdings —the existing bibliographic record and its original holdings, and the duplicate bibliographic record and its corresponding holdings.
Do not Import – Does not import the duplicate record. Result: The existing authority record, or bibliographic record and its holding records, remain the same.
B. If you are importing bibliographic records, the Holding Records group is available. If you do not want to generate holding records, clear the Generate holding records check box. Otherwise, accept the default.
Tip: You must have 852 entries in the records you are importing or other fields mapped to 852 in order for Update barcode values in 852 field with to work. If no 852 field is found in a record, then no barcode is generated for that record.
The Import Summary is a log containing the start and end time of the import session, the number of records in the import file, the number of records imported success- fully, any duplicate barcodes, and the barcode creation summary. Duplicate barcodes are changed to a barcode of “SIRS” followed by the ISN number.
C. In the Barcode group, specify how you want barcodes handled during the import procedure. Your options are:
• To transfer any barcode numbers in the 852#p field of the orig- inal records to M3, select the Automatically generate barcode records check box in the Barcode group. (This should be the only option selected in the Barcode group.) This allows you to continue using this barcode with the same record and places the barcodes you are importing into the M3 system (in the barcode table).
• To create new barcodes for the records being imported, whether barcodes exist in the original records or not, select the Update barcode values in 852 field with check box. You must then accept or change the values in the four boxes below it:
Prefix – To assign a constant prefix to the barcode imported into the 852 field, type it here. For example, type b for bibliographic records or p for patron records. You must assign different prefixes to bibliographic records and patron records.
Suffix Starting Value – To assign an incrementing suffix to the barcodes in the order they import into the system, type the numeric starting value for these records (for example, type 1).
Suffix Increment Type – If you assign a suffix, you must select a format in this list.
Suffix Increment By – If you assign a suffix, type the number of increments you want the records to increase by (for example, 1 increment).
• If you do not want to transfer or assign any barcodes to the records being imported, clear both check boxes (Automatically generate barcode records and Update barcode values in 852 field with).
NOTE: If the first check box is unavailable, clear the second check box to make the first check box available.)
D. In the Assign to group list, select the group to which you want the imported data assigned.
E. When finished, click Finish. While the import procedure takes place, the Import Progress bar displays on screen.
8. When the import procedure is complete, a confirmation prompt displays and asks if you want to view the Import Summary. Click Yes to view it now or No to view it later. It is best to view it now to evaluate the results of the import procedure.
Importing Delimited Records
Delimited data appears in columns, with each field separated by a character such as a comma, tab, semicolon, or space. To import records that are in delimited format:
1. Verify that you are working with the correct database. For instructions, see “Selecting a Database” on page 4-2.
2. On the File menu, select Import, and then click the type of records you are importing. This displays the Open dialog box.
3. Navigate to the file containing the records you want to import, then click Open.
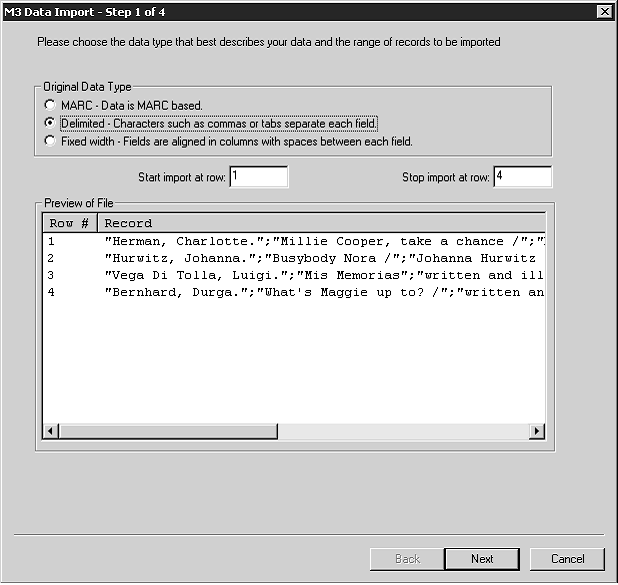
4. In the Step 1 dialog box (Figure 4.56), specify the range of records you want to import.
FIGURE 4.56
To do so:
A. Skip the Original Data Type group. The Delimited option should auto- matically be selected.
B. In the Start import at row and Stop import at row boxes, select the range of records you want to import. By default, the first and last row numbers in the import file are displayed. If you only want to import a portion of the records in the file, type the row numbers corresponding to the range you want to import.
NOTE: The data in the Preview pane displays differently depending on the record type you are importing.
C. When finished, click Next.
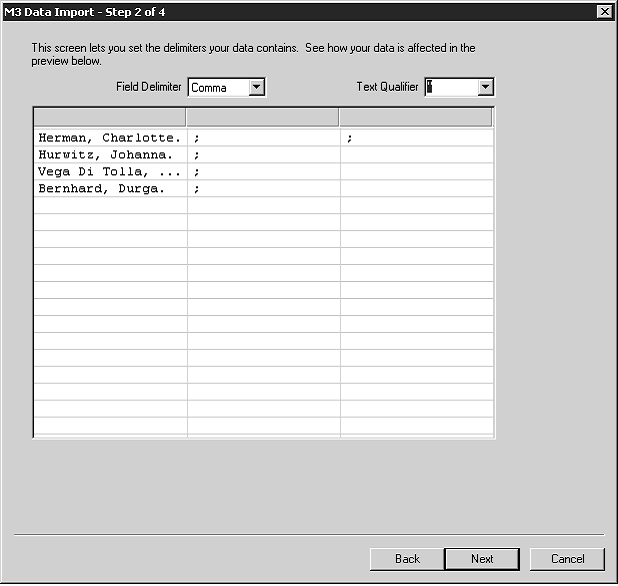
5. In the Step 2 dialog box (Figure 4.57):
FIGURE 4.57
A. In the Field Delimiter list, specify the field delimiter character used by the data to be imported to separate fields in the file. The import utility makes an educated guess based on the contents of the file you are importing; however, verify the delimiter by reviewing the columns of data in the Preview pane. If data does not appear in correct column order, select the appropriate field delimiter. Each time you select a different field delimiter, the Preview pane refreshes.
B. In the Text Qualifier list, specify the character (if any) used by the file to be imported to mark the beginning and end of the data in a field. For instance, if a field contains lastname, firstname, the data might be enclosed within quotes to mark the beginning and end of the data, as in “lastname, firstname”.
C. Click Next.
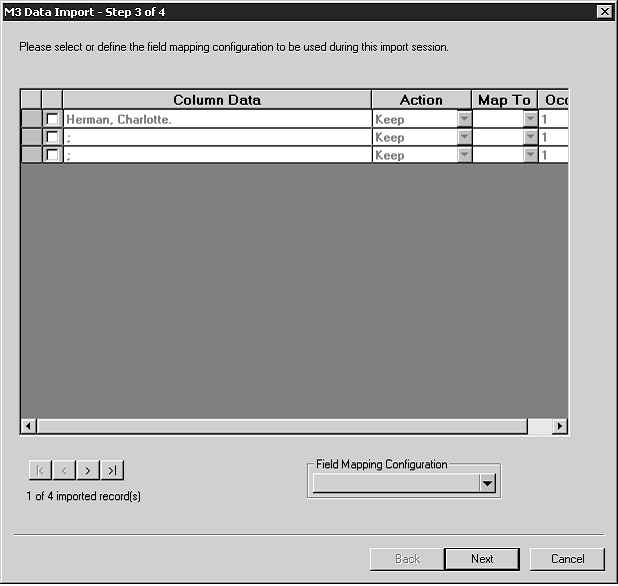
6. In the Step 3 dialog box (Figure 4.58), indicate the MARC field mapping structure that you want the records to conform to once they are imported. (M3 is designed to work with MARC records; therefore, all data fields must map to a MARC field.)
FIGURE 4.58
By default, the dialog box does not have a mapping structure selected. You must select or modify an existing mapping structure (if you’ve imported delimited records before), or create a new configuration.
• To select a field mapping configuration that was previously saved:
A. In the Field Mapping Configuration list, select Load. This displays the Load Field Mapping Configuration dialog box.
B. Select the desired configuration, then click OK.
C. After the Step 3 dialog box refreshes, click Next, and then skip to step 7 beginning on page 4-67.
• To create a new field mapping configuration by modifying a configu- ration that was previously saved:
A. In the Field Mapping Configuration list, select Load. This displays the Load Field Mapping Configuration dialog box.
B. Select the desired configuration, then click OK.
C. After the Step 3 dialog box refreshes, make any desired changes as explained in the next bullet.
• To create a new field mapping configuration:
A. In the check box column, select each field you want to import in the Column Data column. By default, no fields are selected.
B. The Column Data column provides a list of the fields used by the records to be imported. By default, the actual field data for the first record in the file is displayed. (To display the data for other records, click the navigation buttons in the lower left of this dialog box.) The Column Data column works with the Action column.
C. In the Action column, select Keep or Replace for each field you plan to import. By default, Keep is selected for each field.
Select Keep if you want to import all data currently stored in that field.
Select Replace if you want to change the current data in a field to a constant value (such as a library name, a regional code, or a field label). This constant value then appears in this field in all imported records. If you select Replace, then in the Column Data column, type the information you want to appear in this field.
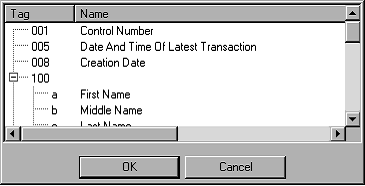
D. In the Map To column, select the destination MARC field or subfield for each field listed in the Column Data column. To map to a destination field or subfield, click the Map To arrow and select the destination field. Patron record fields are shown in the example in Figure 4.59. (You can expand and collapse the field tree by clicking the field’s corresponding plus (+) and minus (–) signs.)
FIGURE 4.59
E. In the Occurrence # (Occ.#) column, select the order in which you want any repeating fields to occur in the destination records. By default, any repeating fields are numbered in sequential order in the Occ.# column. For example, if a field containing the patron’s last name occurs twice, the first listing is assumed to be occurrence 1 and the second is occurrence 2. You can override this occurrence order by typing the preferred order numbers into this column.
NOTE: The import utility assumes that the field or subfield you are mapping to in the Map To column becomes the first occurrence of that field in the new records. You are prompted to either accept this first occurrence order or change to a preferred occurrence order. (If the new occurrence order leaves gaps between occur- rence numbers, a GAP error message advises and allows you to revise the order.)
F. When finished:
If you want to save the configuration to use during another import session, select Save As in the Field Mapping Configuration list. This displays the Save Field Mapping As dialog box. Type a descriptive name for the new mapping configuration, and then click OK.
OR
If you do not want to save the mapping configuration, proceed to the next step.
G. In the Step 3 dialog box, click Next.
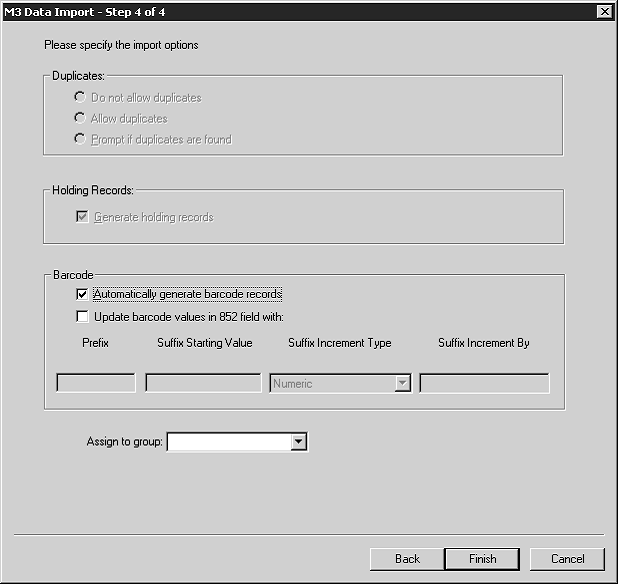
7. In the Step 4 dialog box (Figure 4.60), specify the import options.
FIGURE 4.60
To do so:
A. If you are importing bibliographic records, the Duplicates group is available. If so, do one of the following:
• To prevent the import of records that may duplicate existing records, click Don’t allow duplicates. (All fields in two records need not match to consider the records as duplicates; matching is based upon specific vital field criteria. For example, two records may be considered duplicates if just the ISBN field matches.)
• To import records that may duplicate existing records, click Allow duplicates.
Tip: Select the Don’t show this window again check box before clicking a button to apply the action to the displayed record and all records being imported in
this session.
Tip: You must have 852 entries in the records you are importing or other fields mapped to 852 in order for Update barcode values in 852 field with to work. If no 852 field is found in a record, then no barcode is generated for that record.
• To be prompted when duplicate records are found during the import process, accept the default Prompt if duplicates are found option. This lets you compare the record you are importing to the record already in the M3 system, and then decide whether to import the duplicate record.
If a duplicate record is found, the Bibliographic Compare dialog box displays (Figure 4.55), showing the two records side by side. Using the option buttons, you have the following four choices:
Save Existing – Saves the existing bibliographic record and does not import the duplicate bibliographic record. It imports any corresponding holding records. Result: One bibliographic record with all corresponding holding records.
Replace Existing – Imports the duplicate bibliographic record and replaces the existing bibliographic record. It also imports all corresponding holding records. Result: One bibliographic record with all corresponding holding records.
Import – Imports the duplicate bibliographic record and keeps the existing bibliographic record. It also imports the corresponding holding records and links them to the duplicate bibliographic record, not the existing bibliographic record. Result: Two biblio- graphic records and two sets of holdings —the existing biblio- graphic record and its original holdings, and the duplicate bibliographic record and its corresponding holdings.
Don’t Import – Does not import the duplicate record. Result: The existing bibliographic record and its holding records remain the same.
B. If you are importing bibliographic records, the Holding Records group is available. If you do not want to generate holding records, clear the Generate holding records check box. Otherwise, accept the default.
C. In the Barcode group, specify how you want barcodes handled during the import procedure. Your options are:
• To transfer any barcode numbers in the 852#p field of the orig- inal records to M3, select the Automatically generate barcode records check box in the Barcode group. (This should be the only option that is selected in the Barcode group.) This allows you to continue using this barcode with the same record and places the barcodes you are importing into the M3 system (in the barcode table).
• To create new barcodes for the records being imported, whether barcodes exist in the original records or not, select the Update barcode values in 852 field with check box. You must then accept or change the values in the four boxes below it:
Prefix – To assign a constant prefix to the barcodes imported into the 852 field, type it here. For example, type b for bibliographic records or p for patron records. You must assign different prefixes to bibliographic records and patron records.
Suffix Starting Value – To assign an incrementing suffix to the barcodes in the order they import into the system, type the numeric starting value for these records (for example, type 1).
The Import Summary is a log containing the start and end time of the import session, the number of records in the import file, the number of records imported success- fully, any duplicate barcodes, and the barcode creation summary. Duplicate barcodes are changed to a barcode of “SIRS” followed by the ISN number.
Suffix Increment Type – If you assign a suffix, you must select a format in this list.
Suffix Increment By – If you assign a suffix, type the number of increments you want the records to increase by (for example, 1 increment).
• If you do not want to transfer or assign any barcodes to the records being imported, clear both check boxes (Automatically generate barcode records and Update barcode values in 852 field with).
NOTE: If the first check box is unavailable, clear the second check box to make the first check box available.
D. In the Assign to group list, select the group to which you want the imported data assigned.
E. When finished, click Finish. While the import procedure takes place, the Import Progress bar displays on screen.
8. When the import procedure is complete, a confirmation prompt displays and asks if you want to view the Import Summary. Click Yes to view it now or No to view it later. It is best to view it now to evaluate the results of the import procedure.
Importing Fixed Width Records
Fixed width data appears in columns, with each field in the original record sepa- rated into columns of a specified width. Typically, fixed width records are patron records. To import records that are in fixed width format:
1. Verify that you are working with the correct database. For instructions, see “Selecting a Database” on page 4-2.
2. On the File menu, select Import, and then click the type of records you are importing. This displays the Open dialog box.
3. Navigate to the file you want to import, then click Open.
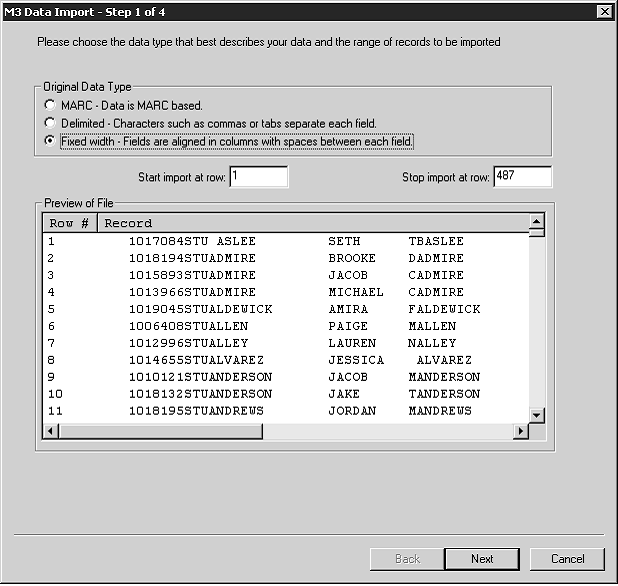
4. In the Step 1 dialog box (Figure 4.61), specify the range of records you want to import.
FIGURE 4.61
To do so:
A. Skip the Original Data Type group. The Fixed width option should auto- matically be selected.
B. In the Start import at row and Stop import at row boxes, select the range of records you want to import. By default, the first and last row numbers in the import file are displayed. If you only want to import a portion of the records in the file, type the row numbers corresponding to the range you want to import.
NOTE: The data in the Preview pane looks different depending upon the record type you are importing.
C. When finished, click Next.
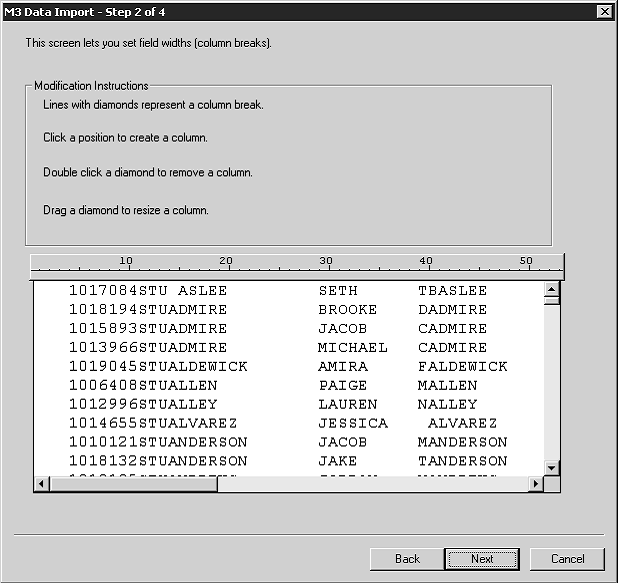
5. In the Step 2 dialog box (Figure 4.62), indicate where the column break is for each column in the data. No column breaks are designated by default.
FIGURE 4.62
To indicate a column break:
A. Click in the diamond row where a column break should occur, which is always to the left of the field data. This creates a vertical line at the column break point.
• To move a column break, click and drag the diamond in the diamond row.
• To remove a column break, double-click the diamond in the diamond row.
B. Repeat this for each desired column break. When finished, click Next.
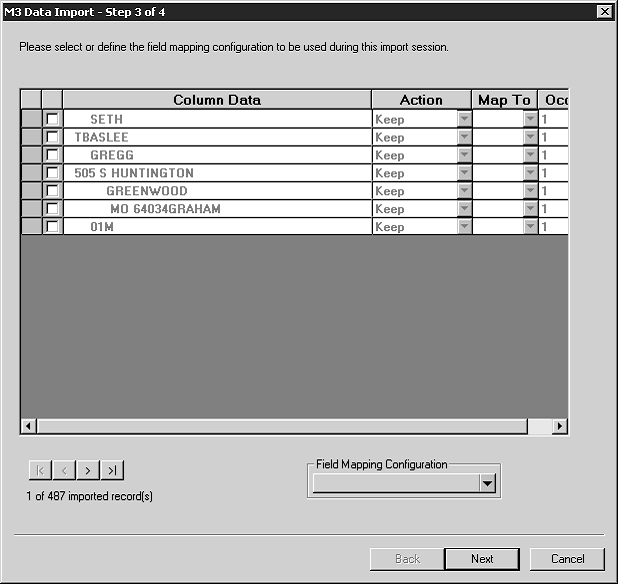
6. In the Step 3 dialog box (Figure 4.63), indicate the MARC field mapping structure that you want the records to conform to once they are imported. (M3 is designed to work with MARC records; therefore, all data fields must map to a MARC field.)
FIGURE 4.63
By default, the Step 3 dialog box does not have a mapping structure selected. You must select or modify an existing mapping structure (if you’ve imported fixed width records before), or create a new configura- tion.
• To select a field mapping configuration that was previously saved:
A. In the Field Mapping Configuration list, select Load. This displays the Load Field Mapping Configuration dialog box.
B. Select the desired configuration, then click OK.
C. After the Step 3 dialog box refreshes, click Next, and then skip to step 7 on page 4-74.
• To create a new field mapping configuration by modifying a configu- ration that was previously saved:
A. In the Field Mapping Configuration list, select Load. This displays the Load Field Mapping Configuration dialog box.
B. Select the desired configuration, and then click OK.
C. After the Step 3 dialog box refreshes, make any desired changes as explained in the next bullet.
• To create a new field mapping configuration:
A. Select the check box by each field you want to import. By default, no fields are selected.
B. The Column Data column provides a list of the fields used by the records to be imported. By default, the actual field data for the first record in the file is displayed. (To display the data for other records, click the navigation buttons in the lower left of this dialog box.) The Column Data column works with the Action column.
C. In the Action column, select Keep or Replace for each field you plan to import. By default, Keep is selected for each field.
Select Keep if you want to import all data currently stored in that field.
Select Replace if you want to change the current data in a field to a constant value (such as a library name, a regional code, or a field label). This constant value then appears in this field in all imported records. If you select Replace, then in the Column Data column, type the information you want to appear in this field.
D. In the Map To column, select the destination MARC field or subfield for each field listed in the Column Data column. To map to a destination field or subfield, click the Map To arrow and select the destination field (Figure 4.64). (You can expand and collapse the field tree by clicking the field’s corresponding plus (+) and minus (–) signs.)
FIGURE 4.64
E. In the Occurrence # (Occ.#) column, select the order in which you want any repeating fields to occur in the destination records. By default, any repeating fields are numbered in sequential order in the Occ.# column. For example, if a field containing the patron’s last name occurs twice, the first listing is assumed to be occurrence 1 and the second is occurrence 2. You can override this occurrence order by typing the preferred order numbers into this column.
NOTE: The import utility assumes that the field or subfield you are mapping to in the Map To column becomes the first occur- rence of that field in the new records. You are prompted to either accept this first occurrence order or change to a preferred occur- rence order. (If the new occurrence order leaves gaps between occurrence numbers, a GAP error message advises and allows you to revise the order.)
F. When finished:
If you want to save the configuration to use during another import session, select Save As in the Field Mapping Configuration list. This displays the Save Field Mapping As dialog box. Type a descriptive name for the new mapping configuration, and then click OK.
OR
If you do not want to save the mapping configuration, proceed to the next step.
G. In the Step 3 dialog box, click Next.
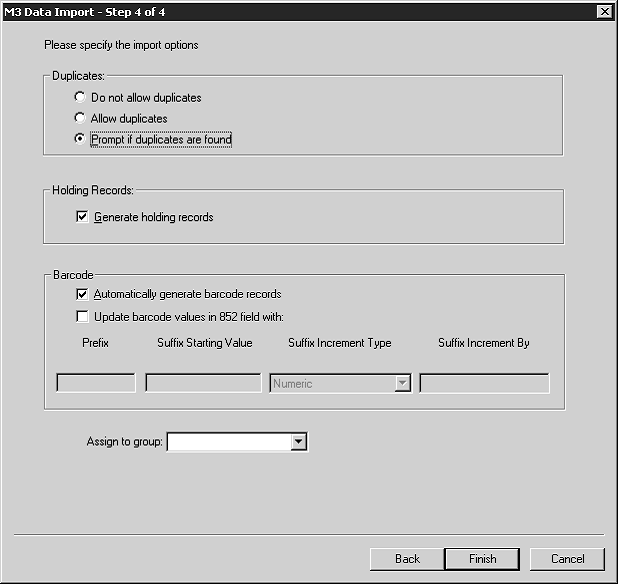
7. In the Step 4 dialog box (Figure 4.65), specify the import options.
FIGURE 4.65
To do so:
A. If you are importing bibliographic records, the Duplicates group is available. If so, do one of the following:
• To prevent the import of records that may duplicate existing records, click Don’t allow duplicates. (All fields in two records need not match to consider the records as duplicates; matching is based upon specific vital field criteria. For example, two records may be considered duplicates if just the ISBN field matches.)
• To import records that may duplicate existing records, click Allow duplicates.
• To be prompted when duplicate records are found during the import process, click Prompt if duplicates are found. This lets you compare the record you are importing to the record already in the
Tip: Select the Don’t show this window again check box before clicking a button to apply the action to the displayed record and all records being imported in this session.
Tip: You must have 852 entries in the records you are importing or other fields mapped to 852 in order for Update barcode values in 852 field with to work. If no 852 field is found in a record, then no barcode is generated for that record.
M3 system, and then decide whether to import the duplicate record.
If a duplicate record is found, the Bibliographic Compare dialog box displays (Figure 4.55), showing the two records side by side. Using the option buttons, you have the following four choices:
Save Existing – Saves the existing bibliographic record and does not import the duplicate bibliographic record. It imports any corresponding holding records. Result: One bibliographic record with all corresponding holding records.
Replace Existing – Imports the duplicate bibliographic record and replaces the existing bibliographic record. It imports all corre- sponding holding records. Result: One bibliographic record with all corresponding holding records.
Import – Imports the duplicate bibliographic record and keeps the existing bibliographic record. It also imports the corresponding holding records and links them to the duplicate bibliographic record, not the existing bibliographic record. Result: Two biblio- graphic records and two sets of holdings —the existing biblio- graphic record and its original holdings, and the duplicate bibliographic record and its corresponding holdings.
Don’t Import – Does not import the duplicate record. Result: The existing bibliographic record and its holding records remain the same.
B. If you are importing bibliographic records, the Holding Records group is available. If you do not want to generate holding records, clear the Generate holding records check box. Otherwise, accept the default.
C. In the Barcode group, specify how you want barcodes handled during the import procedure. Your options are:
• To transfer any barcode numbers in the 852#p field of the orig- inal records to M3, select the Automatically generate barcode records check box in the Barcode group. (This should be the only option selected in the Barcode group.) This allows you to continue using this barcode with the same record and places the barcodes you are importing into the M3 system (in the barcode table).
• To create new barcodes for the records being imported, whether barcodes exist in the original records or not, select the Update barcode values in 852 field with check box. You must then accept or change the values in the four boxes below it:
Prefix – To assign a constant prefix to the barcode imported into the 852 field, type it here. For example, type b for bibliographic records or p for patron records. You must assign different prefixes to bibliographic records and patron records.
Suffix Starting Value – To assign an incrementing suffix to the barcodes in the order they import into the system, type the numeric starting value for these records (for example, type 1).
Suffix Increment Type – If you assign a suffix, you must select a format in this list.
The Import Summary is a log containing the start and end time of the import session, the number of records in the import file, the number of records imported success- fully, any duplicate barcodes, and the barcode creation summary. Duplicate
barcodes are changed to a barcode of “SIRS” followed by the ISN number.
Suffix Increment By – If you assign a suffix, type the number of increments you want the records to increase by (for example, 1 increment).
• If you do not want to transfer or assign any barcodes to the records being imported, clear both check boxes (Automatically generate barcode records and Update barcode values in 852 field with).
NOTE: If the first check box is unavailable, clear the second check box to make the first check box available.
D. In the Assign to group list, select the group to which you want the imported data assigned.
E. When finished, click Finish. While the import procedure takes place, the Import Progress bar displays on screen.
F. When the import procedure is complete, a confirmation prompt displays and asks if you want to view the Import Summary. Click Yes to view it now or No to view it later. It is best to view it now to evaluate the results of the import procedure.