Before using Circulation, you should set up your library’s system schedule. You can set up multiple schedules to accommodate different times of the year. For example, your summer schedule may differ from the rest of the year.
To set up your library circulation schedule:
On the side menu, click Options. This displays the Circulation Options. Click the Schedule button, this will display the Schedule page with four tabs. Enter the appropriate information in each tab as described in the following sections.
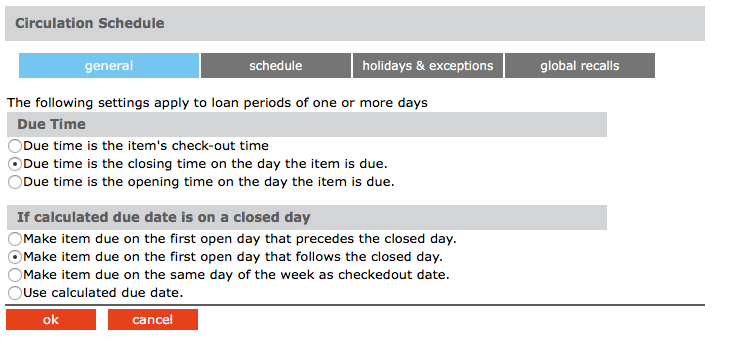
General Tab
In this tab, establish general loan period rules.
1. Under Due Time, click the option appropriate for your library.
2. Under If calculated due date is on a closed day, click the option appropriate for your library.
3. When finished, click the Schedule tab.
Schedule Tab
In this tab, establish periods and indicate your library’s open and closed days. You can create multiple schedules to apply to different times of the year.
1. Under Period, specify this schedule’s starting date and end date. To do so, click Add. This enters a new line. Modify the From and To dates by clicking the date arrows and selecting the desired dates in the calendar.
2. Under Day, click the Mon arrow, and then click Open or Closed. Repeat for all days of the week.
3. Under Circulation Hours, select the Start Time and End Time for each day of the week that you are open. To do so, click a time arrow and select the time.
NOTE: If you want to create an additional schedule,
wait until you have completed the Holidays & Exceptions
tab and the Global Recalls tab for this schedule.
4. When finished, click the Holidays & Exceptions tab.
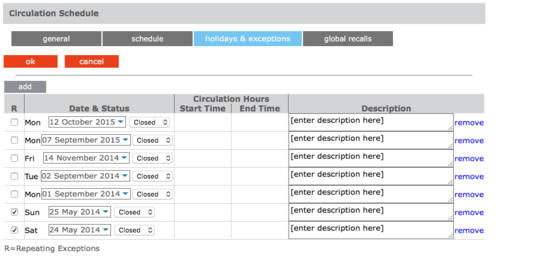
Holidays & Exceptions Tab
In this tab, eliminate or add irregular dates within the schedule you created in the Schedule tab.
1. Click Add. This enters a new line.
2. Enter information for the exception date as follows:
-
Select the R check box if this exception date should repeat every year. This would be appropriate for holidays that always occur on the same date each year, such as New Year’s Day.
-
In the date box under Date & Status, enter the exception date by clicking the date arrow and selecting the desired date in the calendar.
-
In the box beside the date box, select Open or Closed to indicate whether the library is open or closed on the date entered in step B.
-
If you selected Open in step C, enter the Start Time and End Time for this exception day by clicking a time arrow and selecting the time. If you clicked Closed in step C, no times can be entered.
-
In the Description box, type any information necessary to clarify this exception date.
3. To enter more dates, click Add and repeat step 2.
4. When finished, click the Global Recalls tab.
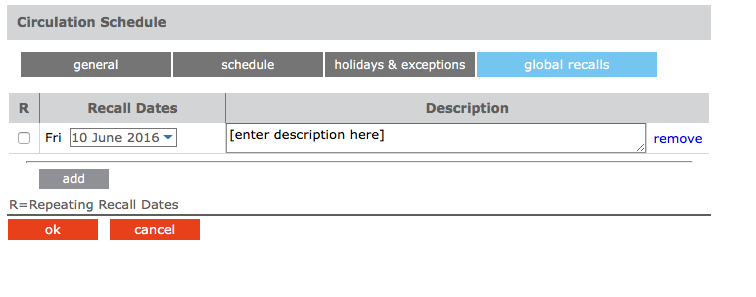
Global Recalls Tab
In this tab, specify the date all items have to be back in the library, such as the end of a school term or an inventory date.
1. Click Add. This enters a new line.
2. Enter information for the closing date as follows:
A. Select the R check box if this closing date should repeat every year.
B. Under Recall Dates, enter the closing date by clicking the date arrow and selecting the desired date in the calendar.
C. In the Description box, type any text necessary to clarify this closing date.
3. To enter more dates, click Add and repeat step 2.
4. When finished, click OK.
5. If you want to add another circulation period (such as a “summer hours” schedule), repeat the procedures for the Schedule, Holidays & Exceptions, and Global Recalls tabs.
Circulation Options
Several configuration settings are available to customize Circulation. Defaults options are good enough for most users. To change the Circulation settings click the Expand button  located on top of each group.
Click Apply after a change has been done.
|
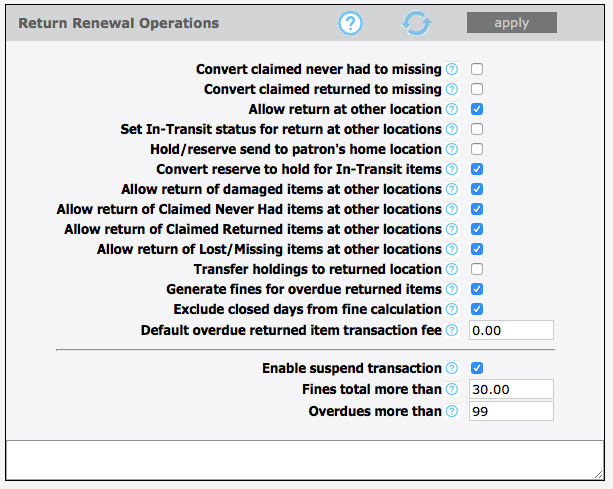
Return Renewal Operations
|
Configure the settings relating to return and/or renewal operations, such as allowing return at other location, in-transit processing, etc.
|
|
Convert claimed never had to missing
|
Select this option to convert the status to MISSING for Items patrons claimed Never Had.
|
|
Convert claimed returned to missing
|
Select this option to convert the status to MISSING for Items patrons claimed returned.
|
|
Allow return at other location
|
Enables accepting return of items belonging to other libraries (organizations).
|
|
Set In-Transit status for return at other locations
|
If enabled, items returned at other locations will have their status set to In-Transit and send to the owning organization.
|
|
Hold/reserve send to patron's home location
|
For items returned at other locations, if there are holds/reserves send the items in-transit to the patrons home locations
|
|
Convert reserve to hold for In-Transit items
|
For items returned at other locations, conver reserves to holds before sending the items in-transit to the patrons home locations
|
|
Allow return of damaged items at other locations
|
Allow return of Claimed Never Had items at other locations.
|
|
Allow return of Claimed Never Had items at other locations
|
Check this option to accept return of Claimed Never Had items at other locations
|
|
Allow return of Claimed Returned items at other locations
|
Check this option to accept return of Claimed Returned items at other locations.
|
|
Allow return of Lost/Missing items at other locations
|
Check this option to accept return of Lost/Missing items at other locations.
|
|
Transfer holdings to returned location
|
Items returned at other locations will be transaferred to the returned locations. Returned location will be the home/owning location.
|
|
Generate fines for overdue returned items
|
Turns on/off generation of fines for returned overdue items.
|
|
Exclude closed days from fine calculation
|
Exclude from the fine calculation the days the libary is closed during the given loan period.
|
|
Default overdue returned item transaction fee
|
This late fee is added to all overdue returned items on top of any calculated overdue fine amount.
|
|
Enable suspend transaction
|
Enable suspend transaction if patron fines amount or overdue transaction count exceed the preset amount.
|
|
Fines total more than
|
Suspend transaction if the patron fines amount exceeds this amount.
|
|
Overdues more than
|
Suspend transaction if the patron overdue transaction count exceeds this amount.
|
|
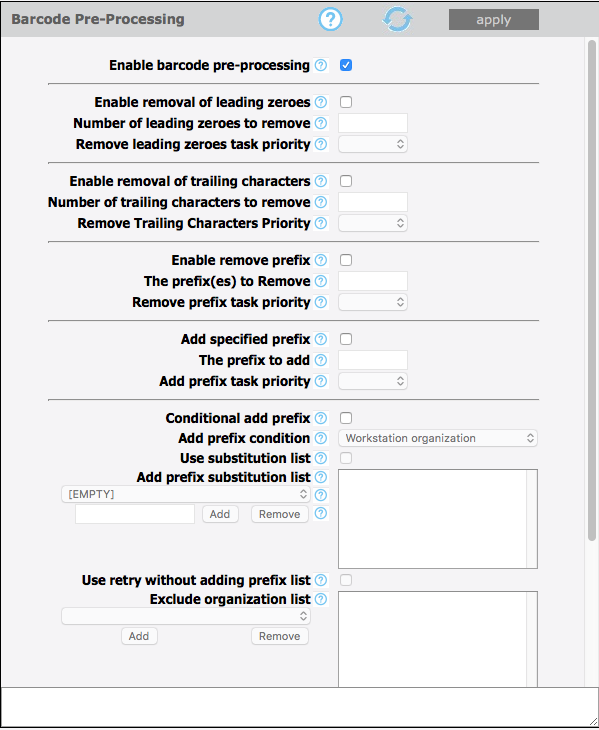
Barcode Pre-Processing
|
These settings instruct Circulation how to massage the raw barcode string into the desire form before submitting the query to the server.
|
|
Enable barcode pre-processing
|
Enable the pre-processing of the raw entered barcodes before querying the server. Often used to add/remove characters due to scanners pecularities.
|
|
Enable removal of leading zeroes
|
Enable removing leading zeroes from the entered raw barcodes.
|
|
Number of leading zeroes to remove
|
Maximun number of leading zeroes to remove from the raw entered barcode. Enter 0(zero) to remove all leading zeroes.
|
|
Remove leading zeroes task priority
|
The task priority (1-6) is the order in which removal of the leading zeroes will take place.
|
|
Enable removal of trailing characters
|
Enable removing trailing characters from the entered raw barcodes.
|
|
Number of trailing characters to remove
|
The number of trailing characters to remove from the entered barcode.
|
|
Remove Trailing Characters Priority
|
The task priority (1-6) is the order in which the removing of trailings characters will take place.
|
|
Enable remove prefix
|
Enable removing prefixes from the entered raw barcodes.
|
|
The prefix(es) to Remove
|
Enter one or more prefix separated with semicolon(;) to be removed from the entered barcodes
|
|
Remove prefix task priority
|
The task priority (1-6) is the order in which the remove prefix will take place.
|
|
Add specified prefix
|
Add the specified prefix to all entered barcode.
|
|
The prefix to add
|
Enter here the prfix to add to the barcodes.
|
|
Add prefix task priority
|
The task priority (1-6) is the order in which the add prefix will take place.
|
|
Conditional add prefix
|
Add a prefix to the barcode based on the current user or workstation organization symbol. In addtion, a substitution list can also be provided.
|
|
Add prefix condition
|
Use either the user or workstation organization symbol as the prefix or as the condition for substitution.
|
|
Use substitution list
|
Enables getting the prefix text from the substitution list. For any symbol matching the condition, add the conrresponding prefix text.
|
|
Add prefix substitution list
|
The list of organization symbols and the corresponding prefixes. Select an Organization, enter prefix text and click on ADD.
|
|
(EMPTY)
|
To force a prefix for user or workstation with empty organization symbol, select [EMPTY] and specify the prefix.
|
|
(ADD) (REMOVE)
|
To exclude an organization from adding a prefix, select the organization and set the prefix to one or more blank spaces.
|
|
Use retry without adding prefix list
|
Re-try without adding prefix for those organizations in the list if fetching barcode fails.
|
|
Exclude organization list
|
The list of organizations to retry without adding the prefix if fetching the barcode fails.
|
|
Conditional add prefix task priority
|
The task priority (1-6) is the order in which the conditional add prefix will take place.
|
|
Make entered barcode fixed length
|
Make all entered barcodes of a fixed length by padding or removing characters as configured.
|
|
Length of the barcode
|
The number of characters to make the entered barcodes.
|
|
Pad leading characters
|
Make the barcodes a fixed length by padding the leading characters. Otherwise pad trailing characters.
|
|
Padding character
|
The character to used to pad the barcodes when the entered barcodes are shorter than the required length.
|
|
Remove leading characters
|
Make the barcodes a fixed length by removing the leading characters. Otherwise remove trailing characters.
|
|
Make fixed length task priority
|
The task priority (1-6) is the order in which the make fixed length will take place.
|
|
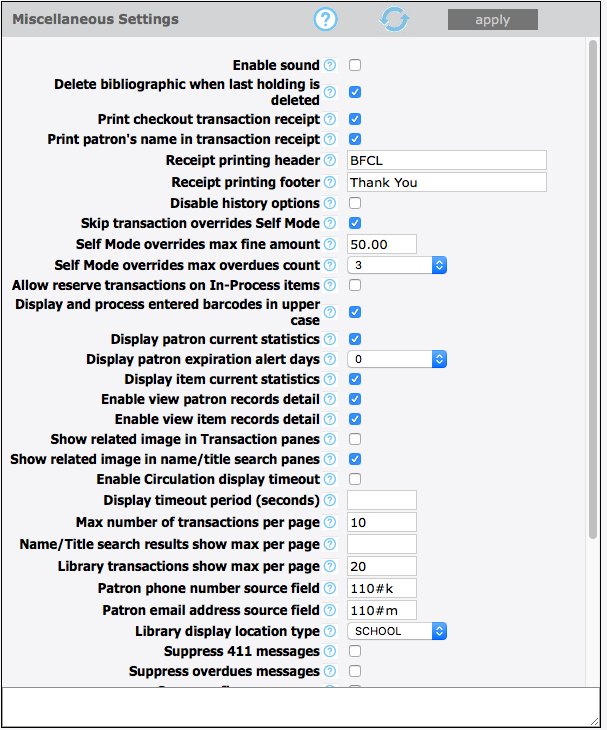
Miscellaneous Settings
|
Provides many options to enhance Circulation customization.
|
|
Enable sound
|
Enable playing sound file at the end of each operation.
|
|
Delete bibliographic when last holding is deleted
|
Delete the bibliographic record when the last attached holding record is deleted.
|
|
Print checkout transaction receipt
|
Enables printing receipt for loan transactions.
|
|
Print patron's name in transaction receipt
|
Enables printing the patron's name when printing receipts. Otherwise the name is masked.
|
|
Receipt printing header
|
The header to print in the receipt. Leave blank if no header is desired.
|
|
Receipt printing footer
|
The footer to print in the receipt. Leave blank if no footer is desired.
|
|
Disable history options
|
Checking this option will disable the history menu options for both patron and item.
|
|
Skip transaction overrides Self Mode
|
Skip transaction overrides in Self Mode. Overrides are NOT waived, instead the transactions are cancelled.
|
|
Self Mode overrides max fine amount
|
This is the maximum fine amount the patron may owe before blocking the transactions in Self Mode when the skip override flag is off.
|
|
Self Mode overrides max overdues count
|
This is the maximum number of overdue loans the patron may have before blocking the transactions in Self Mode when the skip override flag is off.
|
|
Allow reserve transactions on In-Process items
|
Allow reserve transactions on items with In-Process status.
|
|
Display and process entered barcodes in upper case
|
Display and process entered barcodes in upper case.
|
|
Display patron current statistics
|
Display the patron current statistics (number of items currently on loan, on hold, on reserve, fines, etc.
|
|
Display patron expiration alert days
|
The number of days before the patron expiration to display notification alert.
|
|
Display item current statistics
|
Display the item current statistics (number reserves, bookings, fines, etc.
|
|
Enable view patron records detail
|
Enables the option to view all the patron records (patron, barcode, group, etc.) in Full MARC.
|
|
Enable view item records detail
|
Enables the option to view all the item records (holding, bib, barcode, group, etc.) in Full MARC.
|
|
Show related image in Transaction panes
|
Show the related image in the transaction panes. Patron pictures for item transactions and book covers for patron transactions pane.
|
|
Enable Circulation display timeout
|
Clears the Circulation display after a specified timeout period of inactivity.
|
|
Display timeout period (seconds)
|
The number of seconds of inactivity necessary to clear the display.
|
|
Max number of transactions per page
|
Maximum number of transactions to display in the transaction pane at once. Paging will occur if exceeded. Default is 10.
|
|
Library transactions show max per page
|
Maximum number of transactions to display in the library transaction pane at once. Paging will occur if exceeded. Default is 20.
|
|
Patron phone number source field
|
The field in the patron record that Circulation uses to retrieve the patron phone number.
|
|
Patron email address source field
|
The field in the patron record that Circulation uses to retrieve the patron email address for email notifications.
|
|
Library display location type
|
The library display location type (PUBLIC or SCHOOL library) can be used to restrict displaying sensitive information.
|
|
Suppress 411 messages
|
Disable displaying of information (411) messages when a patron loaded.
|
|
Time Zone
|
Select the time zone for your location. Enter user defined time zone as: GMT+HH:MM or GMT-HH:MM.
|
|
Email service type for notification
|
The type of email service to use for notification. Currently only SMTP service is supported.
|
|
Email server IP address
|
The IP address of the email server to used for email notifications.
|
|
Email server port
|
The the listening port of the email server. Default value is port 25.
|
|
Sender email address
|
The email address of the sender. The email address that will be used in the FROM field of the email notifications.
|
|
Email address to furnish copy to
|
The email address to furnish copy of email notifications. The email address that will be used in the CC field of the email notifications.
|
|
Authenticate
|
Check this option if your email server requires authentication.
|
|
User:
|
Enter the SMTP account user name.
|
|
Password:
|
Enter the SMTP account user password.
|
|
Duplicate patron detection fields
|
One or more fields separated with slash(/) used in the auto import to detect duplicate patron records. Default field is 852#p.
|
|
Use AND operator in duplicate detection
|
For multiple duplicate detection fields use AND to require matching on every field. Otherwise matching on any of the fields.
|