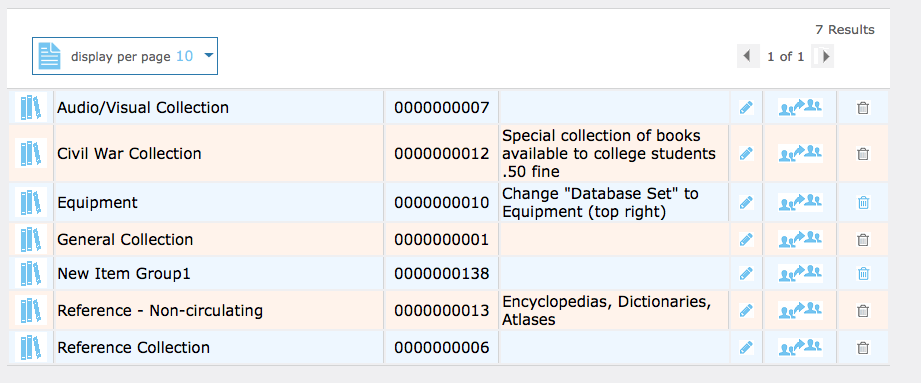
Creating a New Item Group
1. Select a Catalog database in the Database Set list.
2. In the New list, select Item Group, then click the New button on the right. This creates a “New Item Group1” entry.

NOTE: If the new entry does not appear, verify that All
Groups or Item Groups is selected in the Display list.
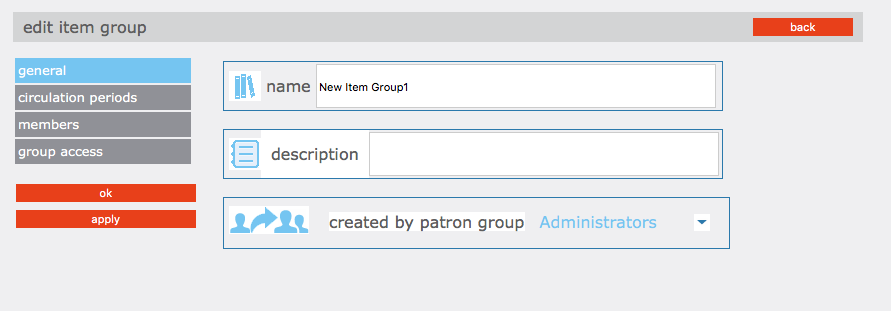
3. Click the  link to the right of the new group. This opens the General page for the new group. Proceed with the following sections to enter information for this group.
General. On this page, enter identification information for the group.
1. In the Name box, type the item group’s name.
2. In the Description box, type any information needed to describe this group. This will display on the main Group Editor page.
3. The Created by Patron Group box displays the patron group of the user that created this group. Only administrators can modify this entry.
4. Click Apply to save your entries on this page, then click Circ Periods in the side menu and proceed to the next section.
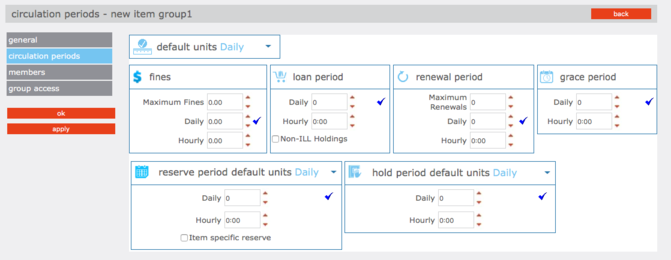
Circ Periods. On this page, establish circulation time frames and fine amounts for this item group.
1. To enter different limits for this item group:
-
In the Default Units list, select Daily or Hourly as the default time unit for Loan Period, Renewal Period, Grace Period, and Fines.
-
In Loan Period, Renewal Period, Grace Period, and Fines, enter the time limit for each period type. Also, enter the following:
-
Under Renewal Period, enter the maximum number of renewals allowed.
-
Under Fines, enter the maximum fine amount.
-
In
Reserve and
Hold Period Default Units, enter the time for each of this features
-
Reserve Period Default Units are the number of days or hours that the reserve is valid. This number should be a large one, e.g. 200 days, to accommodate long lists of reserves for popular materials. When the reserve period ends, the reserve is cancelled.
-
Hold Period Default Units are the number of days or hours that the item is held in the library, waiting for the patron to pick it up. When the hold period ends, if the item has not been retrieved and loaned, the item moves to the hold of the next patron on the reserve list, or it returns to normal status and should be re-shelved.
-
A checkmark in the box for
Item Specific Reserve indicates that reserves are placed on specific holding records rather than on titles. This is useful for items such as periodicals, where the specific issue is usually required, rather than any issue of that title.
-
Click
OK. This returns you to the Item
Group Overrides page.
2. Click Apply to save your entries on this page, then click Members in the side menu and proceed to the next section.
Note: The Maximum Fine amount is used
by the program as the replacement cost
if an item is damaged or lost and there is
no price in the 852#9 of the holding record.
Every library should enter an amount in this
box, even if the library does not charge
overdue fines.
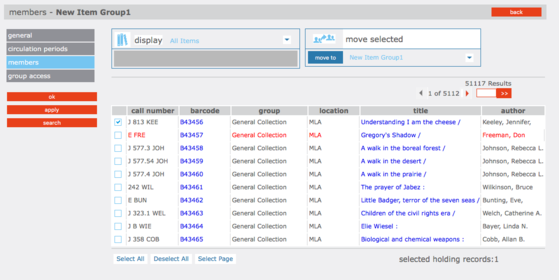
Members. On this page, add and remove item group members. Items assigned to this group adhere to the circulation parameters established in Circ Periods.
1. In the Display list, select All Items. This displays a list of all items, not just items currently assigned to this group.
2. Select the check box next to each item you want to add to the item group. To locate specific items:
-
On the side menu, click Search. This displays the Search page.
-
Type your search query into the appropriate boxes. To select a different MARC field or Boolean operator, click the arrow next to the appropriate list, and then select the preferred field or operator. Then click Search. This displays a list of items matching your search query.
3. Under Move selected records, the new group name displays. To move the selected items to this group, click the >> button on the left. This displays the new group with its assigned items.
4. Click Apply to save your entries on this page, then click Group Access in the side menu and proceed to the next section.
Tip: You can also scan items into the group. To do so, select Scan
Items into Current Group in the Display list. Then scan the item’s
barcode or type the barcode in the Barcode box.
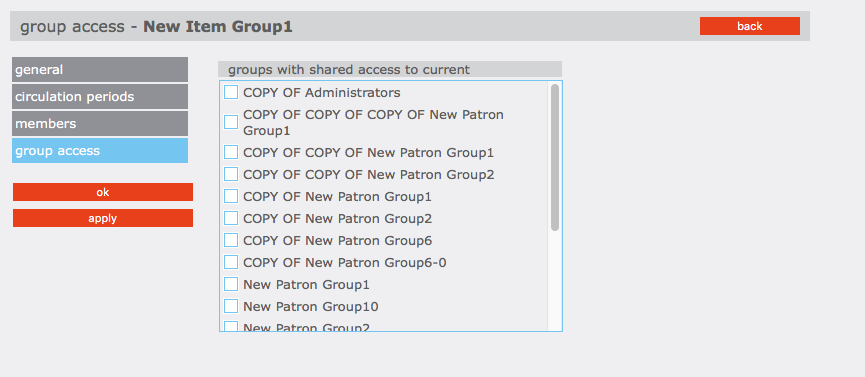
Group Access. On this page, specify which patron groups you want to have access to this group.
-
The Groups Without Access box displays the patron groups that do not have access to make changes to this group. To change the group access, click the patron group that you want to have access to this item group, then click the << button. This moves the patron group to the Groups With Shared Access To Current box. Repeat this for all groups that you want to have access to this item group.
-
Click OK to save your entries on this page and return to the Group Editor home page.