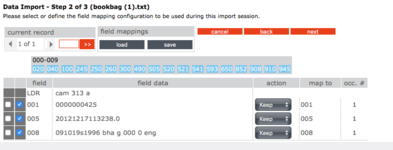
7. On the Data Import - Step 2, indicate the field mapping configuration to be used during the import session.
The gray box lists all fields, with the fields in the current record displayed in blue. You can click a field to view it. To view another record, click the navigation arrows under current record.
You can either accept the default configuration or modify it, or select a previously saved field map. If you accept the default, click Next and skip to step 8.
To use a previously saved field map, click Load in the Field Mappings box. A window will open with a list of the previously saved field maps. Click Load next to the name of the desired map. At this point you can modify the field map again or click Next and skip to Data Import - step 3.
To modify the field mapping configuration:
In the Step 2 dialog box, review the Field column for fields that repeat. If you plan to change the mapping of a repeating field, and if all occurrences of the repeating field are to be mapped to the same destination field, then you can save time and keystrokes by selecting the Field Collapse check box. This collapses all the occurrences of the repeating field into one line, creating a single occurrence and enabling you to simultaneously remap all occurrences of this field to the same field. (If you do not use this feature, you must revise the mapping for each occurrence individually.) To use this option, select the Field Collapse check box by the first occurrence of the repeating field.
In the second check box column, all fields and subfields are selected by default. Clear the check box next to the fields and subfields you do not want to import.
In the Action column, select Keep or Replace for each field and subfield you plan to import.
Select Keep if you want the data currently stored in that field to be kept during the import procedure.
Select Replace if you want to change the current data in a field to a constant value (such as a library name, regional code, or field label) during the import procedure. A keyword box will display in the Field Data column; type the information you want to appear in this field.
D. The Map To column indicates the destination MARC field or subfield for each field you plan to import. By default, this column displays the same field tag number and subfield code listed in the Field column.
Tip: To map most but not all occurrences of a repeating
field to the same destination field, you can still use the
optional Field Collapse procedure explained in step
A, with one modification. After selecting the Field
Collapse check box and revising the Map To destination,
clear the Field Collapse check box. This separates the
repeating field listings once again but maintains the
Map To modification entered while the fields were
united. You can then modify the mapping as explained
in step D for those few listings that do not match
the global change you entered while the fields were united.
To change the Map To value, type a new field and subfield in the text box, or click the arrow to the right and select a field and subfield in the window.
E. Click Next.
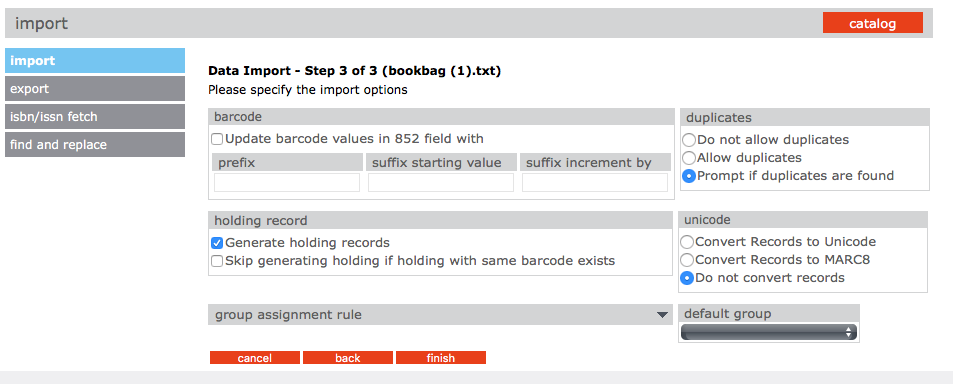
8. On the Data Import - Step 3, specify the import options.
Tip: You must have 852 fields
in the records you are
importing or other fields
mapped to 852 in order for
Update barcode values in
852 field with to work. If no
852 field is found in a record,
then no barcode is generated
for that record.
A. You can create new barcodes for the records being imported, whether barcodes exist in the original records or not. To do so, select the Update barcode values in 852 field with check box under Barcode. Then:
Prefix – To assign a constant prefix to the barcode, type it here. For example, type B for bibliographic records or P for patron records. You must assign different prefixes to bibliographic records and patron records.
Suffix Starting Value – To assign an incrementing suffix to the barcodes in the order they import into the system, type the numeric starting value for these records (for example, type 1).
Suffix Increment By – If you assign a suffix, type the number of increments you want the records to increase by (for example, 1 increment).
B. If you are importing bibliographic records, the Duplicates options are available. Choose one of the following:
To prevent the import of records that may duplicate existing records, click Don’t allow duplicates. (All fields in two records need not match for the records to be considered duplicates; for example, two bibliographic records may be considered duplicates if just the ISBN field matches.)
To import records that may duplicate existing records, click Allow duplicates.
To be prompted when duplicate records are found during the import process, click Prompt if duplicates are found option. This lets you compare the record you are importing to the existing record, and then decide whether to import the duplicate record.
C. If you are importing bibliographic records, the Holding Records option is available. If you do not want to generate holding records, clear the Generate holding records check box. Otherwise, leave it selected.
D. In the Unicode box, you can choose to convert records to Unicode, convert records to MARC8, or not convert records.
E. In the Default group list, select the group you want the imported data assigned to by default.
F. If you want to assign a rule to this data, click the Expand View button next to Group Assignment Rule.
Select the check box to the left of the first box to activate it. To the right of the box, click the arrow button.
Enter the rule you want assigned. (Example: Type 852k under Field, select Equals, and then type REF under Text.)
Click Add. Add other rules if desired. When finished, click Close.
In the list to the right of the arrow, select the group to assign records to when they meet the rule criteria. (Example: Select Reference Collection to complete the example in step 2.)
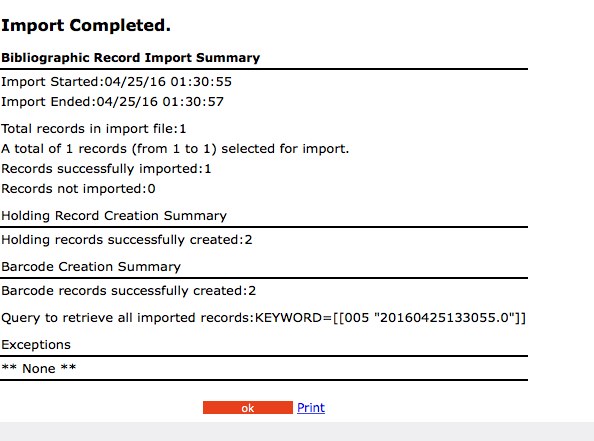
9. When finished, click Finish. While the import processes, a progress bar displays.
If a duplicate record is found and you selected Prompt if duplicates are found in step 8B, the Bibliographic Compare window displays
Using the four buttons, you have the following choices:
Save Existing – Saves the existing record and does not import the duplicate record. All corresponding holding records are imported. Result: One bibliographic record with all corresponding holding records.
Replace Existing – Imports the duplicate record and replaces the existing record. All corresponding holding records are also imported. Result: One bibliographic record with all corresponding holding records.
Import – Imports the duplicate record and keeps the existing record. All corresponding holding records are also imported and linked to the duplicate bibliographic record. Result: Two bibliographic records and two sets of holdings—the existing bibliographic record and its original holdings, and the duplicate bibliographic record and its corresponding holdings.
Do not Import – Does not import the duplicate record. Result: The bibliographic record and its holding records remain the same.
Tip: Select the Don’t show
this window again check box
before clicking a button to
apply the action to the
displayed record and all
records being imported in
this session.
10. When the import procedure is complete, the import summary displays. Click OK to return to the Import page, or click Print to print the summary.