For detailed instructions on the procedures included in this chapter, as well as OPAC procedures not included in this chapter, refer to the Mandarin M3 Users Guide.
This chapter describes:
• How to conduct Standard, Enhanced, and Visual Catalog searches of your library’s holdings
• How to work with search results, including viewing the record details
• How to use the Bookbag
• How to print records or save records to a file
• How to use Shelf Browse to locate records
• How to use the My Account tab
STARTING THE OPAC
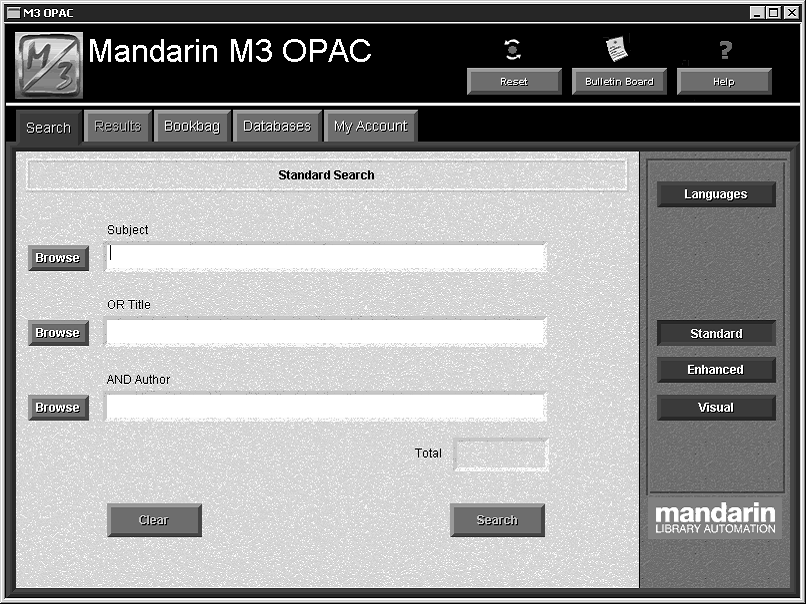
Open the M3 folder on your desktop, then double-click the OPAC icon. This displays the main OPAC window (Figure 2.1) with Standard Search selected.
FIGURE 2.1
ABOUT THE M3 OPAC
The M3 Online Public Access Catalog (OPAC) is a flexible, multilingual search interface that enables the patron to search for records using three different search methods. The patron can then work with the search results in a variety of brief and expanded record formats.
The three available search methods are:
• Standard Search – A basic keyword search method that recognizes Boolean logic, truncation, and phrase searches, and allows index browsing.
• Enhanced Search – A more advanced search method that offers search flexibility and options. Patrons can enter simple or complex keyword search queries, and use index browsing.
• Visual Catalog Search – An easy point-and-click graphical search method.
Patrons click colorful buttons to narrow their searches from broad topics to more defined sub-topics, ultimately reaching search results.
The following six features enhance the patron’s search session.
• The Bookbag allows a patron to set aside selected records throughout the course of the search session for additional review or batch printing.
• The Shelf Browse function quickly locates records with a call number sim- ilar to that of a selected record. This is equivalent to looking at items to the left or right of a specific item on a library shelf.
• The History function keeps a cumulative list of Enhanced Search queries.
A time-saving AutoSearch feature lets you select a search in the list and return to that search by clicking a button. To ensure privacy, a patron can clear this cumulative list at any time.
• The Reset feature deletes all information stored in the History, and returns all OPAC settings to their default positions.
• The Bulletin Board links to either a local HTML file or a World Wide Web address that your library wants patrons to view.
• On-screen Help, which provides instructions on performing a variety of tasks, can be accessed by clicking the Help button on the Header bar.
STANDARD SEARCH
1. On the Search tab, click Standard. This displays the Standard Search window (Figure 2.1).
Tip: You can also click Browse to select a search term from a list of the indexed entries for the selected MARC field.
2. Type your search query into one or more of the three keyword boxes. Each box is labeled to indicate the MARC record field it searches. The two lower boxes also indicate the Boolean operator applied to the box below.
3. Click Search. If matches are found, the Search Results window displays a list of search results (Figure 2.4).
ENHANCED SEARCH
1. On the Search tab, click Enhanced. This displays the Enhanced Search window (Figure 2.2).
FIGURE 2.2
Tip: You can also click Browse to select a search term from a list of the indexed entries for the selected MARC field.
2. Type a search query into one or more of the three keyword boxes. To use different MARC record fields or Boolean operators, select a different field or operator from the appropriate list.
3. Click Search. If matches are found, the Search Results window displays a list of search results (Figure 2.4).
VISUAL CATALOG SEARCH
1. On the Search tab, click Visual. This displays a button menu (Figure 2.3).
FIGURE 2.3
Tip: Two navigation buttons function as follows:
• Back returns to the previous button menu.
• Start Over returns to the first button menu.
2. Click the button for the desired topic. This displays another level of but- tons. Depending on the number of button menus in your OPAC, you may have to navigate several levels to narrow your search.
3. When the search is complete, the Search Results window displays a list of search results (Figure 2.4). See the next section, “Working with Search Results,” for details on your options in the Results tab.
WORKING WITH SEARCH RESULTS
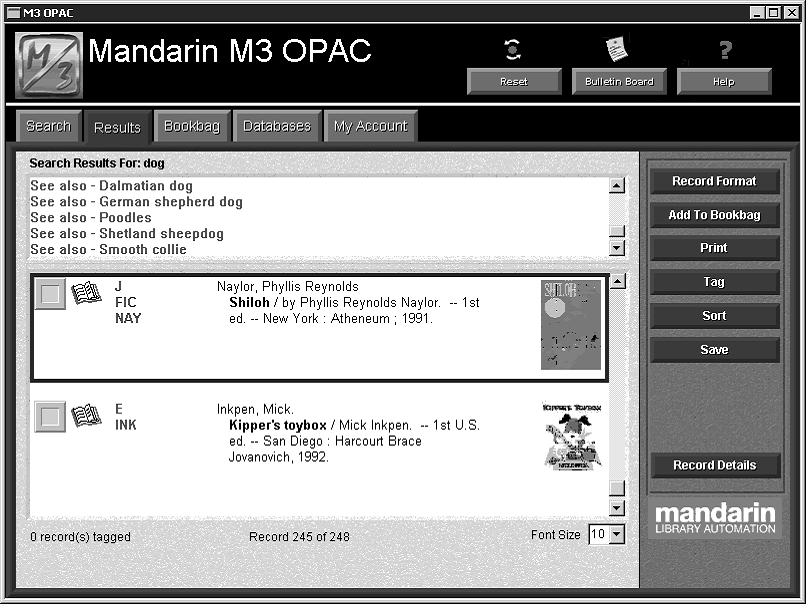
After conducting a search, the Search Results window displays in the Results tab (Figure 2.4).
FIGURE 2.4
Tip: You can also double-click the record to view the Record Details window.
• Cross-Reference box – If you are using a version of M3 that supports Authority Control and the search query you entered is defined under Authority Control, cross-references display in the Cross-Reference box. Click a “See” or “See also” link to view the search results for that heading.
• Availability check box – Indicates whether the item is available: green indi- cates available, red indicates unavailable.
• Media type icon – Displays the media type of the record.
Viewing the Record Details
To access more information about a specific record, including the location of the item, select the record and click Record Details. This displays the Record Details window. See “Working with Record Details” on page 2-6 for more information.
Using the Bookbag
To use the Bookbag to create a reading list or bibliography:
1. Click the Availability check box next to each record you want to add to the Bookbag.
2. Click Add to Bookbag, and then click Add Tagged.
3. You can then view the records in the Bookbag by clicking the Bookbag tab.
Printing Records
To print records:
1. Click the Availability check box next to each record you want to print.
2. Click Print, and then click Print Tagged.
Saving Records
To save records to a file:
1. Click the Availability check box next to each record you want to save.
2. Click Save, and then click Save Tagged.
3. Navigate to the location where you want to save the record(s). In the File name box, type a name for the file, and then click Save. This saves the record(s) in rich text format (RTF).
WORKING WITH RECORD DETAILS
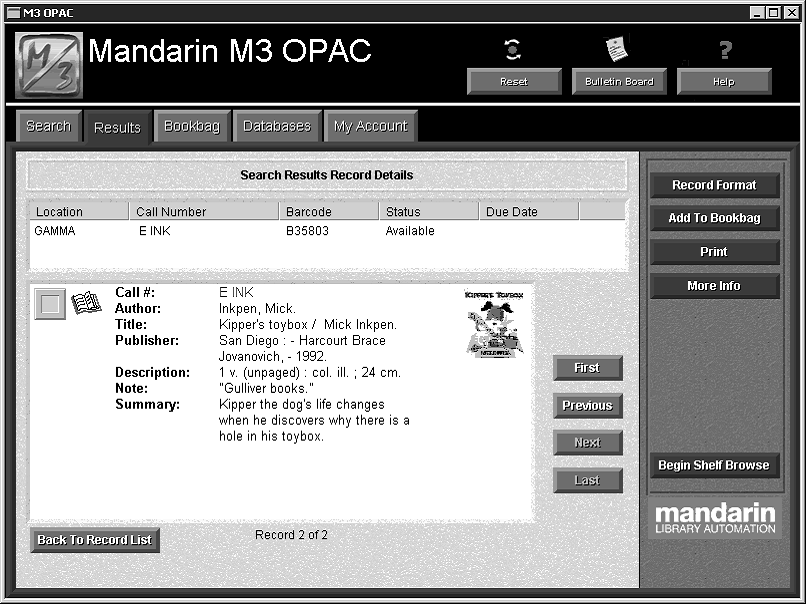
The Record Details window (Figure 2.5) provides details about the record selected in the Search Results list, including location and status information.
FIGURE 2.5
• Holdings box – Lists each copy of the item. By default, this holding record information includes the location, call number, availability status, and, if applicable, due date.
• Expanded Record box – Displays an expanded version of the bibliographic record, along with an Availability check box and media type icon.
Using the Bookbag
To use the Bookbag to create a reading list or bibliography, click Add to Bookbag. You can then view the records in the Bookbag by clicking the Bookbag tab.
Using Shelf Browse
Shelf Browse allows a patron to quickly find records with a call number similar to that of a selected record. The patron can move one bibliographic record at a time forward or back. This is similar to looking at items to the left or right of a selected item on a library shelf. To use Shelf Browse:
1. Click Begin Shelf Browse. This changes the window to Shelf Browse mode and the active call number for this record appears in the status bar.
2. From here, your options include:
• To view the previous record “on the shelf,” click Previous.
• To view the next record “on the shelf,” click Next.
• To end this Shelf Browse session, click End Shelf Browse.
• To return to the Search Results window, click Back To Record List.
USING THE MY ACCOUNT TAB
Note: This tab is available only if it has been activated by your system administrator.
This feature allows patrons to view their own open and closed transactions as well as their personal information on file with the library.
To access your account:
1. Click the My Account tab. This displays the My Login dialog box.
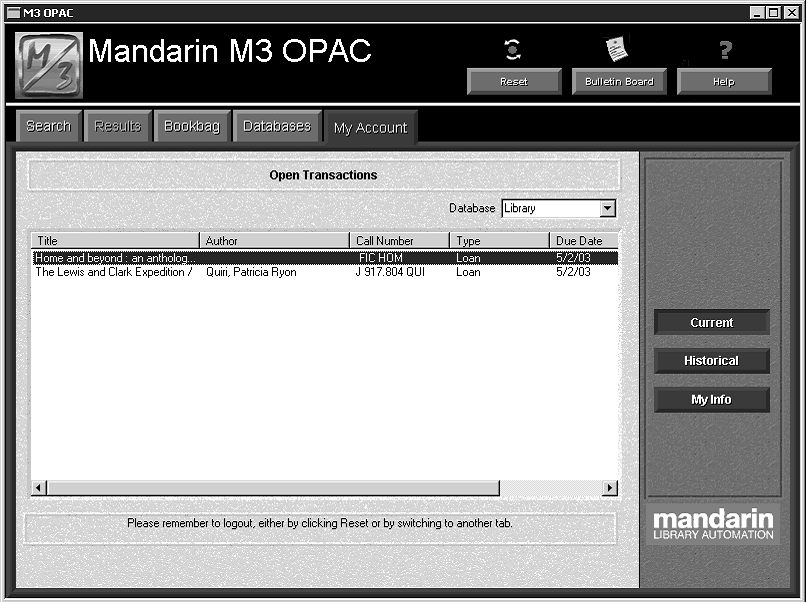
2. In the Patron Barcode box, type the barcode from your library card. If your patron record has a password assigned to it, type your password in the Password box (if not, no password is required). Then click OK. This dis- plays the My Account tab with your transactions listed (Figure 2.6).
FIGURE 2.6
Option buttons
The option buttons provide the following choices:
• Current – View your open, or current, transactions.
• History – View your closed, or historical, transactions.
• My Info – View personal information that the library has on file for you.


