Conducting a Full Inventory
To conduct a full inventory:
1. Scan the barcode of each item on the shelves, following shelflist order. Use a barcode scanner such as a tricoder.
NOTE: A tricoder can hold an average of 6,000 scanned barcodes at a time. Once that capacity is reached, the information needs to be uploaded into the inventory file. It may take several scanning and uploading sessions to build the inventory data.
2. Upload the scanned barcode records (for the shelved items) from the bar- code scanner to M3 Inventory. To do so:
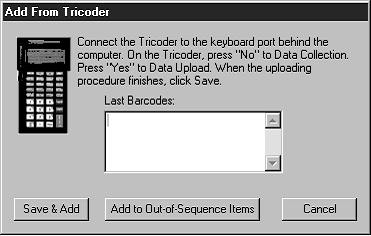
A. On the File menu, click Upload From Reader. (Or, right-click while pointing to the Barcode pane to access a shortcut menu.) This displays the Add From Tricoder window (Figure 8.3).
FIGURE 8.3

B. Follow the instructions in the window, then click Save & Add. This displays the Save As dialog box.
C. Navigate to the location where you want to store the barcode file. If you are going to upload multiple barcode files, you may want to create a new folder for the files.
D. In the File name box, type a name for the barcode file you are uploading, and then click Save. This saves the file and adds the barcodes to the current inventory. (If you need to upload multiple times to scan the entire collection, be sure to designate different names for each upload file to avoid overwriting data.)
3. Scan the barcode of each item that is out-of-sequence (that is, items not on the shelves, such as items on carts).
4. Upload the scanned barcode records (for the out-of-sequence items) from the barcode scanner to M3 Inventory. To do so:
A. On the File menu, click Upload From Reader. (Or, right-click while pointing to the Barcode pane to access a shortcut menu.) This displays the Add From Tricoder window (Figure 8.3).
B. Click Add to Out-of-Sequence Items. This adds the items to the out-of- sequence list without creating a file. A misplaced item check is not performed on the out-of-sequence list.
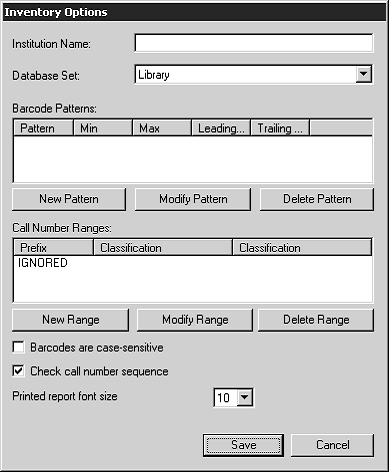
5. On the Action menu, click Inventory Options. This displays the Inventory
Options window (Figure 8.4).
FIGURE 8.4

6. In the Database Set list, select the database containing the holdings that are now being inventoried.
7. (Optional Step) You can configure the Inventory module to recognize a specific pattern of characters, a certain barcode length, or both. If any scanned barcodes deviate from this character and/or length specification, the deviant barcodes are highlighted in the barcode listing. To do so:
A. Click New Pattern. This displays the New Pattern dialog box
(Figure 8.5).
FIGURE 8.5

B. To set up a character pattern, type the pattern in the Pattern box. For example, if all barcodes involved in this full inventory begin with the same three characters, type those three characters here.
C. To set up a length pattern:
• In the Minimum Length box, type the minimum number of charac- ters in the barcode pattern.
• In the Maximum Length box, type the maximum number of charac- ters in the barcode pattern.
D. Click OK to return to the Inventory Options window, where your pattern entries display in the Barcode Patterns box.
E. Select the Barcodes are case-sensitive check box to locate the exact text of the barcode. For example, if you select this check box and search for B200, you only find occurrences of B200. You will not find an occurrence of b200.
F. Select the Check call number sequence check box to check for and report any barcodes that are not in the sequence being searched.
G. Click Save.
8. Create the barcode file. To do so:
A. On the File menu, click Add Barcode File. This displays the Open dialog box.
B. Navigate to the location where you stored the barcode records files.
Double-click the file name. (If you uploaded multiple barcode record files, double-click one of the files. Then repeat this step for each barcode record file you uploaded.) This imports the data into the M3
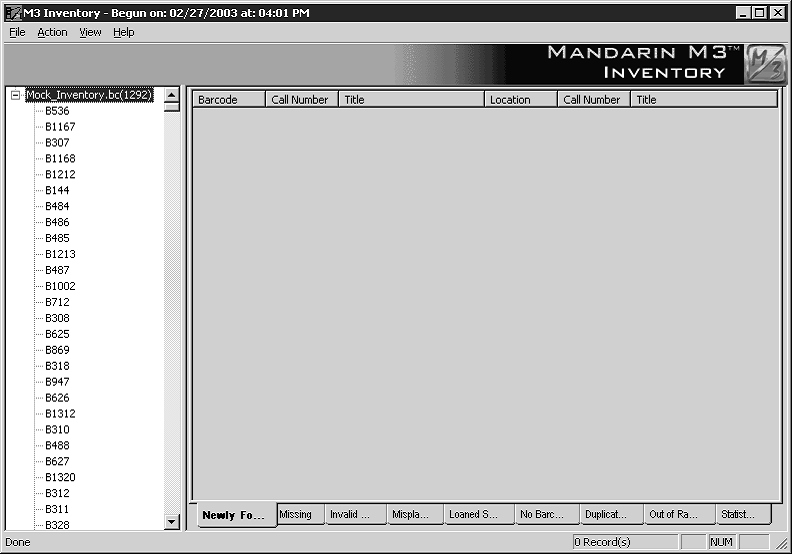
Inventory module and creates a file in M3 Inventory. The file name appears in the Barcode pane in the main Inventory window
(Figure 8.6).
C. The total number of barcodes imported is displayed to the right of the name of the newly created file. Click the plus (+) sign to expand the file and view the list of barcodes entered.
FIGURE 8.6

FIGURE 8.7

9. Run the Do Inventory procedure. To do so:
A. On the Action menu, click Do Inventory. M3 Inventory compares the barcode information to the corresponding holdings data. When finished, a dialog box (Figure 8.7) displays with a summary of the inventory results.
B. Click OK to close the dialog box and return to the main Inventory window. M3 Inventory places the appropriate information in each of the nine tabs in the Inventory pane:
• Newly Found – Lists items present in this barcode upload, but previously flagged as missing. (NOTE: To change the status of all newly found items to “Normal,” click Mark Newly Found Items on the Action menu. At the confirmation prompt, click OK.)
• Missing – Lists all items missing from this barcode upload. If the item has a Location (852#a), the Location appears before the call number.
• Invalid Barcodes – Lists items that do not belong in the collection or have the wrong barcode length.
• Misplaced – Lists items that are in the wrong shelf position.
• Loaned Shelved – Lists items that have an availability status of loaned, but are actually on the shelf.
• No Barcode – Lists items that have no barcode on file in the catalog.
• Duplicate Barcode – Lists items that have duplicate barcodes.
• Out of Range(s) – Lists items that are not in the inventory call number range, but are in the barcode upload in shelflist order.
• Statistics – Displays a summary of the current inventory results, as well as statistics regarding this inventory.
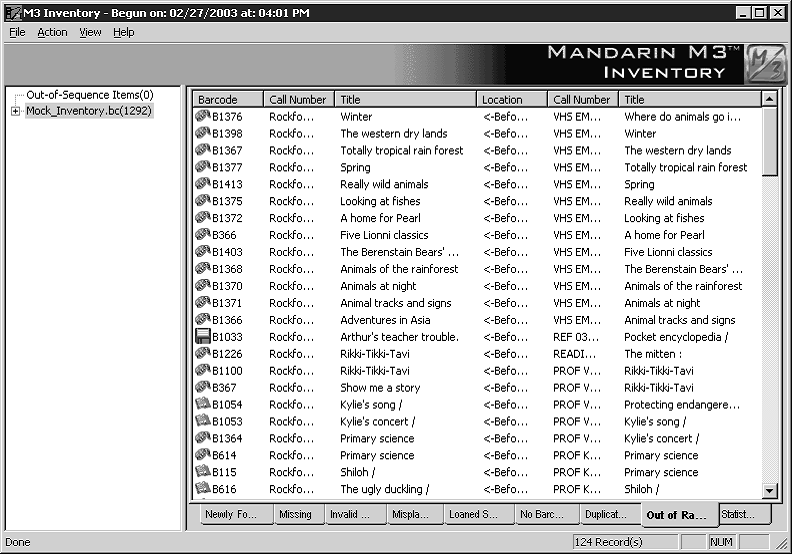
C. Click any tab to view the corresponding information. In Figure 8.8, the Out of Range(s) tab is selected. This information can be printed or saved to a file, if desired. (See “Printing and Saving Results” on
page 8-14.)
FIGURE 8.8

10. To place a “missing” status in the corresponding holding records of all items listed in the Missing tab:
A. Click the Missing tab. Some items may display in black and some in red. Black signifies the item was listed as missing in a previous inven- tory. Red signifies the item was listed as missing during this inventory.
B. On the Action menu, click Mark Missing Items. At the confirmation prompt, click OK. This turns all red items to black and places a status of “missing” in the corresponding holding records.