Using Inventory
This chapter describes:
• How to conduct a full inventory
• How to conduct a partial inventory
• How to enter additional barcodes after the barcode records have been uploaded
• How to remove barcodes during the inventory process
• How to print and save inventory results
• How to export a barcode list of inventory results
• How to open a previously saved inventory session or report
ABOUT M3 INVENTORY
Using M3 Inventory, you can conduct a full or partial inventory of your library’s holdings. A full inventory involves scanning the entire collection during one time period. A partial inventory involves scanning portions of the collection at any time throughout the year. Both types of inventory are explained in this chapter.
Conducting an inventory with M3 requires only a few basic steps. First, the items to be inventoried need to be scanned. Then the scanning results need to be uploaded into the M3 Inventory module. If conducting a partial inventory, the range limits of the corresponding holdings need to be entered. Lastly, the “Do Inventory” procedure must be run to compare the scanned barcodes to the corre- sponding holdings database.
When M3 Inventory compares the scanning results to the contents of the holdings database, it groups and categorizes any differences as Newly Found, Missing, Invalid Barcode, Misplaced, Loaned Shelved, No Barcode, Duplicate Barcode, or Out of Range(s) Items. Once the results are compiled, you can print the results lists needed to reconcile your inventory.
STARTING M3 INVENTORY
If desired, you can run the M3 Inventory module while other M3 modules are open. However, to ensure accurate inventory results, you should not circulate or catalog items while the collection is being scanned.
To start the M3 Inventory module:
1. On the taskbar, click the Start button, select Programs, select Mandarin M3, and then click Inventory. This displays the Inventory Login dialog box.
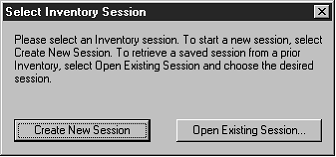
2. Type your user ID in the Login Name box, your password in the Password box, and then click OK. This displays the Select Inventory Session window (Figure 8.1).
FIGURE 8.1

3. Click Create New Session or Open Existing Session.
• If you click Create New Session, the main M3 Inventory window displays
(Figure 8.2), ready for you to conduct an inventory.
• If you click Open Existing Session, the Open dialog box displays. Navi- gate to the inventory session file you want to open, then click OK. This opens the session in the main M3 Inventory window (Figure 8.2).
INVENTORY WINDOW FEATURES
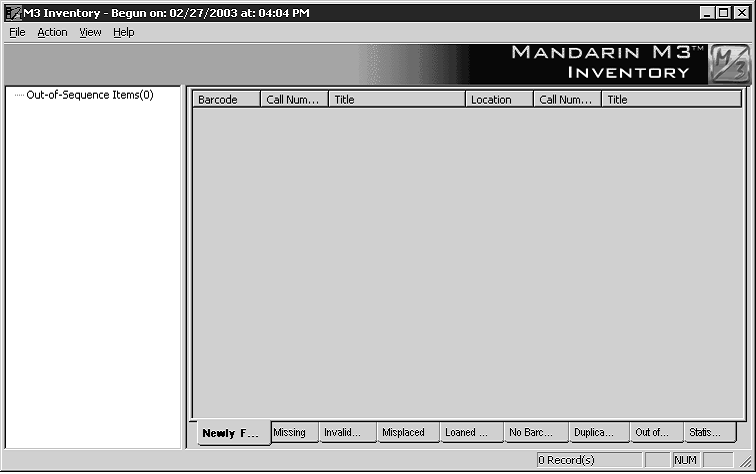
All M3 Inventory functions can be accessed from the main Inventory window. The Inventory window (Figure 8.2) is divided into three parts: the Inventory menu bar, the Barcode pane (left pane), and the Inventory pane (right pane).
FIGURE 8.2

• Inventory menu bar – Contains the File, Action, View, and Help menus:
• File menu – Allows you to open and save sessions, add and remove a barcode or a barcode file, upload barcodes from the scanner, open or save an inventory report, export barcodes, print reports, and con- figure the print setup.
• Action menu – Allows you to run the Do Inventory procedure, clear all lists, mark items, run user-defined reports, and access Inventory Options.
• View menu – Allows you to change the language of the interface, view a summary of inventory statistics, and turn the status bar on and off.
• Help menu – Allows you to access Inventory Help topics and connect to the Mandarin Web page.
• Barcode pane – Displays the barcode files you are working with.
• Inventory pane – Displays the results of your inventory procedure. It is divided into nine tabs, corresponding to the results of the barcode scan- ning. These tabs are: Newly Found, Missing, Invalid Barcode, Misplaced, Loaned Shelved, No Barcode, Duplicate Barcode, Out of Range(s), and Statistics.
NOTE: Media type icons display in the Inventory pane in all tabs (except Statistics) alongside items that have a media type assigned. For information on assigning media types, see “Appendix E: Configuring Media Type Icons” on page E-1. To disable these icons, change the HasIcons entry in the InventoryDisplay.ini file (located in the Inventory folder in your M3 directory) from 1 to 0, then restart the Inventory module.
SELECTING AN INTERFACE LANGUAGE
In M3 Inventory, you can specify the interface language. This affects screen ele- ments such as names of windows, buttons, and text boxes; it does not affect the language of the records in your database.
To select an interface language:
1. On the View menu, click Languages. This displays a sub-menu with the lan- guages available for selection.
2. Click the language you want to use. This refreshes your Inventory interface to display the selected language.