The M3 Picture Manager utility allows you to import multiple image files and auto- matically link the images to the appropriate bibliographic or patron records. Once imported, images can be displayed alongside the records in the Circulation window and the OPAC Search Results, Record Details, and Bookbag windows. Item and patron images can be displayed in Circulation, but only item images can be displayed in the OPAC.
This utility also allows you to update your bibliographic and patron records with pictures that have already been imported. This feature locates the pictures in your picture table and attaches them to the corresponding bibliographic or patron records. You may want to use this feature if, for example, you add bibliographic records to your database after batch importing and linking pictures.
Note: Image files must be in .jpg or .bmp format to be used in M3.
Displaying Imported Pictures
To display images in the OPAC, they must be enabled after import. For instructions, see “Enabling Cover Images” on page 6-31.
Once pictures are imported, they display automatically in Circulation alongside patrons and items in the Patron and Item panes if M3 v1.6 was your first installa- tion of M3. If you had a version of M3 installed prior to installing 1.6, you must do the following:
• Add a graphic cell to the Patron pane for each Circulation mode (Loan, Return, and so on) in which you want an image to display; changes made to one mode will not apply to the other modes. For instructions, see “Modifying the Patron Pane Display” on page 5-59.
• Add a graphic cell to the Item pane for each Circulation mode (Loan, Return, and so on) in which you want an image to display; changes made to one mode will not apply to the other modes. For instructions, see “Modifying the Item Pane Display” on page 5-64.
Importing Pictures
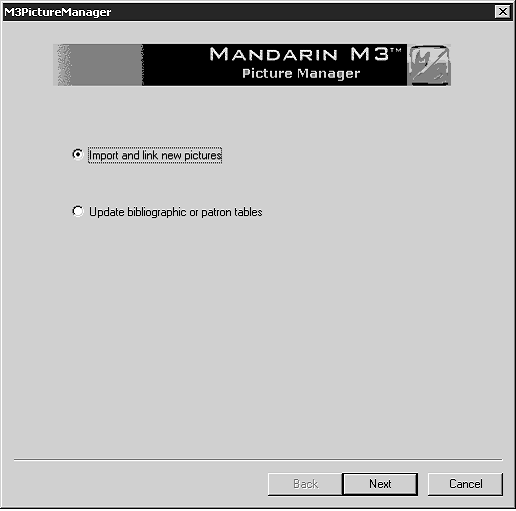
1. On the File menu, select Import, then click Pictures. This displays the M3 Picture Manager window (Figure 4.47).
FIGURE 4.47
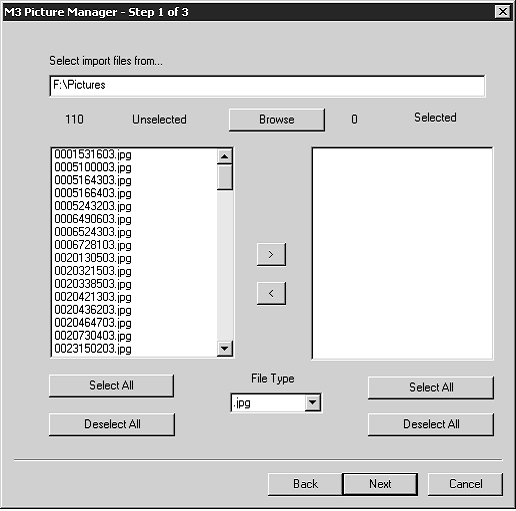
2. Click Import and link new pictures, then click Next. This displays the Step 1 dialog box (Figure 4.48).
FIGURE 4.48
3. Locate the image files you want to import.
• In the Select import files from box, type the path of the image files to import. The file names display in the Unselected box.
OR
• Click Browse. This displays the Open dialog box. Navigate to the direc- tory containing the files, then click OK. The file names display in the Unselected box.
NOTE: Images are listed only if they are the type selected in the File Type list; if desired, select a different type. Only .jpg or .bmp files will be imported.
4. Move each file you want to import from the Unselected box to the Selected box. To do so, select each of the files you want to import, then click the > button. To move all files, click Select All, then click the > button.
5. Click Next. This displays the Step 2 dialog box (Figure 4.49)
FIGURE 4.49
6. The first picture to be imported displays.
• If you want to import all pictures you selected in the Step 1 dialog box without viewing them, click Import.
• If you want to view each picture you selected, click Import or Don’t import for this image, and then click Next Picture. Repeat for each pic- ture you want to view. To skip to the end of the picture list, click Import or Don’t import for the remaining images.
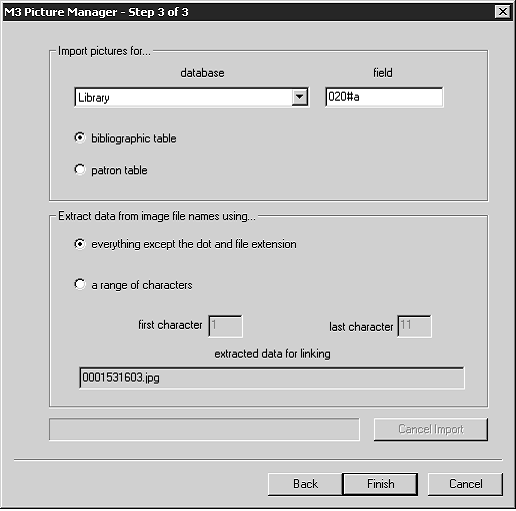
7. Click Next. This displays the Step 3 dialog box (Figure 4.50).
FIGURE 4.50
Note: To disable the field option, change the Allow Match Field Edit entry in the Global.ini.REG file (the default path is C:\M3 Server\Registry\Common) from 1 to 0. The default fields can also be modified in this file.
8. In the database list, select the database for which you want to import pic- tures.
9. Click bibliographic table or patron table to indicate the table for which you want to import the pictures.
10. The field box displays the field that will be used to match the picture to a bibliographic or patron record. This field is placed in the 991#b field of the picture record.
11. Click everything except the dot and file extension or a range of characters to indicate how you want to extract data from the image file names.
• If your file names are descriptive names or vary in length, select every- thing except the dot and file extension. The names of all picture files being imported must be the same length to use a range of characters.
• If you select a range of characters, enter the appropriate numbers in the first character and last character boxes. These numbers will be used to limit the data that is matched in the picture file name. For example, if you enter 3 in the first character box and 10 in the last character box, and the picture file name is 0042789354.jpg, the numbers 42789354 will be matched. The characters to be matched display in the extracted data for linking box. (NOTE: If you choose this option, the names of all picture files being imported must be the same length.)
12. Click Finish. This imports the pictures.
Updating Bibliographic or Patron Records with Pictures Use this feature to update your bibliographic or patron records with pictures that have already been imported. If you have not yet imported pictures, see “Importing Pictures” on page 4-50.
1. On the File menu, select Import, then click Pictures. This displays the M3 Picture Manager window (Figure 4.47).
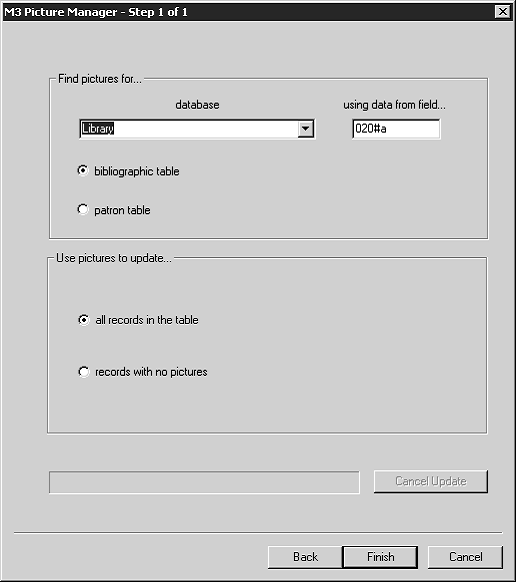
2. Click Update bibliographic or patron tables, then click Next. This displays the Step 1 dialog box (Figure 4.51).
FIGURE 4.51
3. In the database list, select the database for which you want to attach pic- tures.
4. Click bibliographic table or patron table to indicate whether you want to attach pictures to bibliographic records or patron records.
5. The using data from field box displays the field that will be used to match a picture to a bibliographic or patron record. This field is placed in the
991#b field of the picture record.
6. Click all records in the table or records with no pictures (records without a 996 field) to indicate which bibliographic or patron records you want to attach pictures to.
7. Click Finish. This places the ISN of the picture record in the 996#a field of the bibliographic or patron record.
Adding a Picture Field to a Bibliographic or Patron Record To add a picture field to one bibliographic or patron record at a time, follow the procedure below. To import multiple image files at once, follow the procedure in “Importing Pictures” on page 4-50.
1. Display the desired bibliographic or patron record in the Bibliographic - Cataloging (Figure 4.8) or Patron - Cataloging (Figure 4.21) window.
2. Follow the procedure beginning with step 3 in “Adding a Picture Field to a Bibliographic or Patron Record” on page 5-38.


