Using the Grouping Function
If you want all records that have the same value for a particular field to be printed together on a report, they need to be grouped. Grouping differs from sorting in that it only prints associated records together on a report; it does not put the records in order. In the following example, we will create a grouping of all patrons in a particular city.
Step 1: Adding a Group
1. On the Tools menu, click Grouping. This displays the Grouping dialog box
(Figure 7.16).
FIGURE 7.16

2. Select the field that you want to group in the left column, then click the > button to move the field to the Group Fields box. In this example, we will select 110#b (City). When finished, click Close.
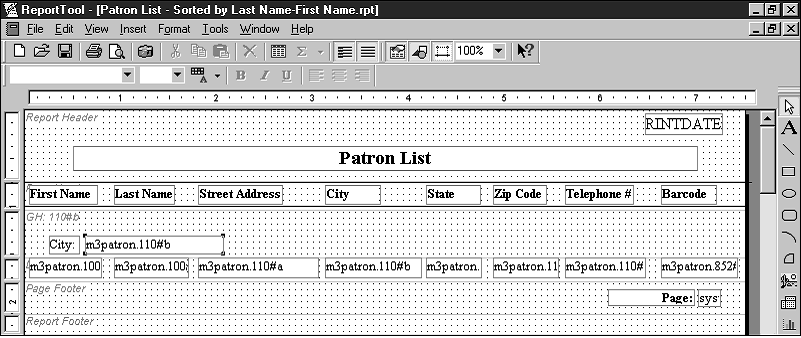
Step 2: Adding a Group Header
1. On the Tools menu, click Grouping. This displays the Grouping dialog box
(Figure 7.16). M3Patron.110#b now appears in the Group Fields box.
2. Click M3Patron.110#b in the Group Fields box. This enables the Group Break
Options group. Select the Header check box, then click Close.
3. The report window now displays the 110#b field in the Group Header (GH) section as shown in Figure 7.17.
FIGURE 7.17

Step 3: Adding a Field and Field Label
1. On the Insert menu, click Fields. This displays the Fields window (Figure 7.13).
2. Drag 110#b into the Group Header (GH: 110#b) section of the report, then close the Fields window. This adds the new field.
3. Click the text box that contains the column header City and press
CTRL+C. This copies the text box.
4. Click in the Group Header section, then click CTRL+V. This pastes the copied text box and adds the new field label.
5. Click in the new City text box and type a colon (:) after the word City. Align the new text box so that City appears as the field label as shown in
Figure 7.18
FIGURE 7.18
6. In order for your report to group and sort properly, you must add the M3Patron.110#b field to your sort criteria. For instructions, see “Step 7: Adding and Sorting Fields” on page 7-13.