Working with Bibliographic Records
Cataloging Window Features
The bibliographic version of the Cataloging window (Figure 4.2) has a split window that displays brief bibliographic and holding records. The bibliographic record version of this window is shown in Figure 4.2.
FIGURE 4.2
• Cataloging menu bar – Contains the File, Edit, View, and Help menus.
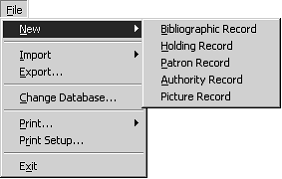
• From the File menu (Figure 4.3), create new records, import and export records, change databases, and access printing commands.
FIGURE 4.3
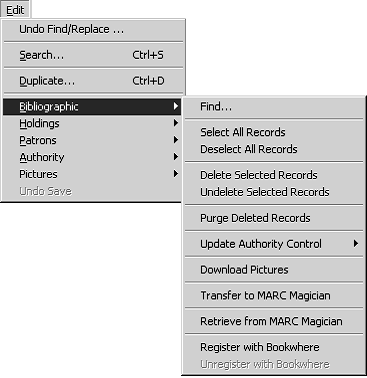
• From the Edit menu (Figure 4.4), access the commands Undo Find/ Replace, Search, Duplicate, Find, Select/Deselect All Records, Delete/Unde- lete Selected Records, Purge Deleted Records, and Undo Save, as well as several optional features (if they are available in your M3 system).
FIGURE 4.4
Tip: To sort information by any field in the pane, click the field’s column heading. One click sorts in ascending order; a second click sorts in descending order.
• From the View menu, enable/disable the status bar display on the Cat- aloging window.
• From the Help menu, access Cataloging Help topics and connect to the
Mandarin Web page.
• Column headings – Each pane includes a set of column headings. These are names that identify the MARC record field displayed below each heading.
• Bibliographic records pane – After a bibliographic record search, this pane lists brief bibliographic records matching the search query. Your library can configure which MARC fields display in this pane.
• Holding records pane – After a bibliographic record search, this pane lists brief holding records matching the search query. The list of holding records corresponds to the bibliographic record selected in the upper pane. Your library can configure which MARC fields display in this pane.
• Status bar – The status bar displays the current database being used and the number of bibliographic and holding records found matching the search query.
Searching for a Bibliographic Record
The Search Dialog Box
The default bibliographic version of the Search dialog box is shown in Figure 4.5.
FIGURE 4.5
Search Tips:
• You can apply the trunca- tion asterisk (*) to the begin- ning and/or end of a keyword; the wildcard question mark (?) character within a keyword (wom?n); and quotation marks (“ ”) around a phrase.
• You can use the AND, OR, and NOT Boolean operators to connect keywords within a keyword box. Be sure to type operators in capital letters.
All M3 Search dialog boxes use the keyword search method. You can search for keywords in as many as three bib record fields.
NOTE: Options in the record field lists are the search attributes defined by Z39.50 protocol. Among other options, they include MARC record fields and indexes of multiple MARC record fields. For simplicity, this Users Guide refers to them as MARC fields.
Your system can be configured to display different default MARC fields and
Boolean operators.
How to Search
To search for a bibliographic record:
1. On the Edit menu, click Search. This displays the Search dialog box (Figure 4.5).
2. In the Search For list, select Bibliographic.
3. Type your search query into the appropriate keyword boxes. To select a different MARC field or Boolean operator, click the arrow next to the appropriate list, and then select the preferred field or operator.
4. Click Search. This displays a list of records matching your search query (Figure 4.6).
FIGURE 4.6
5. From here, you can:
• Click any bib record in the upper pane to display corresponding holding records in the lower pane.
• Double-click a brief bib or holding record to view its full MARC record. A full MARC bib record matching this search is shown in Figure 4.12; a full MARC holding record is shown in Figure 4.17.
• Select a check box to tag the corresponding record for deletion or printing. To tag a block of records, select the first record and press SHIFT while selecting the last record; this tags all records in between.
• Print tagged records or all records in the list. To do so, select Print on the File menu, then click Records (to print tagged) or List (to print all).
• Create a new similar record by clicking Duplicate on the Edit menu. (For instructions, see “Creating a Bibliographic Record” on page 4-6.)
• Move (not copy) a holding record from one bib record to a different bib record. To do so, click and drag the holding record to the appro- priate bib record.
• Start another search from the Edit menu.
Creating a Bibliographic Record
There are three ways to create a new bibliographic record: (1) You can use a tem- plate and edit it to match the new record; (2) You can duplicate an existing biblio- graphic record, then edit it to create the new record; (3) You can click New in the After Saving group when creating or editing a different bib record. The first two methods are explained in the following sections, “From a Template” and “By Dupli- cating an Existing Bib Record.” The third method is explained in the New bullet in step 5 of “Editing a Bibliographic Record” on page 4-8.
From a Template
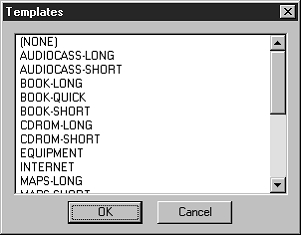
1. On the File menu, select New, and then click Bibliographic Record. This dis- plays the Templates dialog box (Figure 4.7).
FIGURE 4.7
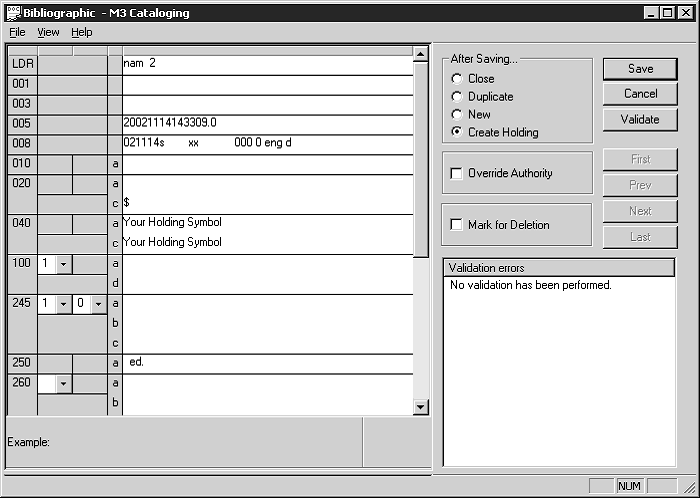
2. Click the appropriate template for the record you want to create, then click OK. This displays the template in the Bibliographic - Cataloging window (Figure 4.8).
FIGURE 4.8
Note: If you do not want empty fields to be deleted when the record is saved, change the Strip Empty Fields entry in the Active- MarcEdit.ini file (located in your M3 directory) to OVER- RIDE=on, then restart the Cataloging module. Authority Control users should not change this setting.
FIGURE 4.9
Tip: To insert a picture field in this record so a picture displays alongside the record when it is involved in a trans- action, see “Adding a Picture Field to a Bibliographic or Patron Record” on page 5-38.
3. Enter field and subfield data for the new record. To move through the record, use your keyboard up and down arrows. Notice that status bar information changes to identify the selected field and subfield.
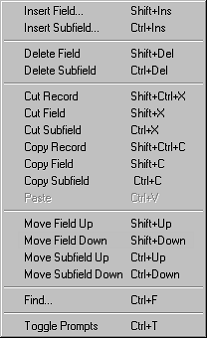
• To access a menu with edit commands (Figure 4.9), right-click the field or subfield you want to edit. From this menu, you can insert, delete, cut, copy, paste, and move fields. You can click Find to locate text within this record, or click Toggle Prompts to change the MARC field labels from numbers to text.
• To access a list of fixed field standard choices (including position and legal characters) pertaining to a particular fixed field, double-click in the field. The dialog box for fixed field 008 is shown in Figure 4.10. You can define your fixed field by typing in text or, where available, clicking the arrow button and selecting an option in the list. When fin- ished, click OK.
FIGURE 4.10
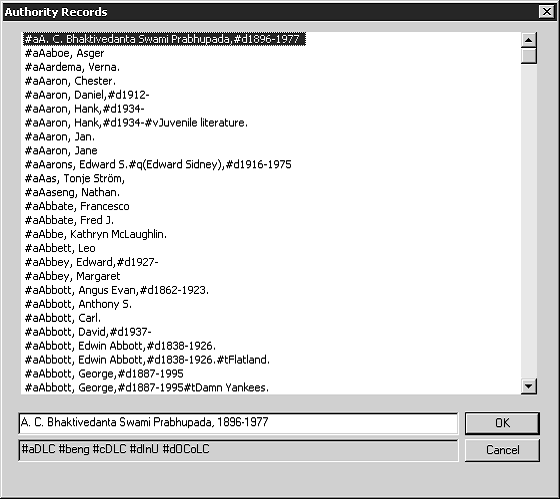
• If you are using a version of M3 that supports Authority Control, and the field you want to edit is managed under Authority Control, then the field is not editable (unless you use the Override Authority feature explained on page 4-10). To select an authority record, click subfield a in the white edit area of the subfield (shown in Figure 4.12). This displays the Authority Records dialog box (Figure 4.11).
FIGURE 4.11
Select the authority record you want to use, then click OK. This returns you to the Bibliographic - Cataloging window (Figure 4.8) and enters the new record in the selected field.
• To save a version of this record as a template for future use, click Save As Template on the File menu.
4. Click Validate to check for errors in the record. If any errors appear in the Validation Errors box, fix or ignore them. To view information explaining each error, click the plus (+) sign to the left of the error.
5. When finished editing the record and validating errors (but before saving), click an option in the After Saving group to indicate what you want to happen after you save the record. The options are:
• Close exits the saved record and returns to the Cataloging window.
• Duplicate creates a new record identical to the one you are saving; you can edit the duplicate record to create another record.
• New exits the saved record and displays a new template window to modify. (If more than one bib template is available, the Templates dialog box displays. Select a template, then click OK.)
• Create Holding exits the saved record and displays a corresponding holding record template where you can add local information such as call number, barcode number, and location. If more than one template is available, the Templates dialog box displays, allowing you to select a template.
6. To mark this record for deletion, select the Mark for Deletion check box.
For instructions on purging records marked for deletion, see “Step 2: Purging Records Marked for Deletion” on page 4-47.
7. When finished, click Save. This saves the record and displays another record or the Cataloging window, depending on which option you selected in the After Saving group.
By Duplicating an Existing Bib Record
1. On the Edit menu, click Search. This displays the Search dialog box (Figure 4.5).
2. In the Search For list, select Bibliographic.
3. Type your search query into the appropriate boxes. To select a different MARC field or Boolean operator, click the arrow next to the appropriate list, and then select the preferred field or operator. (For search tips, see page 4-4.)
4. Click Search. This displays a list of bib and holding records matching your search query.
5. Click the bib record to be duplicated. On the Edit menu, click Duplicate.
This displays the Bibliographic - Cataloging window (Figure 4.8) con- taining the corresponding full MARC record. This is a duplicate MARC bib record.
6. Edit this record as needed. For instructions, see steps 3 through 5 begin- ning on page 4-7.
7. When finished, click Save. This saves the record and displays another record or the Cataloging window, depending on which option you selected in the After Saving group.
Editing a Bibliographic Record
To edit a bib record:
1. If the record to be edited is not displayed:
A. On the Edit menu, click Search. This displays the Search dialog box (Figure 4.5).
B. In the Search For list, select Bibliographic.
C. Type your search query into the appropriate boxes. To select a different MARC field or Boolean operator, click the arrow next to the appropriate list, and then select the preferred field or operator. (For search tips, see page 4-4.)
D. Click Search. This displays a list of bib and holding records matching your search query.
E. Double-click the bib record you want to edit. This displays the selected record in full MARC format (Figure 4.12).
FIGURE 4.12
Tip: To navigate through the records in the search results list, click the navigation buttons First, Prev, Next, and Last.
Note: To have access to the Override Authority feature, the Override Authority check box must be selected in Group Editor.
2. Edit this record as needed. For instructions, see steps 3 through 6 begin- ning on page 4-7.
3. When finished, click Save. This saves the record and displays another record or the Cataloging window, depending on which option you selected in the After Saving group.
Using the Override Authority Feature
If you are using a version of M3 that supports Authority Control, the Override Authority feature allows you to edit fields in a bibliographic record that are man- aged under Authority Control. It can be utilized when creating or editing a biblio- graphic record.
To use the Override Authority feature:
1. Display the bibliographic record you want to edit in the Bibliographic - Cataloging window (Figure 4.12). (For instructions on locating and dis- playing a record, follow steps 1A through 1E in “Editing a Bibliographic Record” on page 4-9.)
2. Select the Override Authority check box. This makes all Authority Control- managed fields editable.
3. Click in the white edit area of the field you want to edit and type new entries as desired.
4. When finished, click Save in the Bibliographic - Cataloging window.
5. Verify your bibliographic records for consistency. To do so, see the following section, “Verifying Bibliographic Records with Authority Control.”
Note: After the update, any records that cannot be veri- fied appear in the Cataloging window.
Verifying Bibliographic Records with Authority Control
If you are using a version of M3 that supports Authority Control, you will want to verify your bibliographic records for consistency after the initial record import and subsequent imports. When you update, M3 matches the authority fields in all bibliographic records against the local authority table to ensure that all records are using the correct authority fields.
Verifying Records
To verify all records or newly added records:
On the Edit menu, select Bibliographic, select Update Authority Control, and then click one of the following:
• Verify All – Checks all records.
• Verify New – Checks all records added since the last update.
To verify selected records:
1. In the brief MARC record list, select the check box by each bibliographic record you want to verify.
2. Right-click in the Bibliographic records pane. In the command menu, click
Verify Selected Records. This checks only the selected records.
Unlinking Bibliographic Records from Authority Records If you are using a version of M3 that supports Authority Control, you can remove the links between ALL bibliographic and authority records. To do so:
On the Edit menu, select Bibliographic, select Update Authority Control, and then click Unlink Bibliographic.
NOTE: To use Authority Control after performing this procedure, you must click Verify All to reverify your records. For instructions, see the preceding section, “Verifying Bibliographic Records with Authority Control.”

