Working with Holding Records
Cataloging Window Features
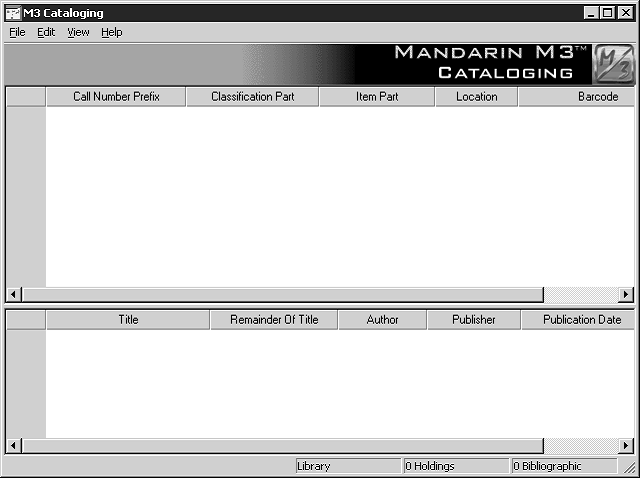
As with the bib version of the Cataloging window, the holding record version has a split window that displays brief bibliographic and holding records. However, the panes are reversed; the holding record appears in the top pane and the corre- sponding bib record appears in the lower pane. The holding version of the window is shown in Figure 4.13. The other window features are similar to the bib version; see “Cataloging Window Features” on page 4-2 for descriptions.
FIGURE 4.13

Searching for a Holding Record
The Search Dialog Box
The default holding version of the Search dialog box is shown in Figure 4.14.
FIGURE 4.14

All M3 Search dialog boxes use the keyword search method. You can search for keywords in as many as three holding record fields.
NOTE: Options in the record field lists are the search attributes defined by Z39.50 protocol. Among other options, they include MARC record fields and indexes of multiple MARC record fields. For simplicity, this Users Guide refers to them as MARC fields.
Your system can be configured to display different default MARC fields and Boolean operators.
How to Search
To search for a holding record:
1. On the Edit menu, click Search. This displays the Search dialog box (Figure 4.14).
2. In the Search For list, select Holdings.
3. Type your search query into the appropriate keyword boxes. To select a different MARC field or Boolean operator, click the arrow next to the appropriate list, and then select the preferred field or operator. (For search tips, see page 4-4.)
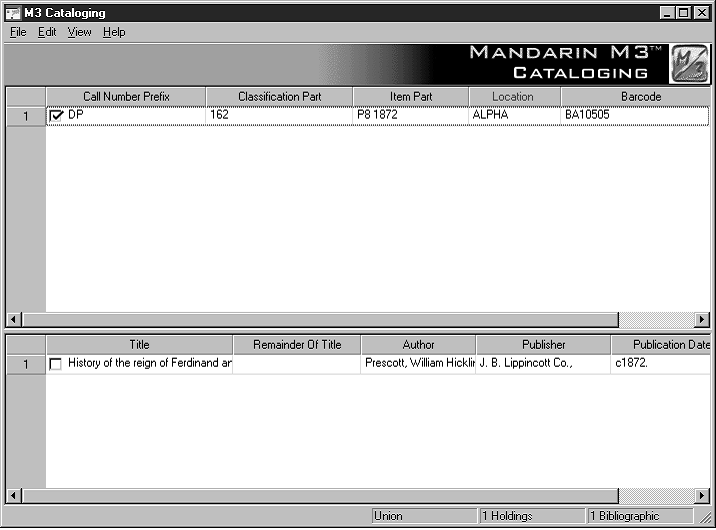
4. Click Search. This displays a list of records matching your search query (Figure 4.15).
FIGURE 4.15

5. From here, you can:
• Double-click a brief holding or bib record to view its full MARC record. A full MARC holding record matching this search is shown in Figure 4.17.
• Select a check box to tag the corresponding record for deletion or printing. To tag a block of records, select the first record and press SHIFT while selecting the last record; this tags all records in between.
• Print tagged records or all records in the list. To do so, select Print on the File menu, then click Records (to print tagged) or List (to print all).
• Create a new similar record by clicking Duplicate on the Edit menu. (For instructions, see “Creating a Holding Record” on page 4-14.)
• Start another search from the Edit menu.
Creating a Holding Record
To create a holding record:
1. Locate the bib record matching the holding record you want to create.
A. On the Edit menu, click Search. This displays the Search dialog box (Figure 4.14).
B. In the Search For list, select Bibliographic.
C. Type your search query into the appropriate boxes. To select a different MARC field or Boolean operator, click the arrow next to the appropriate list, and then select the preferred field or operator. (For search tips, see page 4-4.)
D. Click Search. This displays a list of bib and holding records matching your search query (Figure 4.15).
2. Click the bib record matching the holding record you want to create.
• If a holding record similar to the one you want to create appears in the lower pane, use this as a template. Click the brief holding record, then click Duplicate on the Edit menu.
OR
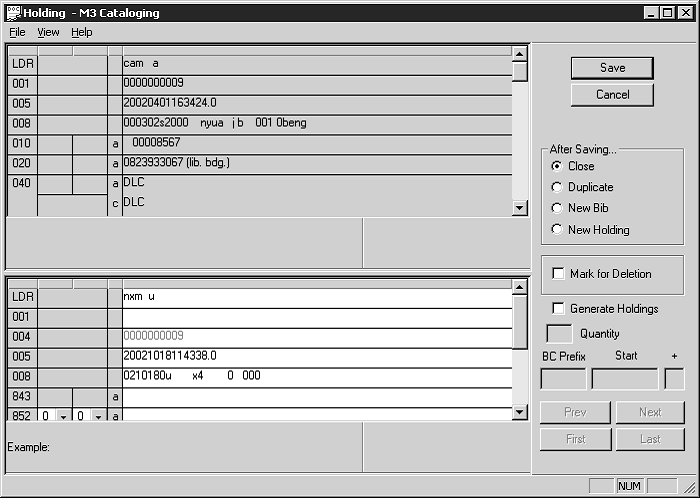
• If no similar holding record exists, select New on the File menu, and then click Holding Record. (If more than one holding template is avail- able, the Templates dialog box displays (Figure 4.7). Click the desired template, then click OK.) This displays the holding record template in the Holding - Cataloging window (Figure 4.16). The template displays some entries from the bib record you selected, including the prefix (852#k).
FIGURE 4.16

3. Enter field and subfield data for the new record. For instructions, see step 3 beginning on page 4-7. NOTE: Since Authority Control fields are not available for holding records, skip the Authority Control option explained on page 4-8.
Tip: If you want the holding record to display a status of “unavailable” in the OPAC (for example, until you have received the item), insert field 994#a (Status). In the 994#a field list, select i=IN PROCESS.
4. When finished editing the record (but before saving), click an option in the After Saving group. This selection indicates what you want to happen once you save the record. The options are:
• Close exits the saved record and returns to the Cataloging window.
• Duplicate creates a new record identical to the one you are saving; you can edit the duplicate record to create another record.
• New Bib exits the saved record and displays the Templates dialog box, allowing you to select a new bib template to edit.
• New Holding exits the saved record and displays a new holding tem- plate to edit in the holding records pane. If more than one holding template is available, the Templates dialog box displays, allowing you to select a template.
Note: You cannot generate holdings from a holding record that is marked for dele- tion.
Note: The prefix and suffix values are assigned in 852#p.
Note: Do not select the Mark for Deletion check box if you selected the Generate Hold- ings option in step 4.
OR
• Select the Generate Holdings check box to create multiple holding records, using the holding record displayed in the lower pane as a template.
A. Type the number of holdings you want to add in the Quantity box.
NOTE: This number is in addition to the holding records that already exist for this bibliographic record.
B. If the record’s barcode has a prefix, it appears in the BC Prefix box. Modify if desired. If the barcode does not have a prefix and you would like to add one, type a value in the BC Prefix box.
C. The barcode suffix appears in the Start box. Modify if desired. The suffix must be a numeric value and will be the starting value for the barcodes of the new holding records.
D. In the + box, type the number by which you want the suffix to increment. For example, if the values are 1000 in the Start box and 2 in the + box, the first holding record will be assigned a barcode of [Prefix]1000 and the next holding record will be assigned [Prefix]1002.
5. To mark this record for deletion, select the Mark for Deletion check box.
For instructions on purging records marked for deletion, see “Step 2: Purging Records Marked for Deletion” on page 4-47.
6. When finished, click Save. This saves the record and displays another record or the Cataloging window, depending on which option you selected in step 4.
NOTE: If you selected Generate Holdings in step 4 and a barcode created by this procedure already exists, an error message displays and no holdings are created. Click OK and modify the value in the Start and/or + box, then click Save again.
Editing a Holding Record
To edit a holding record:
1. If the record to be edited is not displayed:
A. On the Edit menu, click Search. This displays the Search dialog box (Figure 4.14).
B. In the Search For list, select Holdings.
C. Type your search query into the appropriate boxes. To select a different MARC field or Boolean operator, click the arrow next to the appropriate list, and then select the preferred field or operator. (For search tips, see page 4-4.)
D. Click Search. This displays a list of bib and holding records matching your search query.
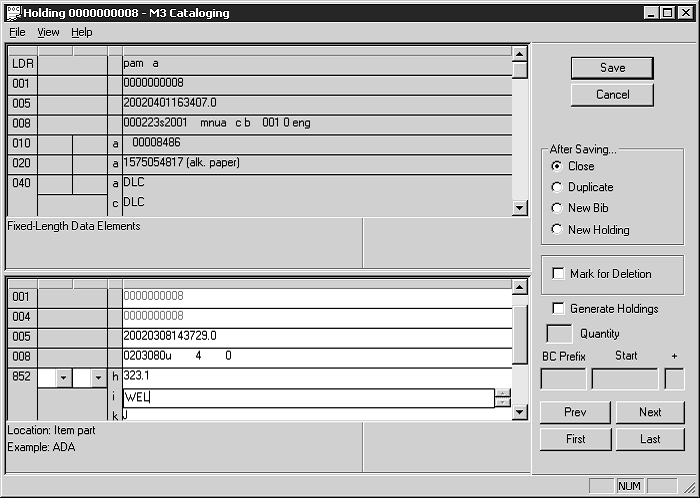
E. Double-click the holding record you want to edit. This displays the selected record in full MARC format (Figure 4.17).
FIGURE 4.17

Tip: To navigate through the records in the search results list, click the navigation buttons Prev, Next, First, and Last.
2. Edit this record as needed. For instructions, see step 3 beginning on page 4-7. NOTE: Since Authority Control fields are not available for holding records, skip the Authority Control option explained on page 4-8.
3. When finished editing the record (but before saving), click an option in the After Saving group or select the Generate Holdings check box. For instructions, see step 4 on page 4-15.
4. To mark this record for deletion, select the Mark for Deletion check box.
For instructions on purging records marked for deletion, see “Step 2: Purging Records Marked for Deletion” on page 4-47.
5. When finished, click Save. This saves the record and displays another record or the Cataloging window, depending on which option you selected in the After Saving group.