Working with Patron Records
Cataloging Window Features
The patron version of the Cataloging window is similar to the bib version (shown in Figure 4.2), except it only contains patron records. The patron version of the window is shown in Figure 4.18. The other window features are similar to the bib version; see “Cataloging Window Features” on page 4-2 for descriptions.
FIGURE 4.18

Searching for a Patron Record
The Search Dialog Box
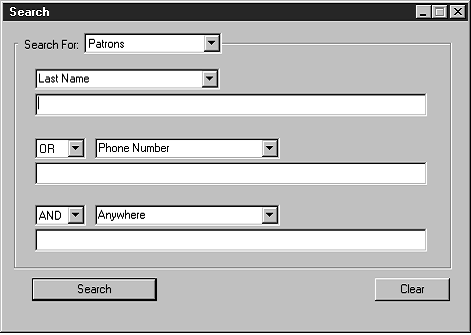
The default patron version of the Search dialog box is shown in Figure 4.19.
FIGURE 4.19

All M3 Search dialog boxes use the keyword search method. You can search for keywords in as many as three patron record fields.
Your system can be configured to display different default patron record fields and Boolean operators.
How to Search
To search for a patron record:
1. On the Edit menu, click Search. This displays the Search dialog box (Figure 4.19).
2. In the Search For list, select Patrons.
3. Type your search query into the appropriate keyword boxes. To select a different MARC field or Boolean operator, click the arrow next to the appropriate list, and then select the preferred field or operator. (For search tips, see page 4-4.)
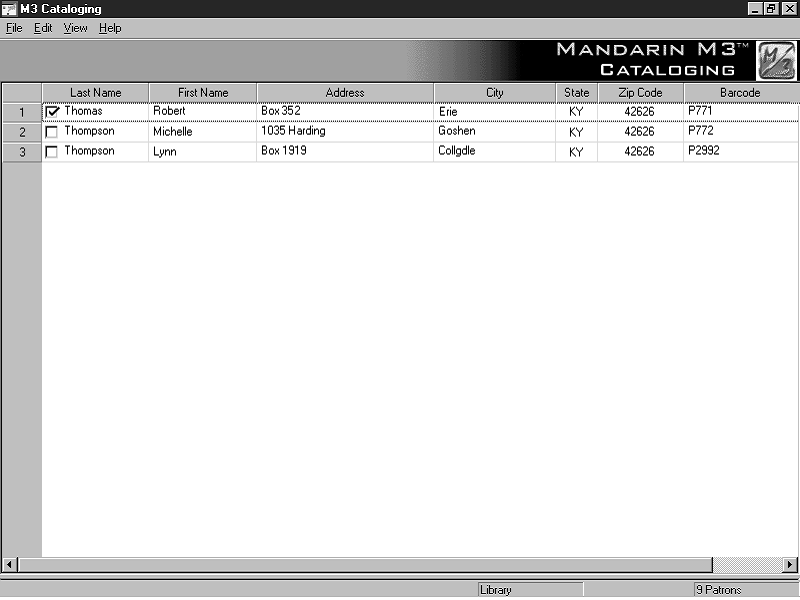
4. Click Search. This displays a list of records matching your search query
FIGURE 4.20

5. From here, you can:
• Double-click a brief patron record to view its full MARC record. A full MARC patron record matching this search is shown in Figure 4.23.
• Select a check box to tag the corresponding record for deletion or printing. To tag a block of records, select the first record and press SHIFT while selecting the last record; this tags all records in between.
• Print tagged records or all records in the list. To do so, select Print on the File menu, then click Records (to print tagged) or List (to print all).
• Create a new similar record by clicking Duplicate on the Edit menu. (For instructions, see “Creating a Patron Record” on page 4-19.)
• Start another search from the Edit menu.
Creating a Patron Record
There are two ways to create a new patron record. (1) You can use a template and edit it to create the new record. (2) You can duplicate an existing patron record, then edit it to create the new record.
From a Template
1. On the File menu, select New, and then click Patron Record. (If more than one patron template is available, the Templates dialog box displays (Figure 4.7). Click the desired template, then click OK.) This displays the patron record template in the Patron - Cataloging window (Figure 4.21).
FIGURE 4.21

Note: To automatically delete all fields left empty when the record is saved, change the Strip Empty Fields entry in the ActiveMarcEdit.ini file (located in your M3 direc- tory) to OVERRIDE=off, then restart the Cataloging module.
Tip: To insert a picture field in this record so a picture displays alongside the record- when it is involved in a trans- action, see “Adding a Picture Field to a Bibliographic or Patron Record” on page 5-38.
2. Enter field and subfield data for the new record. To move through the record, use your keyboard up and down arrows. Notice that status bar information changes to identify the selected field and subfield.
• To access a menu with edit commands (Figure 4.9), right-click the field or subfield you want to edit. From this menu, you can insert, delete, cut, copy, paste, and move fields. You can click Find to locate text within this record, or click Toggle Prompts to change the MARC field labels from numbers to text.
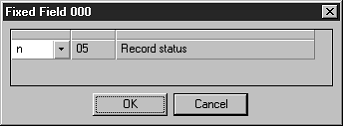
• To access a list of Leader field standard choices (including position and legal characters), double-click in the Leader field. This displays the Fixed Field dialog box (Figure 4.22). In the Record Status list, select a status, then click OK.
FIGURE 4.22

• To save a version of this record as a template for future use, click Save As Template on the File menu.
3. When finished editing the record (but before saving), click an option in the After Saving group to indicate what you want to happen after you save the record. The options are:
• Close exits the saved record and returns to the Cataloging window.
• Duplicate creates a new record identical to the one you are saving; you can edit the duplicate record to create another record.
4. To mark this record for deletion, select the Mark for Deletion check box.
For instructions on purging records marked for deletion, see “Step 2: Purging Records Marked for Deletion” on page 4-47.
5. When finished, click Save. This saves the record and displays another record or the Cataloging window, depending on which option you selected in the After Saving group.
By Duplicating an Existing Patron Record
1. On the Edit menu, click Search. This displays the Search dialog box (Figure 4.19).
2. In the Search For list, select Patrons.
3. Type your search query into the appropriate keyword boxes. To select a different MARC field or Boolean operator, click the arrow next to the appropriate list, and then select the preferred field or operator. (For search tips, see page 4-4.)
4. Click Search. This displays a list of records matching your search query (Figure 4.20).
5. Click the patron record to be duplicated. On the Edit menu, click Duplicate. This displays the Patron - Cataloging window (Figure 4.21) containing the corresponding full patron record. This is a duplicate patron record.
6. Edit the record as needed. For instructions, see steps 2 through 4 begin- ning on page 4-19.
7. When finished, click Save. This saves the record and displays another record or the Cataloging window, depending on which option you selected in the After Saving group.
Editing a Patron Record
To edit a patron record:
1. If the record to be edited is not displayed:
A. On the Edit menu, click Search. This displays the Search dialog box (Figure 4.19).
B. In the Search For list, select Patrons.
C. Type your search query into the appropriate boxes. To select a different MARC field or Boolean operator, click the arrow next to the appropriate list, and then select the preferred field or operator. (For search tips, see page 4-4.)
D. Click Search. This displays a list of brief patron records matching your search query (Figure 4.20).
E. Double-click the patron record you want to edit. This displays the corresponding full record (Figure 4.23).
FIGURE 4.23

Tip: To navigate through the records in the search results list, click the navigation buttons Prev, Next, First, and Last.
2. Edit this record as needed. For instructions, see steps 2 through 4 begin- ning on page 4-19.
3. When finished, click Save. This saves the record and displays another record or the Cataloging window, depending on which option you selected in the After Saving group.