Creating a New Patron Group
1. Select a Catalog database in the Database List.
2. In the New list, select Patron Group, then click the New button on the right. This creates a “New Patron Group1” entry.
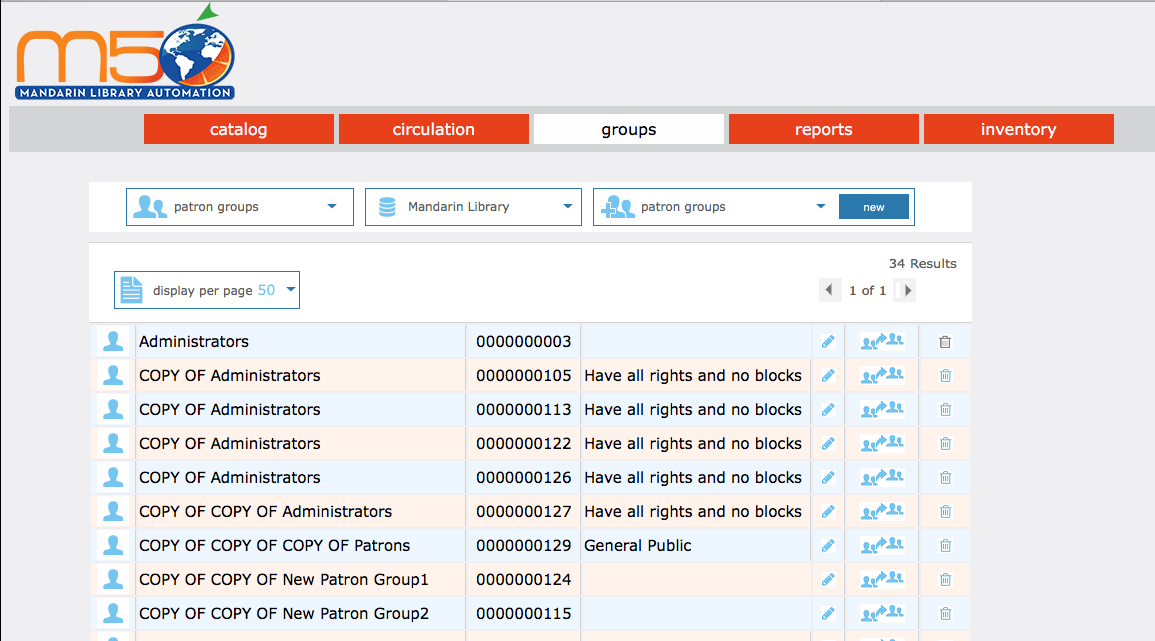
2. In the New list, select Patron Group, then click the New button on the right. This creates a “New Patron Group1” entry.
Note: If the new entry does not
appear, verify that All Groups
or Patron Groups is selected
in the Display list.
3. Click the Edit link  to the right of the new group. This opens the Edit page for the new group. Proceed with the following sections to enter information for this group.
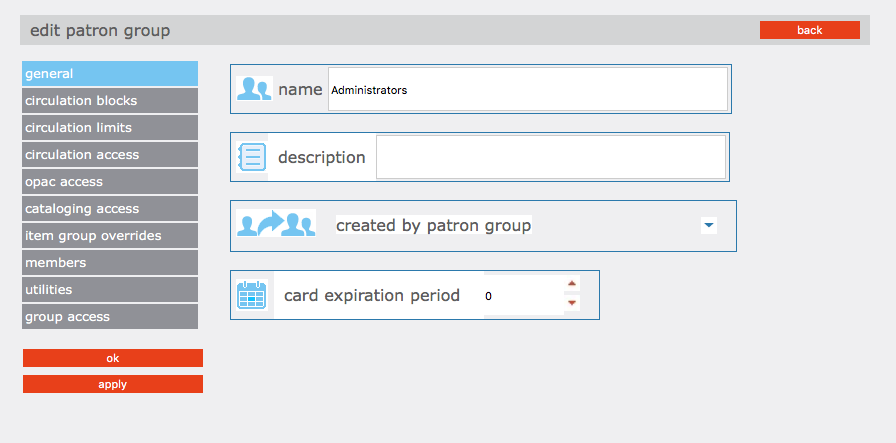
Edit. On this page, enter identification information for the group.
1. In the Name box, type a distinguishing name for the patron group.
2. In the Description box, type any information needed to describe this group. This will display on the main Group Editor page.
3. The Created by Patron Group box displays the patron group of the user that created this group. Only administrators can modify this entry.
4. In the Card Expiration Period box, type or select the number of days a library card issued to a member of this patron group remains valid before requiring renewal.
5. Click Apply to save your entries on this page, then click Circ Blocks in the side menu and proceed to the next section.
Note: When a new patron record is added to the system, the record is assigned
to a patron group. In many libraries, the unique barcode for that patron is placed
on the person’s library card. The library card’s expiration date is calculated from
the number of days entered in the Card Expiration Period box, using the date the
the number of days entered in the Card Expiration Period box, using the date the
new patron record was created as day one.
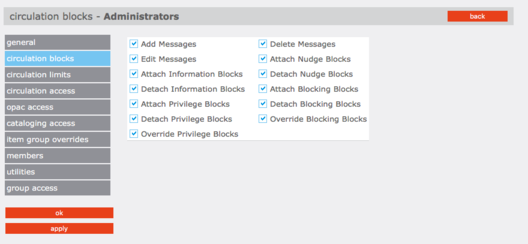
Circ Blocks. On this page, customize the patron group's rights to add, modify, place, remove, and override system messages. Typically, selected library staff members require such rights - general patrons do not.
1. Select the functions needed by members of this patron group:
-
Add, Edit, and Delete Messages allows group members to add, edit, and delete patron and item messages.
-
Attach and Detach Information Blocks allows group members to attach and detach messages assigned the information block type.
-
Attach and Detach Nudge Blocks allows group members to attach and detach messages assigned the nudge block type.
-
Attach, Detach, and Override Privilege Blocks allows group members to attach, detach, or override messages assigned the privilege block type.
-
Attach, Detach, and Override Blocking Blocks allows group members to attach, detach, or override messages assigned the blocking block type.
2. Click Apply to save your entries on this page, then click Circ Limits in the side menu and proceed to the next section.
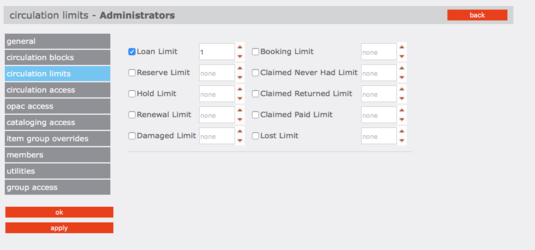
Circ Limits. On this page, customize the circulation quantity limits for the patron group. Specify the maximum number of items for each type of transaction listed.
1. Select a circulation limit, i.e. number of items, for each limit type. To do so:
-
Select the check box next to the desired limit type.
-
In the list next to the limit type, select or enter a limit amount. Enter 0 if none of this type is allowed.
-
Repeat for each limit you want to set. If a limit is not selected, no limit is assigned, i.e. the number of items is unlimited.
2. Click Apply to save your entries on this page, then click Circ Access in the side menu and proceed to the next section.
Note: Depending on your permissions,
some of these options may be unavailable.
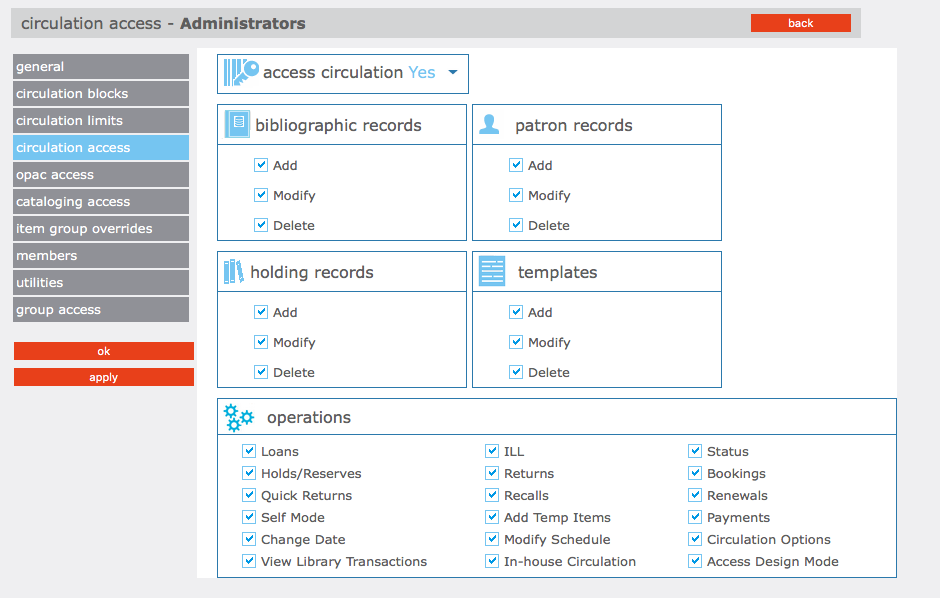
Circ Access. On this page, specify whether this patron group is allowed to access any circulation functions.
1. In the Access Circulation list, select Yes or No. If you select Yes, you can enable any available function listed on the page by selecting the function. Functions are organized into five groups:
-
Bibliographic Records – pertains to bibliographic record maintenance
-
Patron Records – pertains to patron record maintenance
-
Holding Records – pertains to holdings record maintenance
-
Templates – pertains to template record maintenance
-
Operations – lists various types of circulation transactions
If you select No, all functions listed on this page are disabled.
2. Click Apply to save your entries on this page, then click OPAC Access in the side menu and proceed to the next section.
Note: Depending on your permissions,
some of these options may be unavailable.
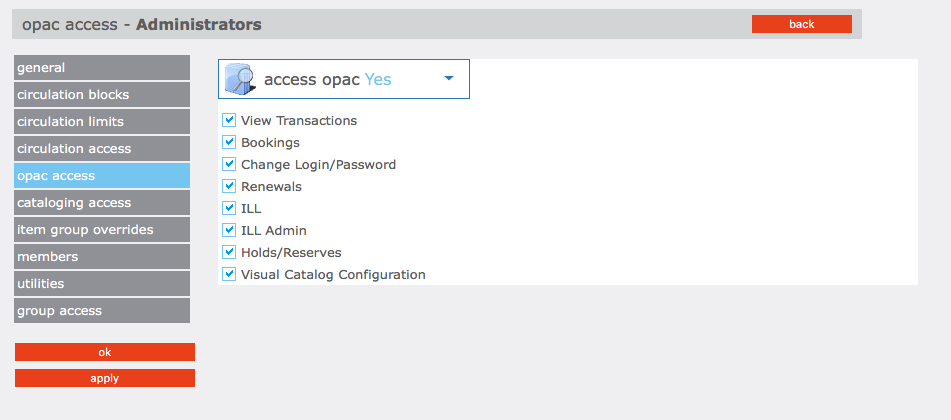
OPAC Access. On this page, specify whether this patron group is allowed to access any OPAC functions. The OPAC is the search feature found in the Catalog tab.
1. In the Access OPAC list, select Yes or No. If you select Yes, you can enable any available function listed on the page by selecting the function. Options are:
-
View Transactions – allows patrons to view their transactions in the My Account tab
-
Renewals – allows patrons to renew items
-
Holds/Reserves – allows patrons to place a hold/reserve on items
-
Bookings – allows patrons to book items
-
ILL – allows patrons to request interlibrary loans
-
Visual Catalog Configuration – allows library staff to configure the Visual Catalog display
If you select No, all functions listed on this page are disabled.
2. Click Apply to save your entries on this page, then click Cataloging Access in the side menu and proceed to the next section.
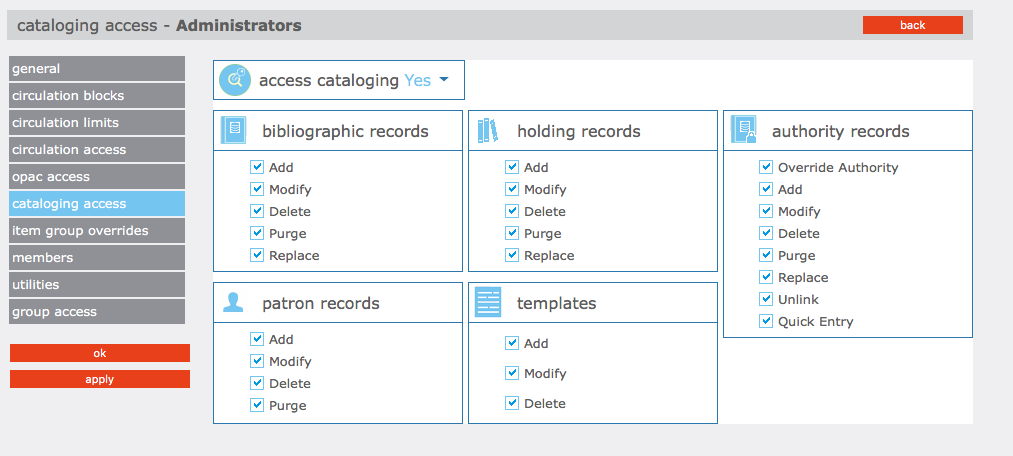
Cataloging Access. On this page, specify whether this patron group is allowed to access any Catalog functions.
1. In the Access Cataloging list, select Yes or No. If you select Yes, you can enable any available function listed on the page by selecting the function. Functions are organized into five groups:
-
Bibliographic Records – pertains to bibliographic record maintenance
-
Holding Records – pertains to holdings record maintenance
-
Patron Records – pertains to patron record maintenance
-
Authority Records – pertains to authority record maintenance
-
Templates – pertains to template maintenance
If you select No, all functions listed on this page are disabled.
2. Click Apply to save your entries on this page, then click Item Group Overrides in the side menu and proceed to the next section.
2. Click Apply to save your entries on this page, then click Item Group Overrides in the side menu and proceed to the next section.
Note: Depending on your permissions,
some of these options may be unavailable.
Note: The Override Authority option and
the options under Authority Records are
available only if you are using a version
of M5 that supports Authority Control.
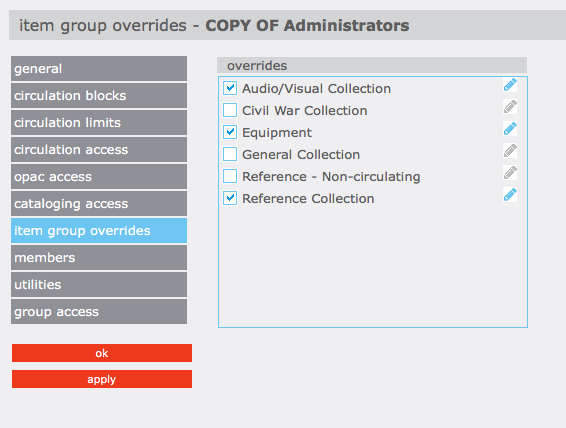
Item Group Overrides. On this page, grant this patron group rights to override specific circulation limits connected to item groups. For example, if the item group “Audio/visual Collection” limits the number of loan renewals to one, you can establish a different limit for this particular patron group.
1. In the Overrides box, click the item group name.
2. While the item group name is selected, click  . A new page opens that displays the circulation limits for the selected item group.
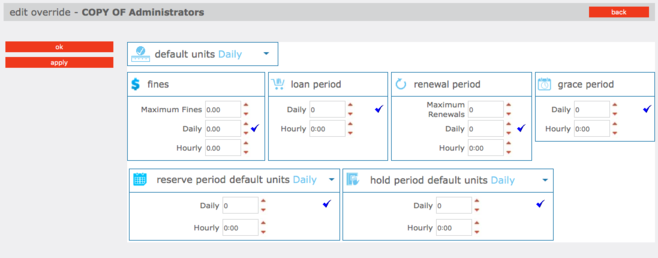
3. In the Default Units list, select Daily or Hourly as the default time unit for Loan Period, Renewal Period, Grace Period, and Fines.
4. In Loan Period, Renewal Period, Grace Period, and Fines, enter the time limit for each period type. Also, enter the following:
Under Renewal Period, enter the maximum number of renewals allowed.
Under Fines, enter the maximum fine amount.
5. Click OK. This returns you to the Item Group Overrides page.
6. Click Apply to save your entries on this page, then click Members in the side menu and proceed to the next section.
 |
 |
|
|
|
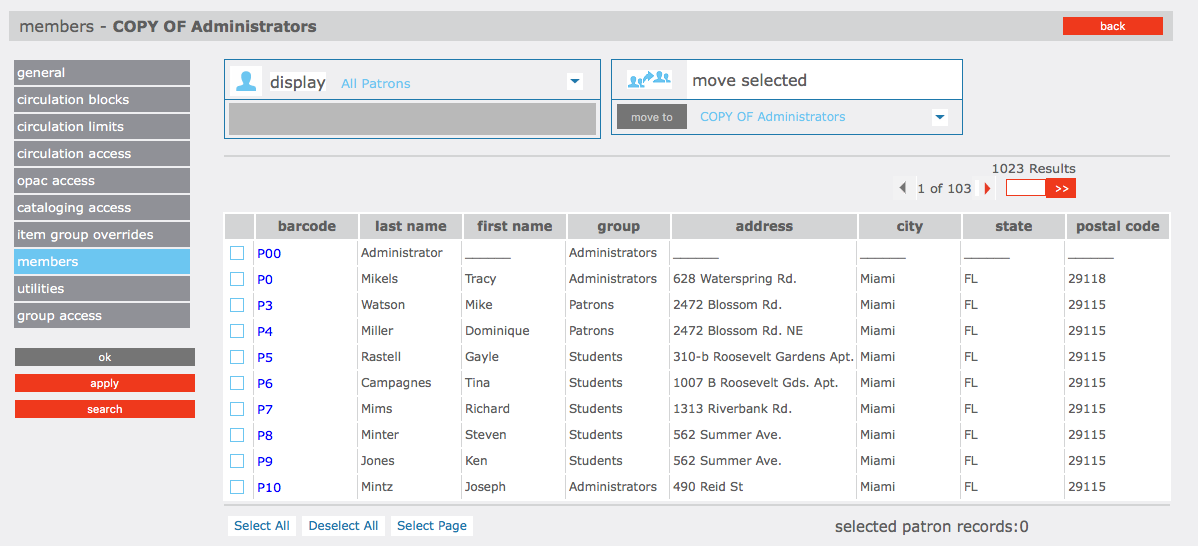
Members. On this page, add and remove patron group members. Skip this page if you have not yet entered any patron records for this group. You can add members to this group later using the Edit function.
1. In the Display list, select All Patrons. This displays a list of all patrons, not just patrons currently assigned to this group.
2. Select the check box next to each patron you want to add to the patron group. To locate specific patrons:
-
In the side menu, click Search. This displays the Search page.
-
Type your search query into the appropriate boxes. To select a different MARC field or Boolean operator, click the arrow next to the appropriate list, and then select the preferred field or operator. Then click Search. This displays a list of patrons matching your search query.
3. Under Move selected records, the new group name displays. To move the selected patrons to this group, click the >> button on the left. This displays the new group with its assigned patrons.
4. Click Apply to save your entries on this page, then click Utilities in the side menu and proceed to the next section.
Tip: You can also scan patrons into the group. To do so, select Scan Patrons
into Current Group in the Display list. Then scan the patron’s barcode or type
the barcode in the Barcode box.
Tip: Click Select All at the bottom of the list to select all patrons listed.
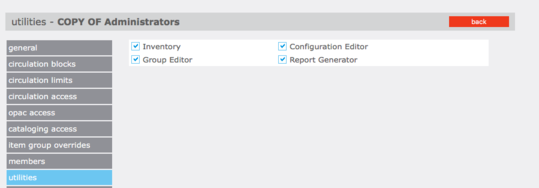
Utilities. On this page, specify whether this patron group is allowed to access any of the functions listed.
1. To allow access to a utility, select the corresponding check box. Options are:
-
Inventory – allows members of this patron group to view and conduct inventory functions through M5 Inventory
-
Group Editor – allows members of this patron group to view and conduct functions in the Group Editor
-
Configuration Editor – allows members of this patron group to perform configuration functions in M3 Configuration Editor
-
Report Generator – allows members of this patron group to view and create reports through Reports
2. Click Apply to save your entries on this page, then click Group Access in the side menu and proceed to the next section.
Note: Depending on your permissions, some of these options may be unavailable.
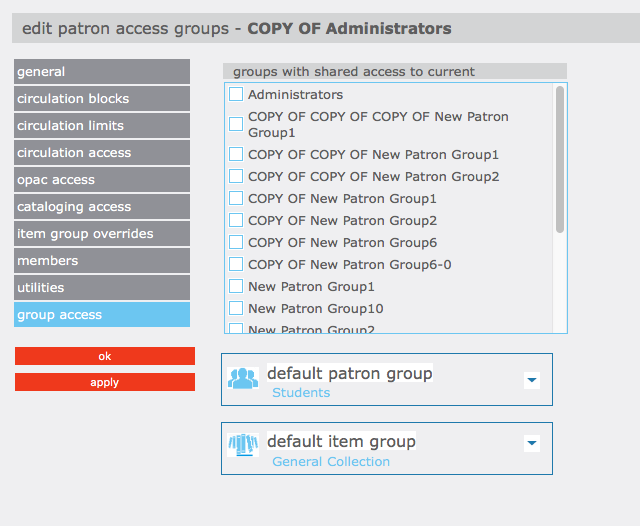
Group Access. On this page, specify which patron groups you want to have access to this group.
1. To change the group access, click the patron group that you want to have access to this patron group.
2. In the Default Patron Group list, select the patron group that you want to appear as the default group when a member of this patron group creates a patron record in the Cataloging and Circulation modules. This default group appears in patron records in the Standard Group (991#a) field.
3. In the Default Item Group list, select the item group that you want to appear as the default group when a member of this patron group creates a holding record in the Cataloging and Circulation modules. This default group appears in holding records in the Standard Group (991#a) field.
4. Click OK to save your entries on this page and return to the Group Editor home page.