Using Textbook database in M3
In M3, you can use your textbook database as you would your library database: you can catalog, circulate, search for, generate reports for, inventory, and perform other functions with your textbooks.
Using the M3 OPACs
To search your textbook database in the Windows OPAC or Web OPAC:
1. On the Databases tab, select the check box next to the textbook database. Clear the check box next to any database you do not want to search.
2. Click Apply.
3. Click the Search tab and conduct your search.
Using M3 Cataloging
Once textbook records are in your M3 database (created or imported through the Cataloging module), you can perform all textbook cataloging functions including adding, editing, and deleting data.
To access the textbook database in Cataloging:
1. On the File menu, click Change Database. This displays the Change Data- base dialog box.
2. In the Current Database list, select the textbook database, and then click OK. You can now perform all cataloging functions in this database.
TIPS:
• In the holding record, use the 995#a field to enter a textbook’s condition. The default choices are New, Good, Fair, Poor, and Unusable.
• In the patron record, use the 852#b field to enter each student’s homeroom or the 852#c field to enter each student’s teacher. You can then check out textbooks by class; to do so, perform a search for the homeroom teacher in Circulation (selecting Homeroom or Teacher in the drop-down list in the Patron Search dialog box) to obtain a list of all students in the class, allowing you to check out a textbook to each student.
• In the holding record, use the 852#9 field to record each textbook’s price. This will be the amount of the fine if the item is lost by the stu- dent.
Adding Holdings to Textbook Records
The Cataloging module makes it easy for you to add multiple holdings to a text- book record.
1. Search for the bibliographic record of the textbook you want to add hold- ings to. You search results appear in the upper pane of the main Cata- loging window.
2. Click the bib record in the upper pane. Then do one of the following:
• If a holding record similar to the one you want to create appears in the lower pane, use this as a template. Click the holding record, then click Duplicate on the Edit menu.
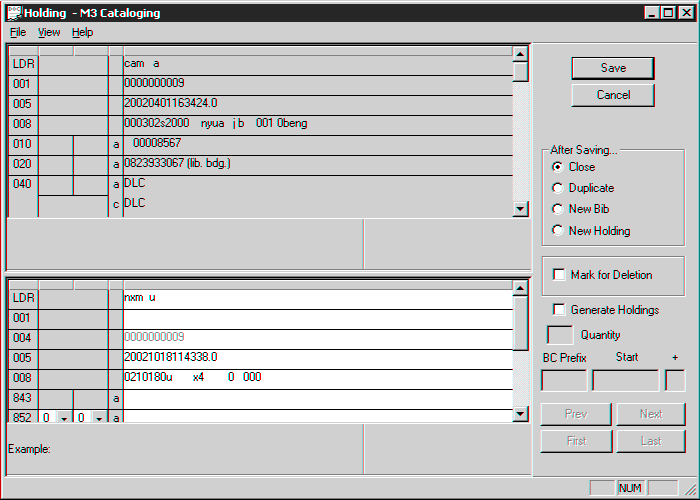
• If no similar holding record exists, select New on the File menu, and then click Holding Record. (If more than one holding template is avail- able, the Templates dialog box displays. Click the desired template, then click OK.) This displays the new holding record in the Holding - Cataloging window (Figure 3).
FIGURE 3
Note: The prefix and suffix values are assigned in 852#p.
3. In the lower pane, enter field and subfield data for the holding records.
4. Select the Generate Holdings check box. This activates the boxes below.
A. In the Quantity box, type the number of holdings you want to add.
B. If the record’s barcode has a prefix, it appears in the BC Prefix box. Modify if desired. If the barcode does not have a prefix and you would like to add one, type a value in the BC Prefix box.
NOTE: This number is in addition to the holding records that already exist for this bibliographic record.
Tip: The available conditions are New, Good, Fair, Poor, and Unusable.
C. The barcode suffix appears in the Start box. Modify if desired. The suffix must be a numeric value and will be the starting value for the barcodes of the new holding records.
D. In the + box, type the number for the suffix to increment by. For example, if the values are 1000 in the Start box and 2 in the + box, the first holding record will be assigned a barcode of [Prefix]1000 and the next holding record will be assigned [Prefix]1002.
5. When finished, click Save. (NOTE: If a barcode you chose already exists, an error message displays and no holdings are created. Click OK and modify the value in the Start and/or + box, then click Save again.)
Using M3 Circulation
You can perform all textbook circulation functions including check out/check in, renewals, viewing status, adding student fines, recording condition of books, and reporting books as lost.
To use the textbook database in Circulation:
1. On the File menu, click Change Database. This displays the Change Data- base dialog box.
2. In the Current Database list, select the textbook database, and then clickOK. You can now perform all circulation functions in this database.
Several common procedures are described in the following sections. Instructions for all circulation functions are available in Chapter 5, “Using M3 Circulation,” in the M3 Users Guide.
Checking out a Textbook to a Student
1. On the Circulation toolbar, click Loan.
2. If you are using a barcode scanner, scan the student’s barcode, then scan the barcode of each textbook you want to loan to this student.
OR
A. In the Barcode box, type the student’s barcode, and then press ENTER.
B. In the Barcode box, type the textbook’s barcode, and then press ENTER. Repeat this step for each textbook you want to loan to this student.
The textbooks are now loaned.
Checking in a Textbook from a Student
1. On the Circulation toolbar, click Return.
2. If you are using a barcode scanner, scan the textbook’s barcode.
OR
In the Barcode box, type the textbook’s barcode, and then press ENTER.
3. The textbook is now returned. To record the textbook’s condition:
A. Right-click in the pane where the textbook’s data appears (the pane on the right). In the menu, click Edit.
B. In the Edit Holding Record window, look near the bottom of the window for the field titled Condition (field 995).
If the Condition field does not appear, add it. Right-click in the record and select Insert Field. In the Insert Field dialog box, select 995-Condi- tion, then click OK. In the Insert Subfield dialog box, select a-Condition, then click OK. The field now appears.
C. Click the arrow next to the Condition field on the right side of the window. In the list, select the desired condition, then click OK in the Edit Holding Record window.
Viewing the Status of a Student or Textbook
1. On the Circulation toolbar, click Status.
2. If you are using a barcode scanner, scan the student’s or textbook’s bar- code.
OR
In the Barcode box, type the student’s or textbook’s barcode, and then press ENTER.
3. The status of the student or textbook appears in the window; any open transactions are listed in the lower pane.
Using the Reports
The Textbook Enabler CD includes a report pack of 20 textbook-related reports, which you can generate using ReportTool. To download these reports:
1. Insert the Textbook Enabler CD into the workstation’s CD-ROM drive.
2. Navigate to the CD-ROM drive (D: on most computers) and double-click TextbookReportPack.exe.
3. In the Location to Save Files dialog box, accept the default location or enter another location. (To browse to another location, click Change. Navigate to the desired folder, then click OK.) Click Next.
4. When the report download is complete, click Finish. You can now generate these reports in ReportTool.
Reports Included in the Textbook Report Pack
• Fine-List(ByGrade&Patron)
• Fine-List(ByHomeroom&Patron)
• Fine-List(ByPatron)
• Fine-List(ByTeacher&Patron)
• Item-List(All-ByTitle)
• Item-List(All-ByTitleWithCondition)
• Item-List(ByPubDateForSelectedLocation)
• Item-List(Deleted-All)
• Loan-List(ByGrade&Patron)
• Loan-List(ByHomeroom&Patron)
• Loan-List(ByPatron)
• Loan-List(ByTeacher&Patron)
• Patron-List(All)-School
• Patron-List(ByGrade)
• Patron-List(ByHomeroom)
• Stats-Circulation(Item)
• Stats-Circulation(Patron-All)
• Stats-Circulation(Patron-ByGrade)
• Stats-Circulation(Patron-ByHomeroom)
• Stats-Circulation(Patron-ByTeacher