Customizing the Visual Catalog
Customization Overview
The Visual Catalog is a keyword search method disguised behind a graphical inter- face; topic buttons are connected to query buttons, which are linked to predefined search queries. A query button launches a search of the selected databases and returns a list of results.
These graphical buttons can also be configured to launch software applications or Web pages rather than search databases. M3 ships with a default interface that includes several topic and query buttons. M3 also includes over 75 images that can be displayed on the buttons; these can be found in the VisualCatalogResources folder in your M3 directory.
Many Visual Catalog features are easily customized through a password-protected interface accessed from this search method. This interface, Configuration Mode, categorizes the Visual Catalog graphical interface into the following main compo- nents:
• Topic Component – A topic button that opens a sub-menu of additional buttons. The resulting sub-menu might contain more topic buttons, query buttons, and/or launcher buttons.
• Query Component – A query button linked to a search query, which launches a database search and potentially returns a list of results.
• Launcher Component – A launcher button that launches a software appli- cation or opens a Web page.
• Global Options – Options that globally alter the animation, sound, and visual properties on all button menus.
Customization options available through Configuration Mode are:
• Topic buttons can be added, modified, deleted, and moved at any menu level.
• Query buttons can be added, modified, deleted, and moved at any menu level. Additionally, the search query linked to a query button can be mod- ified.
• Launcher buttons can be added, modified, deleted, and moved at any menu level.
• Visual and sound effects can be globally changed and disabled.
All Configuration Mode customization options are explained in the following sec- tions. Other OPAC customizations (such as printing details and reset timing) are entered in the M3Opac.ini file, and should be performed by a system administrator.
Accessing Configuration Mode
To customize the Visual Catalog, you must access Configuration Mode. To do so:
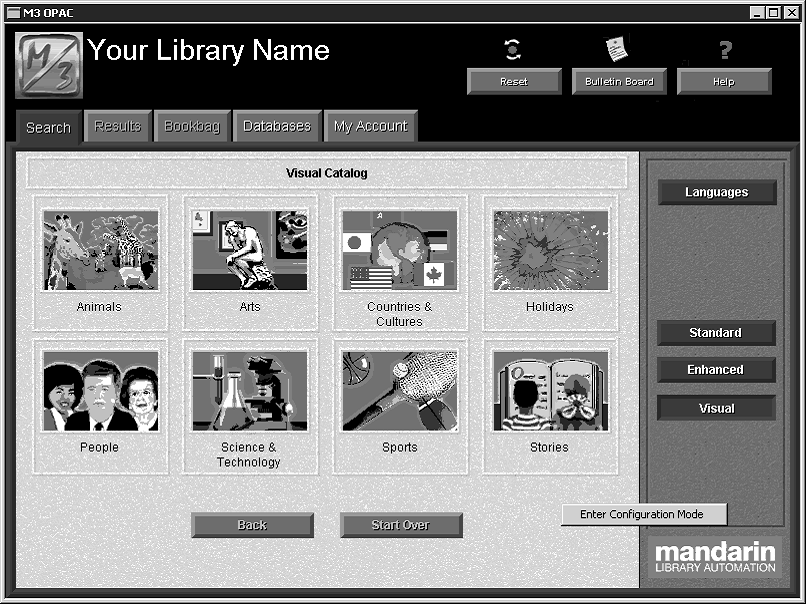
1. Click the Search tab, then click Visual. This displays the Visual Catalog Search window (Figure 6.11).
2. Right-click any open area of the data pane. This opens a menu (shown in Figure 6.25).
FIGURE 6.25
Tip: Individual user IDs and passwords are assigned and modified in patron records. See “Working with Patron Records” on page 5-33 for more information.
3. Click Enter Configuration Mode. This displays the Login dialog box.
4. Type your user name in the Login Name box and your password in the Pass- word box. (If the default name and password have not yet been changed, type admin in the Login Name box and boca raton in the Password box, all in lower-case characters.) Then click OK. This changes the Visual Catalog interface to Configuration Mode, as identified in the tab heading (shown in Figure 6.26).
FIGURE 6.26
Note: Only eight buttons can be placed on a Visual Catalog button menu. If the menu already contains eight buttons, you must delete one before you can add a new one.
Working with Topic Components
About Topic Components
A topic component consists of a topic button that opens a sub-menu of additional buttons. The sub-menu can contain more topic buttons leading to more sub- menus, query buttons that launch database searches, and/or launcher buttons that access different applications. You can add, modify, and delete a topic component, and reposition a topic button. These procedures are covered in the following sec- tions.
Adding a Topic Component
Adding a topic component consists of adding a topic button, and then adding the desired topic and/or query and/or launcher buttons to the sub-menu attached to the new topic button. A topic component can be added at any menu level.
To add a topic component:
1. Access Configuration Mode as explained beginning on page 6-33.
2. Go to the button menu that is to receive the new topic button.
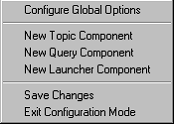
3. Right-click any open area of the data pane. This opens a shortcut menu (Figure 6.27).
FIGURE 6.27
4. Click New Topic Component. This places a blank topic button on the button menu.
5. Right-click the new topic button. This opens a button-specific menu (Figure 6.28).
FIGURE 6.28
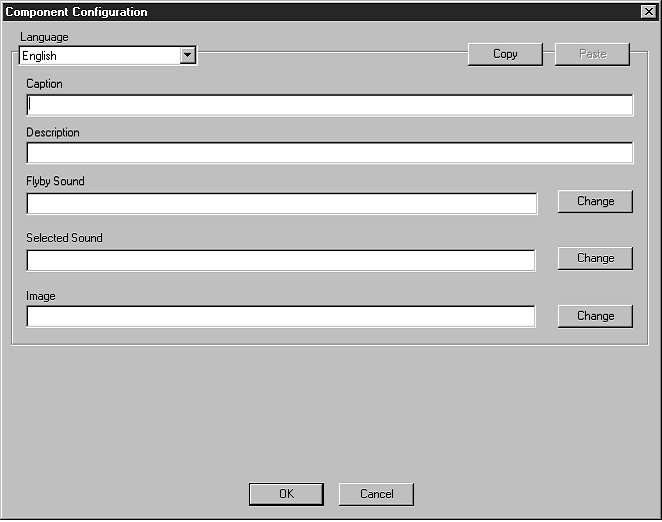
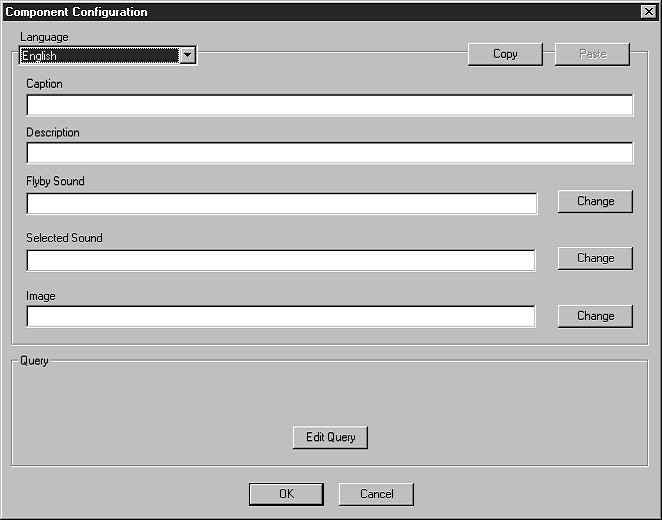
6. Click Modify. This displays the Component Configuration dialog box (Figure 6.29).
FIGURE 6.29
Tips:
• Entries are only required in the Language, Caption, and Image boxes.
• Use the Copy and Paste buttons to create matching topics for a different interface language. This is explained in “Creating a Matching Trans- lated Interface” .
7. Complete the boxes in the dialog box to add text, sound, and visual prop- erties to the new button. Press the TAB key to move from box to box.
• Language – Specify the interface language that applies to this new button. If you are offering the OPAC in multiple interface languages, you need to enter a caption and description for each language. (See “Creating a Matching Translated Interface” on page 6-48 for shortcut instructions.)
• Caption – Type the text you want to appear under the button. Keep it short or the text will extend beyond the button frame.
• Description – Type any descriptive text. This appears near the bottom of the button menu when the mouse points to the button.
• Flyby Sound – Select the sound that plays when the mouse points to the button. To select a sound file, either type the path and file name, or click Change and navigate to the location of the sound file.
• Selected Sound – Select the sound that plays when you click the button. To select a sound file, either type the path and file name, or click Change and navigate to the location of the sound file.
• Image – Select the image that appears on the new button. To select an image file, either type the path and file name, or click Change and nav- igate to the location of the image file.
8. When finished, click OK. This applies the entries to the new topic button, but does not save those entries. To save your entries, right-click any open area of the data pane, then click Save Changes.
9. Click the new topic button. This displays the empty sub-menu linked to this button. The next step is to add buttons to this sub-menu.
10. To add topic buttons (that will in turn create deeper levels), repeat steps
2 through 9 in this procedure. To add query buttons, see “Adding a Query Component” on page 6-38. To add launcher buttons, see “Adding a Launcher Component” on page 6-42.
11. After completing all desired interface modifications, right-click any open area of the data pane, and then click Exit Configuration Mode.
NOTE: If there are any unsaved changes, a warning dialog box appears. You can:
• Click Yes to save the changes and exit Configuration Mode.
• Click No to cancel any unsaved changes and exit Configuration Mode.
• Click Cancel to remain in Configuration Mode without saving changes.
Modifying A Topic Component
A topic component can be modified to change the button caption, description, and visual or sound effects.
To modify a topic component:
1. Access Configuration Mode as explained beginning on page 6-33.
2. Go to the button menu that contains the button to be modified.
3. Right-click the topic button. This opens a button-specific menu (Figure 6.28).
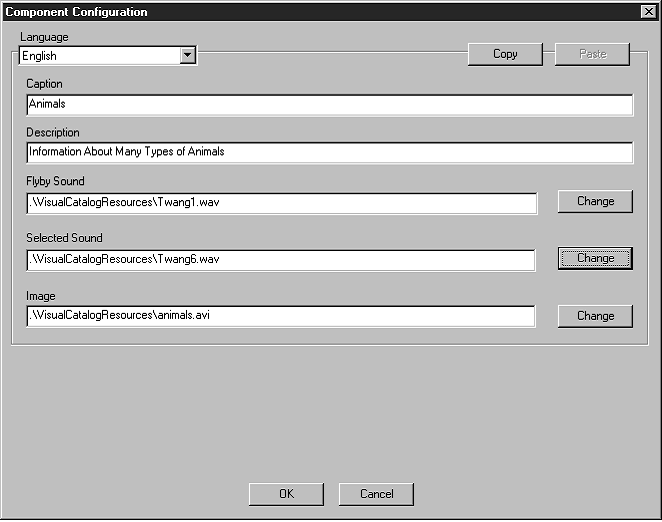
4. Click Modify. This displays the Component Configuration dialog box
(Figure 6.30) containing properties for this component.
FIGURE 6.30
5. Modify any entries as needed. For information about these options, see step 7 in “Adding a Topic Component” on page 6-35.
6. When finished, click OK. This applies the changes to the topic button, but does not save those changes. To save your changes, right-click any open area of the data pane, then click Save Changes.
7. After completing all desired interface modifications, right-click any open area of the data pane, and then click Exit Configuration Mode.
NOTE: If there are any unsaved changes, a warning dialog box appears. You can:
• Click Yes to save the changes and exit Configuration Mode.
• Click No to cancel any unsaved changes and exit Configuration Mode.
• Click Cancel to remain in Configuration Mode without saving changes.
Deleting a Topic Component
A topic component (button and the linked sub-menu system) can be deleted by simply deleting the topic button.
To delete a topic component:
1. Access Configuration Mode as explained beginning on page 6-33.
2. Go to the button menu that contains the topic button to be deleted.
3. Right-click the topic button. This opens a button-specific menu
(Figure 6.28).
4. Click Delete. This deletes the topic component. If additional menu levels are connected below that sub-menu, they are also deleted.
5. To save your changes, right-click any open area of the data pane, and then click Save Changes.
Note: Only eight buttons can be placed on a Visual Catalog button menu. If the menu already contains eight buttons, you must delete one before you can add a new one.
6. After completing all desired interface modifications, right-click any open area of the data pane, and then click Exit Configuration Mode.
NOTE: If there are any unsaved changes, a warning dialog box appears. You can:
• Click Yes to save the changes and exit Configuration Mode.
• Click No to cancel any unsaved changes and exit Configuration Mode.
• Click Cancel to remain in Configuration Mode without saving changes.
Moving a Topic Component
The procedure to reposition a topic button on the button menu is explained in
“Repositioning Buttons on a Button Menu” on page 6-45.
Working with Search Query Components
About Query Components
A query component consists of a query button and the search query linked to the button. When a query button is clicked, the search query is sent, the Results tab becomes active, and the Search Results window appears. You can add, modify, and delete a query component, and reposition a query button. These procedures are covered in the following sections.
Adding a Query Component
Adding a query component consists of adding a query button and defining the query linked to it.
To add a query component:
1. Access Configuration Mode as explained beginning on page 6-33.
2. Go to the button menu that is to receive the new query button.
3. Right-click any open area of the data pane. This opens a shortcut menu
(Figure 6.27).
4. Click New Query Component. This places a blank query button on the button menu.
5. Right-click the new query button. This opens a button-specific menu
(Figure 6.28).
6. Click Modify. This displays the Component Configuration dialog box
(Figure 6.31).
FIGURE 6.31
7. Complete the options in the dialog box to add text, sound, and visual prop- erties to the new button. Press the TAB key to move from box to box. For information about these options, see step 7 on page 6-35.
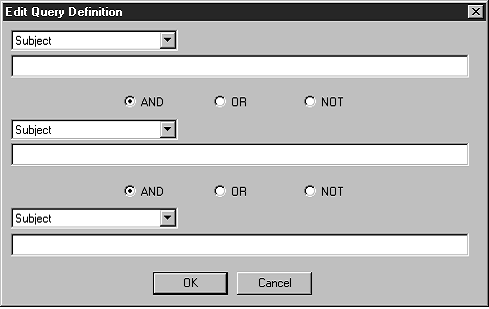
8. Click Edit Query. This displays the Edit Query Definition dialog box
(Figure 6.32).
FIGURE 6.32
9. Enter the search query you want this button to submit. To do so:
A. In the first MARC record field list, select the field you want to search. B. Type the search query into the corresponding keyword box, as shown
in Figure 6.33. The query can be a keyword or multiple keywords joined by Boolean operators AND, OR, and NOT (AND is assumed if no Boolean is typed between keywords). The query recognizes trun- cation, wildcard character, and phrase search techniques.
C. If you want the query to include other MARC fields, repeat steps A and B in the remaining boxes of this dialog box. Be sure to specify the correct Boolean operator between the sets of boxes.
FIGURE 6.33
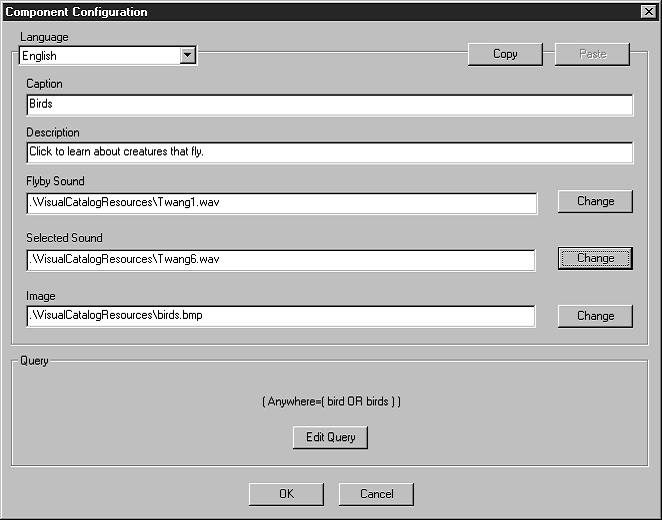
D. When finished, click OK. This closes the Edit Query Definition dialog box. The new query appears above the Edit Query button in the Component Configuration dialog box (see Figure 6.34).
10. When finished, click OK. This applies the entries to the new query button, but does not save those entries. To save your entries, right-click any open area of the data pane, then click Save Changes.
11. After completing all desired interface modifications, right-click any open area of the data pane, and then click Exit Configuration Mode.
NOTE: If there are any unsaved changes, a warning dialog box appears. You can:
• Click Yes to save the changes and exit Configuration Mode.
• Click No to cancel any unsaved changes and exit Configuration Mode.
• Click Cancel to remain in Configuration Mode without saving changes.
Modifying a Query Component
A query component can be modified to change the button caption, description, visual or sound effects, and search query.
To modify an existing query component:
1. Access Configuration Mode as explained beginning on page 6-33.
2. Go to the button menu that contains the button to be modified.
3. Right-click the query button. This opens a button-specific menu
(Figure 6.28).
4. Click Modify. This displays the Component Configuration dialog box (Figure 6.34) containing properties for this component.
FIGURE 6.34
5. To modify text, sound, or visual properties, see step 7 on page 6-35. To modify the search query, see steps 8 and 9 in “Adding a Query Compo- nent,” beginning on page 6-39.
6. When finished, click OK. This applies the changes to the query button, but does not save those changes. To save your changes, right-click any open area of the data pane, then click Save Changes.
7. After completing all desired interface modifications, right-click any open area of the data pane, and then click Exit Configuration Mode.
NOTE: If there are any unsaved changes, a warning dialog box appears. You can:
• Click Yes to save the changes and exit Configuration Mode.
• Click No to cancel any unsaved changes and exit Configuration Mode.
• Click Cancel to remain in Configuration Mode without saving changes.
Deleting a Query Component
A query component (button and the linked search query) can be deleted by simply deleting the query button.
To delete a query component:
1. Access Configuration Mode as explained beginning on page 6-33.
2. Go to the button menu that contains the query component to be deleted.
3. Right-click the query button. This opens a button-specific menu (Figure 6.28).
4. Click Delete. This deletes the query component.
5. To save your changes, right-click any open area of the data pane, and then click Save Changes.
Note: Only eight buttons can be placed on a Visual Catalog button menu. If the menu already contains eight buttons, you must delete one before you can add a new one.
6. After completing all desired interface modifications, right-click any open area of the data pane, and then click Exit Configuration Mode.
NOTE: If there are any unsaved changes, a warning dialog box appears. You can:
• Click Yes to save the changes and exit Configuration Mode.
• Click No to cancel any unsaved changes and exit Configuration Mode.
• Click Cancel to remain in Configuration Mode without saving changes.
Moving a Query Component
The procedure to reposition a query button on the button menu is explained in
“Repositioning Buttons on a Button Menu” on page 6-45.
Working with Launcher Components
About Launcher Components
A launcher component consists of a launcher button and a link to an application or Web page to be launched by the button. You can add, modify, and delete a launcher component, and reposition a launcher button. These procedures are cov- ered in the following sections.
NOTE: The software to be launched must be Windows compatible.
Adding a Launcher Component
Adding a launcher component consists of adding a launcher button and entering a
Web page address or the path/file name of an application to be launched.
To add a launcher component:
1. Access Configuration Mode as explained beginning on page 6-33.
2. Go to the button menu that is to receive the new launcher button.
3. Right-click any open area of the data pane. This opens a shortcut menu (Figure 6.27).
4. Click New Launcher Component. This places a blank launcher button on the button menu.
5. Right-click the new launcher button. This opens a button-specific menu (Figure 6.28).
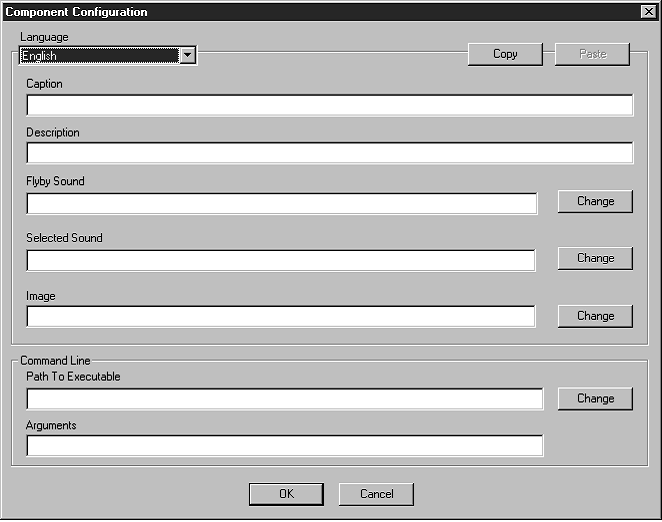
6. Click Modify. This displays the Component Configuration dialog box (Figure 6.35).
FIGURE 6.35
An example of a completed Component Configuration dialog box is shown in Figure 6.36.
7. Complete the options in the dialog box to add text, sound, and visual prop- erties to the new button. Press the TAB key to move from box to box. The first six options control text, sound, and visual properties of the button. For information about these options, see step 7 on page 6-35. To complete the last two boxes, which refer to the application or Web page to be launched:
• Path To Executable – To connect to an application, either type the path and file name, or click Change and navigate to the location of the appli- cation. To connect to a Web page, type the path and file name for your Web browser.
• Arguments – To connect to an application, type any optional arguments or parameters needed to run the application. To connect to a Web page, type the address.
8. When finished, click OK. This applies the entries to the new launcher button, but does not save those entries. To save your entries, right-click any open area of the data pane, then click Save Changes.
9. After completing all desired interface modifications, right-click any open area of the data pane, and then click Exit Configuration Mode.
NOTE: If there are any unsaved changes, a warning dialog box appears. You can:
• Click Yes to save the changes and exit Configuration Mode.
• Click No to cancel any unsaved changes and exit Configuration Mode.
• Click Cancel to remain in Configuration Mode without saving changes.
Modifying a Launcher Component
A launcher component can be modified to change the button caption, description, and visual or sound effects, the path and/or file name of the application to be launched, or the address of the Web page to be opened.
To modify an existing launcher component:
1. Access Configuration Mode as explained beginning on page 6-33.
2. Go to the button menu that contains the button to be modified.
3. Right-click the launcher button. This opens a button-specific menu (Figure 6.28).
4. Click Modify. This displays the Component Configuration dialog box (Figure 6.36) containing properties for this component.
FIGURE 6.36
5. To modify text, sound, or visual properties, see step 7 on page 6-35. To modify the path or file name in the Command Line boxes, see step 7 in “Adding a Launcher Component” on page 6-43.
6. When finished, click OK. This applies the changes to the launcher button, but does not save those changes. To save your changes, right-click any open area of the data pane, then click Save Changes.
7. After completing all desired interface modifications, right-click any open area of the data pane, and then click Exit Configuration Mode.
NOTE: If there are any unsaved changes, a warning dialog box appears. You can:
• Click Yes to save the changes and exit Configuration Mode.
• Click No to cancel any unsaved changes and exit Configuration Mode.
• Click Cancel to remain in Configuration Mode without saving changes.
Deleting a Launcher Component
A launcher component (button and link to an application .exe file or Web page)
can be deleted by simply deleting the launcher button.
To delete a launcher component:
1. Access Configuration Mode as explained beginning on page 6-33.
2. Go to the button menu that contains the launcher component to be deleted.
3. Right-click the launcher button. This opens a button-specific menu (Figure 6.28).
4. Click Delete. This deletes the launcher component.
5. To save your changes, right-click any open area of the data pane, and then click Save Changes.
6. After completing all desired interface modifications, right-click any open area of the data pane, and then click Exit Configuration Mode.
NOTE: If there are any unsaved changes, a warning dialog box appears. You can:
• Click Yes to save the changes and exit Configuration Mode.
• Click No to cancel any unsaved changes and exit Configuration Mode.
• Click Cancel to remain in Configuration Mode without saving changes.
Moving a Launcher Component
The procedure to reposition a launcher button on the button menu is explained in the next section, “Repositioning Buttons on a Button Menu.”
Repositioning Buttons on a Button Menu
Any topic, query, or launcher button can be moved to a different position on a button menu. The procedure is the same for all three types of buttons.
To move a button:
1. Access Configuration Mode as explained on page 6-33.
2. Go to the button menu that contains the button to be moved.
3. Right-click the button. This opens a button-specific menu (Figure 6.28).
4. Click Move Left or Move Right, depending on which way you want to move the button.
5. Repeat steps 3 and 4 until the button reaches the desired position. (A button automatically wraps to the top or bottom level when moved between the fourth and fifth button positions.)
6. To save your entries, right-click any open area of the data pane, then click
Save Changes.
7. After completing all desired interface modifications, right-click any open area of the data pane, and then click Exit Configuration Mode.
NOTE: If there are any unsaved changes, a warning dialog box appears. You can:
• Click Yes to save the changes and exit Configuration Mode.
• Click No to cancel any unsaved changes and exit Configuration Mode.
• Click Cancel to remain in Configuration Mode without saving changes.
Globally Modifying Visual and Sound Effects
From Configuration Mode, you can globally modify, enable, and disable interface visual and sound effects. These changes impact all translated interfaces. To modify effects for a specific button, refer instead to the instructions for modifying topic, query, or launcher components in preceding sections.
To globally change interface visual or sound effects:
1. Access Configuration Mode as explained beginning on page 6-33.
2. Right-click any open area of the data pane. This opens a shortcut menu (Figure 6.27).
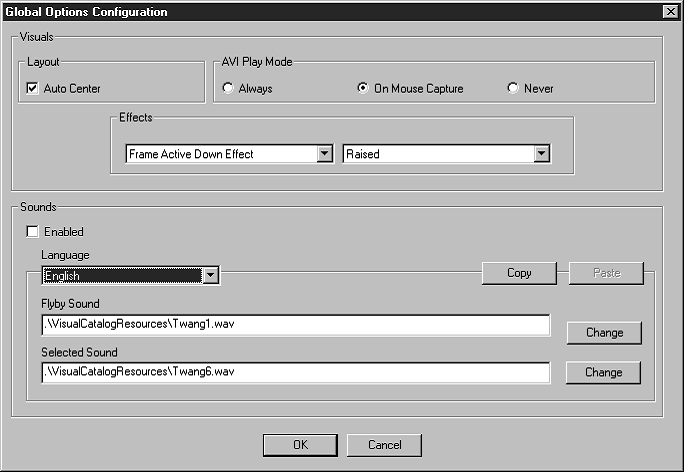
3. Click Configure Global Options. This displays the Global Options Configura- tion dialog box (Figure 6.37).
FIGURE 6.37
4. Modify one or more of the following options:
• Layout – Controls the button alignment on all button menus. Select the Auto Center check box for buttons to appear centered, or clear Auto Center for left alignment.
• AVI Play Mode – Controls button animation behavior:
• Click Always for all animations to play continuously.
• Click On Mouse Capture for an animation to play only when the mouse points to the button.
• Click Never to disable all animations.
• Effects – Controls how button frames and button images display on all button menus. To modify, select a button section and button phase in the left list, then select the desired effect in the right list.
The button sections are:
• Frame – the outer perimeter of the button
• Image – the graphical image within the button
The button phases are:
• Active Down – when the button is clicked
• Active Up – when the mouse is pointing to the button
• Inactive – when the mouse is not pointing to or clicking the button
The right list specifies the available display effects:
• Raised – the entire button or image appears to be raised
• Recessed – the entire button or image appears to be recessed
• Trench – a narrow recessed trench outlines the button or image
• Wall – a narrow raised wall outlines the button or image
• Enabled – Controls all Visual Catalog sound effects. Select the Enabled check box to enable sound effects, or clear to disable.
• Language – Identifies the language interface of the global sound effects. This only applies if you offer the OPAC in multiple interface languages and want to use different sound effects for the different interface languages. If your institution offers multiple languages, you must complete a separate Global Options Configuration dialog box for each interface language. To do so, see steps 11 through 15 in the next section, “Creating a Matching Translated Interface.”
• Copy/Paste – Used only when you need to create a separate Global Options Configuration dialog box for a different interface language. This is explained in the next section, “Creating a Matching Translated Interface.”
• Flyby Sound – Identifies the sound that plays when the mouse points at a button. A default flyby sound is entered. To select a sound file, either type the path and file name, or click Change and navigate to the loca- tion of the sound file.
• Selected Sound – Identifies the sound that plays when a button is clicked. A default sound is entered. To select a sound file, either type the path and file name, or click Change and navigate to the location of the sound file.
5. When finished, click OK. This applies the changes, but does not save them. To save your changes, right-click any open area of the data pane, then click Save Changes.
6. After completing all desired interface modifications, right-click any open area of the data pane, and then click Exit Configuration Mode.
NOTE: If there are any unsaved changes, a warning dialog box appears. You can:
• Click Yes to save the changes and exit Configuration Mode.
• Click No to cancel any unsaved changes and exit Configuration Mode.
• Click Cancel to remain in Configuration Mode without saving changes.
Tip: If you are the system administrator for your insti- tution and are familiar with the file system of the M3 OPAC, there is another way to create a parallel interface. For infor- mation, contact Mandarin Tech Support.
Creating a Matching Translated Interface
The Visual Catalog interface can be offered to patrons in other interface lan- guages. Each language requires its own set of global options and topic/query/ launcher components; this creates a parallel translated interface.
A shortcut feature, Copy/Paste, makes it easy to create a parallel interface. The Copy and Paste buttons appear in every Component Configuration dialog box and in the Global Options Configuration dialog box.
NOTE: The Visual Catalog ships with a default set of English topic components and query components. Before creating a parallel translated interface, make sure the English version has been customized to meet your library’s needs; this saves customization time.
To create a parallel translated interface:
1. At the main button menu level, access Configuration Mode as explained beginning on page 6-33.
2. Click Languages, select the interface language you are translating from, and then click OK. This is the master interface you will copy from to create the new parallel interface. (In most cases, this is the English interface.)
3. Right-click the first button on the button menu. (It can be a topic button, query button, or launcher button.) This opens a button-specific menu (Figure 6.28).
4. Click Modify. This displays the Component Configuration dialog box
(Figure 6.36) containing the properties for this component.
5. Click Copy.
6. In the Language list, select the interface language you are adding.
7. Click Paste. This creates a duplicate dialog box containing all the original entries.
8. In the Caption and Description boxes, type the translated text. Assuming you want to keep all other entries the same between the two languages, click OK. This applies the entries to the parallel interface, but does not save those entries.
9. Right-click any open area of the data pane, then click Save Changes. This saves your entries, but does not exit Configuration Mode.
10. Repeat steps 3 through 9 for each topic, query, and launcher button in your Visual Catalog. This creates a parallel Component Configuration dialog box for each component.
11. Right-click any open area of the data pane. This opens a shortcut menu
(Figure 6.27).
12. Click Configure Global Options. This displays the Global Options Configura- tion dialog box (Figure 6.38).
FIGURE 6.38
13. Click Copy.
14. In the Language list, select the interface language you are adding.
15. Click Paste. This creates a duplicate Global Options Configuration dialog box containing all the original entries. Assuming you want to keep all effects the same between the two languages, click OK.
16. Your new parallel language interface is now complete. Right-click any open area of the data pane, and then click Exit Configuration Mode. This dis- plays a warning dialog box. Click Yes and exit Configuration Mode.
17. To review and use the new parallel interface, click Languages on the Search tab, and then click the language of the parallel interface you just created. Then click OK. This refreshes the Visual Catalog, changing all interface text to the new language.
Modifying a Translated Interface
You can modify a translated topic, query, or launcher component. You can also modify the global sound effects for a translated interface. If you modify an existing interface in one language, you may need to make matching changes in all interface languages offered to your patrons.
Modifying a Translated Component
To modify an existing topic, query, or launcher component:
1. At the main button menu level, access Configuration Mode as explained beginning on page 6-33.
2. Go to the button menu that contains the topic, query, or launcher compo- nent to be modified.
3. Right-click the button to be modified. This opens a button-specific menu (Figure 6.28).
4. Click Modify. This displays the Component Configuration dialog box con- taining properties of this component (example shown in Figure 6.36).
5. To modify text, sound, or visual properties, see step 7 on page 6-35. To modify a search query, see steps 8 and 9 beginning on page 6-39. To modify a launcher component link, see step 7 on page 6-43.
6. When finished, click OK. This applies the changes, but does not save them.
7. When satisfied with the changes made to the component, save your changes. To do so, right-click any open area of the data pane, then click Save Changes. This saves your changes, but does not exit Configuration Mode.
8. After completing all desired interface modifications, right-click any open area of the data pane, and then click Exit Configuration Mode.
NOTE: If there are any unsaved changes, a warning dialog box appears. You can:
• Click Yes to save the changes and exit Configuration Mode.
• Click No to cancel any unsaved changes and exit Configuration Mode.
• Click Cancel to remain in Configuration Mode without saving changes.
Modifying Translated Global Sound Effects
To modify the global sound effects in an existing parallel language interface:
1. At the main button menu level, access Configuration Mode as explained beginning on page 6-33.
2. Right-click any open area of the data pane. This opens a shortcut menu (Figure 6.27).
3. Click Configure Global Options. This displays the Global Options Configura- tion dialog box (Figure 6.39).
FIGURE 6.39
4. In the Language list, select the interface language that requires the sound modification.
5. Modify the sound effects as needed. You cannot modify the visual effects for this language only; if you change the visuals, those changes will apply to every interface language offered to patrons.
• Flyby Sound – Identifies the sound that plays when the mouse points at a button. To select a sound file, either type the path and file name, or click Change and navigate to the location of the sound file.
• Selected Sound – Identifies the sound that plays when a button is clicked. To select a sound file, either type the path and file name, or click Change and navigate to the location of the sound file.
6. After completing all desired interface modifications, right-click any open area of the data pane, and then click Exit Configuration Mode. This displays a warning dialog box. You can:
• Click Yes to save the changes and exit Configuration Mode.
• Click No to cancel any unsaved changes and exit Configuration Mode.
• Click Cancel to remain in Configuration Mode without saving changes.
Saving and Exiting Configuration Mode
To save and/or exit Configuration Mode:
1. Right-click any open area of the data pane. This opens a shortcut menu (Figure 6.27).
2. Click one of the following:
• Save Changes – This saves your changes, but does not exit Configura- tion Mode.
• Exit Configuration Mode – This displays a warning dialog box. You can:
• Click Yes to save the changes and exit Configuration Mode.
• Click No to cancel any unsaved changes and exit Configuration Mode.
• Click Cancel to remain in Configuration Mode without saving changes.
