Displaying Item and Patron Picture
Pictures, such as cover images and patron photos, can be displayed alongside items and patrons in the Circulation window.
To import and link multiple image files at once, use the M3 Picture Manager utility, which can be accessed through the M3 Cataloging module. To add a picture to one item or patron record at a time, see the following section, “Adding a Picture Field to a Bibliographic or Patron Record.”
Once pictures are imported into your M3 database, they display automatically alongside patrons and items in the Circulation Patron and Item panes if M3 v1.6 was your first installation of M3. If you had a version of M3 installed prior to installing 1.6, you must do the following:
• Add a graphic cell to the Patron pane for each Circulation mode (Loan, Return, and so on) in which you want an image to display; changes made to one mode will not apply to the other modes. For instructions, see “Mod- ifying the Patron Pane Display” on page 5-59.
• Add a graphic cell to the Item pane for each Circulation mode (Loan, Return, and so on) in which you want an image to display; changes made to one mode will not apply to the other modes. For instructions, see “Mod- ifying the Item Pane Display” on page 5-64.
Adding a Picture Field to a Bibliographic or Patron Record
To add a picture field to a bibliographic or patron record:
1. In the Barcode box, type the barcode of the item or patron to which you want to assign the picture, and then press ENTER (or scan the code). This displays the item or patron information in the Item or Patron pane of the Circulation window.
2. If you are working with an item record, click Edit Bibliographic on the Item menu. This displays the Edit Bibliographic Record window (Figure 5.41).
OR
If you are working with a patron record, click Edit Patron on the Patron menu. This displays the Edit Patron Record window (Figure 5.47).
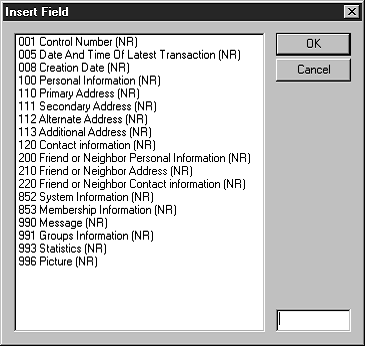
3. Right-click in the window to open a command menu (Figure 5.35), then click Insert Field. This displays the Insert Field dialog box (Figure 5.48 shows the Insert Field dialog box for patron records).
FIGURE 5.48
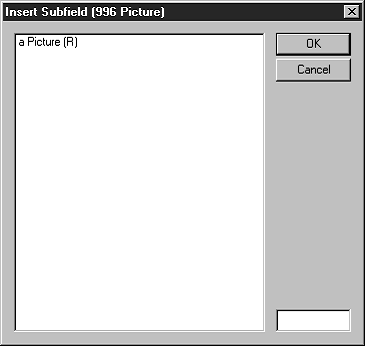
4. Select field 996 Picture, then click OK. This displays the Insert Subfield dialog box (Figure 5.49).
FIGURE 5.49
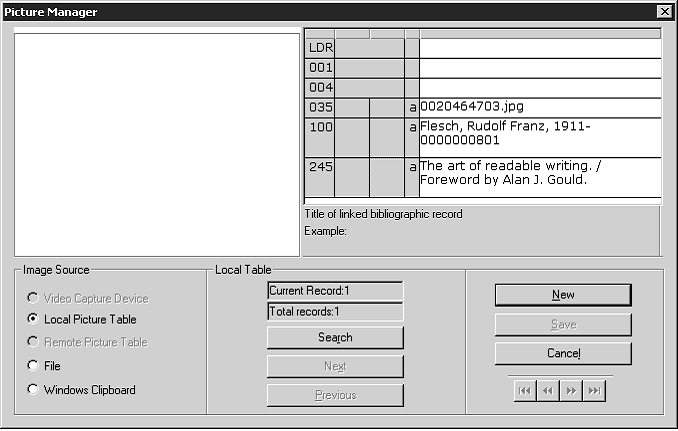
5. Click subfield a, then click OK. This displays the Picture Manager dialog box (Figure 5.50).
FIGURE 5.50
Tip: You can also double-click the 996 field in the record window to display the Picture Manager dialog box.
Note: The video capture device driver must be Microsoft DirectX® compatible.
6. In the Image Source group, select the source of the picture. After you click an option, the name of and the options available in the Image Selection pane (shown in Figure 5.50) change.
• Video Capture Device – Use a video capture device (preferably a USB camera) hooked to your computer to capture a picture. To do so, point the camera at the subject for the picture. The image appears in the Preview pane (shown in Figure 5.52). Click Capture. If satisfied with the image, click Save; if not, click Preview to view the image and capture it again.
• Local Picture Table – Search a local table for picture records. To do so, click Search. This displays the Picture Search dialog box (Figure 5.51).
FIGURE 5.51
Tip: To copy a picture to the Clipboard:
• While viewing the picture, press ALT+PRINT SCREEN.
• Open the picture in a word processing or drawing program, then click Copy (usually on the Edit menu).
A. Type your search query into the appropriate boxes. To select a different MARC field or Boolean operator, click the arrow next to the appropriate list, and then select the preferred field or oper- ator.
B. Click All, Restrict to patron, or Restrict to bibliographics to search for all pictures, pictures assigned a p (patron) in the 991#a field, or pictures assigned a b (bibliographic) in the 991#a field.
C. Click OK. This displays the picture of the first search result in the Preview pane, and the record’s fields and subfields in the Record pane (shown in Figure 5.52).
• Remote Picture Table – Search a remote table for picture records. This option is intended for bibliographic records. The procedure is iden- tical to the procedure for the Local Picture Table option.
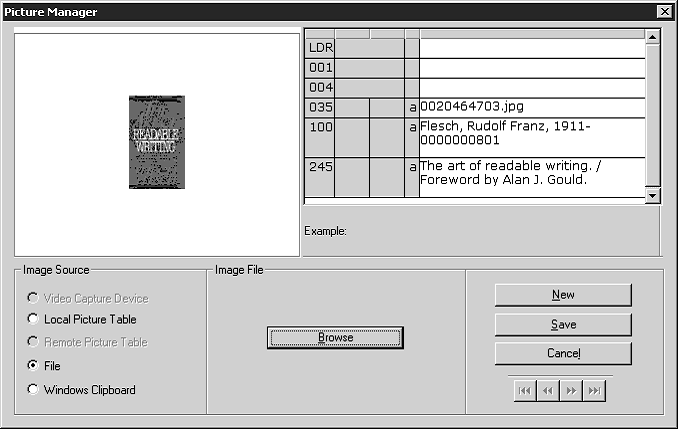
• File – Use a previously-saved picture file (in .jpg or .bmp format). To do so, click Browse. In the Open Image File dialog box, navigate to the desired file, and then click Open. This displays the picture in the Pre- view pane and the record’s fields and subfields in the Record pane (shown in Figure 5.52).
• Windows Clipboard – Use a picture copied to the Windows Clipboard.
To do so, copy the picture to the Clipboard, then click Paste. This dis- plays the picture in the Preview pane and the record’s fields and sub- fields in the Record pane (shown in Figure 5.52).
FIGURE 5.52
7. To add fields to this picture record (such as file name or title), right-click in the Record pane and repeat steps 3 through 5, selecting the field and subfield you want to add.
8. When finished, click Save. This returns you to the Edit Patron Record window or the Edit Bibliographic Record window, and inserts a picture subfield in field 996.